Showing posts with label Cake. Show all posts

2/27/26

Pavlova from freeze dried egg whites


PAVLOVA

Preheat oven to 300 degrees.

Be sure your mixing bowl and beaters are clean (even wipe them with vinegar to be sure) so no fat or oils are on them.

6 T Freeze dried egg whites along with 2 T water per egg white 
3 T powdered sugar (or powdered natural sweetener for low carb)
2 t vanilla 

Mix the egg white powder and water in your mixing bowl to soft peak stage.  With the mixer running on low, add in the powdered sugar or sweetener and the vanilla very slowly, once it's all added in and dissolved into the egg whites, increase speed to medium until it's thick and glossy and stiff peaks.

Turn it out onto parchment in a big blob and then use the back of a large spoon or a large icing knife to pull up the sides, and use your big spoon to scoop out the center a bit.  

Turn your oven down to 225 degrees and bake for 1 1/2 hours, turn off your oven and leave it in (without opening your oven) for at least 6+ hours.  I made mine in the late afternoon and left it overnight.

Served the next day with homemade lemon curd and fresh berries (strawberries and blueberries are good - as well as raspberries).  


Print Friendly and PDF

1/17/26

Low Carb Sugar Free Carrot Cake with my Coffee (and cream cheese frosting on it)


We have been enjoying a keto carrot cake this weekend with our coffee as I had to use up some leftover baby carrots from when we had houseguests... I snapped a couple quick pictures with my cell phone to show it as I don't know that I care enough to try to make it look 'pretty' - I literally take a photo just before I'm going to eat it!

I have a version of it I posted back in 2016... Some of those ingredients are not made any longer and others, I don't use anymore or use newer versions.

Here is the carrot cake (sugar free, low carb) I posted back in 2016.  Very similar to the one I typically make now - just a couple changes.  About 10 years ago I started to add heavy cream to my frostings as well - so similar base - but add a huge dollop of heavy cream and you get more volume, a smooth silky frosting, and even better flavor. 

https://www.housewifebarbie.com/2016/05/ 
 
The current cake I've been making for the past almost 10 years though is this one (based on Carolyn Ketchums recipe!).

  
Low Carb Carrot Cake
 
2 c almond flour
1/3 c coconut flour
1/3 vanilla whey protein powder (I use Isopure and have for 20 years)
1 T baking powder
2 t cinnamon
1 t salt
dash of ground cloves
4 eggs
1/2 c avocado oil
1/2 c brown sugar style sweetener
1/2 c granular style natural sweetener
1 1/2 c shredded baby carrots
2 t baking vanilla
optional - a few tablespoons chopped pecans

Grease and line the pans (I use 2, 8" or 9" pans).  Blend together the dry ingredients (flours, powders, seasoning).  

Mix the eggs, oil and sweeteners, add carrots and vanilla.  Beat in the dry ingredient mixture and add chopped nuts if using.  

Divide batter between the 2 pans and bake in a 350 oven for about 20 minutes, until done in the center.  Let cool.  Remove from pans.  

Spread frosting between layers, top and frost all.

For the Frosting I used:

1 stick butter
8 oz. cream cheese
3/4 c powdered natural sweetener (depending on the brand you use some are sweeter than others so adjust to taste.  1 cup of my allulose/splenda/stevia blend is TOO sweet so must cut back to 2/3-ish.)
1-2 t vanilla
dash of salt
Enough heavy whipping cream to taste and amount you need (I use about 3/4 cup)

In a mixing bowl whip the butter and cream cheese and sweeteners with the vanilla.  Slowly pour in the heavy cream while on low speed and increase to medium high.  Beat until it's whippy and spreadable.   Use on your cakes.


Print Friendly and PDF

8/30/25

Coffeecake Muffins (low carb, keto, yada yada)

It's been a long, long time since I've posted.  Life is still... life-ing.
It's been a tough past couple years.  Most of the time I don't even think of my old cooking and recipe blog!

This afternoon I was taking a break from convincing myself NOT to do all the things my brain is telling me should get done.  I had Coffee Cake Muffins on the counter so I stood there eating one when I suddenly thought about the cooking blog, "An American Housewife" Cooks. No idea why but it popped in my head.  I was SURE I had posted this recipe... probably at least 2 or 3 times, as I've made it at least 50 times in the past 10 years.  I snapped a picture with my cellphone as I was eating, and then later, came online to see if it was here.

Well, I have no idea... because I didn't find it within the first 8 seconds of searching so I just opted to post again.

Carb count depends on the products and brands you use.  Also, when I first started to make this recipe, there were VERY FEW products available... so my original hand written recipe card calls for things like Splenda and I think (?) Brown Sugar Twin or something like that.  Because back then the market had almost no sugar-free, low carb, keto products.  So things change over the years.  Use what you use.  Count your carbs and sugar using your products. 


Coffeecake Muffins

Topping:

1/2 c almond flour
3 T brown sugar style natural sweetener
2 T coconut flour
3/4 t cinnamon
1/4 c melted butter

Mix the topping ingredients together to blend well and set aside.

 
Muffins:

2 c almond flour
1/3 c sweetener of choice
1/4 c whey protein powder (unflavored or vanilla - zero carb, zero sugar)
3 T coconut flour
1 T baking powder
1/2 t cinnamon
1 t vanilla
1/4 t salt
1/2 c melted butter
4 eggs
1/2 unsweetened almond milk

Preheat your oven to 325.
Whisk together the dry ingredients for your muffins.
Stir in the butter, eggs, almond milk and vanilla.  Mix well by hand or briefly with mixer.

Fill lined muffin tins (makes 1 pan of 12-ish or about 6 jumbo with some leftover).  Place some of the crumble topping on each muffin tin of batter.  Bake for 25-30 minutes until done.  Cool complete in pans.  

If you wish at this point you can add a simple sugar free drizzle on top:
1/4 c powdered natural sweetener
2 T water or almond milk
1/2 t vanilla

Or top with a sugar free frosting.  I used a cinnamon flavored frosting on the ones in the photo above. 


Print Friendly and PDF

1/1/25

Lemon Sherbet Cupcakes with Buttercream Frosting

I saved this recipe in my files back in 2023 at some point.  I just saw it and want to post it so I can find it easily if I decide to them them this week.  Lemon everything is sounding so good lately!


 Lemon Sherbet Cupcakes with Buttercream Frosting
 

1 c (8 oz.) salted butter, softened
2 1/2 c granulated sugar
6 large eggs
3 c  all-purpose flour
1 t baking powder
1/2 t baking soda
1/4 t table salt
1 c sour cream
1 T lemon zest
1 T fresh lemon juice
1 t  vanilla extract

Frosting:
1 c butter, softened
3 T lemon zest
4 c powdered sugar
8 T fresh lemon juice
1 to 2 drops yellow liquid food coloring

Preheat oven to 350°F. Beat 1 cup softened butter at medium speed with a heavy-duty stand mixer until creamy; gradually add granulated sugar, beating until light and fluffy. Add eggs, 1 at a time, beating just until blended after each addition.

Stir together flour, baking powder, baking soda, and salt. Add flour mixture to butter mixture alternately with sour cream, beginning and ending with flour mixture. Beat at low speed just until blended after each addition. Stir in 1 tablespoon zest, 1 tablespoon juice, and 1 teaspoon vanilla. Place 30 paper baking cups in three 12-cup standard-size muffin pans; spoon 1/4 cup batter into each baking cup.

Bake in preheated oven until a wooden pick inserted in centers comes out clean, 20 to 23 minutes. Remove from pans to wire racks, and cool completely, about 20 minutes.

Prepare Frosting: Beat 8 ounces softened butter and 3 tablespoons lemon zest at medium speed until creamy, 1 to 2 minutes. Gradually add powdered sugar alternately with 8 tablespoons lemon juice, beating at low speed until blended after each addition. Add up to 1 tablespoon lemon juice, 1 teaspoon at a time, beating until desired consistency is reached. Add food coloring, and beat at high speed until well blended and frosting is light and fluffy, 1 to 2 minutes.

Spoon frosting into a ziplock plastic freezer bag. Snip 1 corner of bag to make a small hole. Pipe about 1 1/2 tablespoons frosting onto each cupcake.

Lime Sherbet Cupcakes: Substitute lime zest for lemon zest and fresh lime juice for lemon juice. For frosting, substitute fresh lime juice for lemon juice, and 1 to 2 drops green liquid food coloring for yellow.

Orange Sherbet Cupcakes: Substitute orange zest for lemon zest and fresh orange juice for lemon juice. For frosting, substitute orange zest for lemon zest and 1 tablespoon lemon juice and 7 to 8 tablespoons fresh orange juice in place of 8 to 9 tablespoons lemon juice. Substitute 1 drop red liquid food coloring for yellow.


Print Friendly and PDF

4/15/24

Homemade White Cake

My favorite white cake that I make for weddings and birthdays starts with a cake mix that is 'doctored up' quite a bit.  However, I've been searching for years for a good homemade from scratch white cake because I rarely have cake mixes on hand.

Here is today's cake.

This photo is literally as I was snitching some cake with my morning coffee... because this FROSTING.  Yum.


Homemade White Cake

2 c flour
2 t baking powder
1 t salt
4 egg whites
1/4 sugar for the egg whites
1 c sugar for cake
1/2 c Crisco shortening
1 1/2 t vanilla
1/2 t almond
1 c milk

Preheat oven to 350 and grease/flour your pan or pans.
In a bowl, place the flour, baking powder and salt.  Whisk and set aside.
In another bowl, beat the egg whites until they are soft peak, sprinkle in the 1/4 c sugar and beat to stiff peaks.  Set aside.

In a large mixer bowl, beat the shortening and 1 c sugar.  Add vanilla and almond.  Add part of the flour mixture, part of the milk, more flour and more milk, mixing between.  When just to the point of being blended and smooth, fold in the beaten egg whites, 1/2 at a time.  Pour into your pans and spread.  Bake according to pan size.  Usually 25-35 minutes for any of the sizes.  Cool in pans 10 minutes and then turn out to cool completely.

Frost.


(Frosting:  2 sticks butter, whipped until pure white.  Add 3 c powdered sugar and some vanilla/almond extract.  Beat.  Use on cake.  Double for 9X13 and double or triple for layer cakes.)


Print Friendly and PDF

12/20/23

Baking Spirits Bright for 2022 - Christmas Cookies and Candies


Cookie Ideas and recipe links:   Baking Spirits Bright in 2022 


Print Friendly and PDF

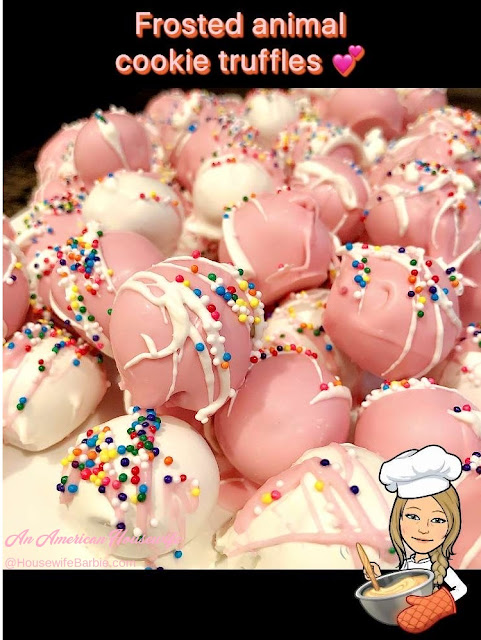
Pink and White Circus Truffles: Frosted Animal Cracker Cookie Truffles

Originally posted in June, 2022
Repost November 2022 to gear up for Christmas baking!


If you follow me on Instagram, you might have seen that I whipped up some quick truffles last week for a mini family reunion we were hosting at our home this weekend. 

I'm a big fan of the actual Mother's brand Circus Animal Cookies (Frosted Animal Crackers) and could eat an entire bag myself, easily.  When I initially decided I wanted to make truffles instead of my typical chocolate chip cookies, I first figured I'd just make the regular almond truffles I know everyone loves, but then thought maybe instead, I should do the Oreo version as well to mix it up a bit.  But... meh. 

When it comes to quick and easy cookie truffles, a regular 'go to' is the Oreo version but it's just as simple to make them with 'Nilla Wafers, animal crackers or obviously - frosted animal crackers like the original (and best version, in my opinion) Circus Animals.

It's basically just pulverizing the cookie, adding enough frosting or cream cheese to hold it together, forming balls and dipping in candy coating.

And... that's what you do!


Frosted Animal Cracker Truffles

Frosted Animal Crackers (like Mother's Brand Circus Animals) (9 oz)
Cream Cheese or white or pink frosting (2 oz)
Pink candy coating (1 small pkg)
White candy coating (1 small pkg)
Muli-colored sprinkles

To each 9 oz. bag of animal cookies you'll want to use about 2 ounces of either frosting or cream cheese.  The amount you make is up to you.  I used 2 bags of Circus Animal Cookies and about 6-ish ounces cream cheese.   

Separate the pink and white cookies from each bag you are using.  Pulverize the white cookies in a food processor and add about 2-3 ounces white frosting or cream cheese and pulse just until it forms a ball.  Repeat with the pink.  If your dough is a bit too sticky to work with, chill in the refrigerator for 30 minutes until you can form balls. The sprinkles in the white tend to turn it a pale 'green' tint.

Using about 1/2 teaspoon, scoop out little bits and roll in tiny balls, both pink and white, placing on parchment paper lined trays.  Freeze for about 20 minutes, and then use a white ball to smash a little and form it around a pink ball and place back on parchment.  Repeat until you've used about half of them and then reverse the process and smoosh a pink one to form around a white center.  If you want skip this step and do single color bites, (faster) just form 3/4" balls out of the white and pink cookie dough as you wish.  

Freeze your balls for about 30 minutes.  Prepare your candy melts by following directions on the packages.  Use a bowl for white and a bowl for pink (separate).  Usually this means microwaving on defrost or 50% power for 1 minute at a time and stirring and mashing between minutes until smooth and melted.

Dip half the balls pink and half white.  Be sure to sprinkle with multi-colored candy sprinkles immediately while they are wet because as they are frozen, they set up very, very quickly.

At the very end you can use the remaining melts to splatter and drizzle across and over the truffles.

You can keep these in the refrigerator for a week easily.  Mine were also out on the counter for 2-3 days, no problem.  


Some are multi color centered (right) and when I ran out of white dough but still had more pink, I did the rest solid pink.  Each are dipped in the opposite color candy coating.


Print Friendly and PDF

12/17/23

Basic Yellow Cake with variations

BASIC YELLOW CAKE

2/3 c sugar
1/4 c shortening
Dash  salt
1 t vanilla
1 egg
1 1/2  c flour
1/2 c milk
2 t baking powder

Cream together shortening and sugar. Add egg and flavoring and beat thoroughly. Sift together dry ingredients and add alternately with milk to sugar mix. Pour into well-greased 2-cake pan and bake at 375ºF for 35 min.


CHOCOLATE CAKE: Add 1 sq of unsweetened chocolate that has been melted over water or 1 T. Cocoa powder to shortening/sugar mixture. 


SPICE CAKE: Add 1 t. cinnamon, 1/2 t nutmeg, 1/4 t cloves, and 1/2 c raisins to cake batter. 


RAISIN CAKE: Add 1/2 c raisins to cake . 


PINEAPPLE UPSIDE DOWN CAKE: In bottom of cake pan pour 2 T melted butter and 1/2 c brown sugar. Mix. Layer pineapple rings and maraschino cherries in center of rings. Cover with batter and bake as before for 30 min.
 

QUICK COFFEE CAKE: Add 1 T grated lemon rind to batter. Pour into greased pan. Sprinkle generously with a mixture of 1/2 c sugar 1 T cinnamon. Bake . 


WASHINGTON PIE: Bake in two cake pans. Prepare cream filling. And place between layers. Sprinkle with powdered sugar. 


Shortcake: Bake in a jelly roll pan. Then cut in squares and top with fresh fruit and whipped cream. 

Cup cakes: Fill 2/3 full and bake as for cake.


Print Friendly and PDF

Lemon Crumb Topping Muffins


Lemon Crumb Topping Muffins

2 cups all-purpose flour
1 T baking powder
1/2  t salt
1/3 c oil
1 1/2 t lemon extract
1/2 c sugar
1 egg
1 c half and half (cream)
1 T lemon zest

1/4 c flour
1/4 c sugar
2 T butter
1 T lemon zest


Preheat the oven to 425 degrees. In a medium size bowl, combine the flour, baking powder and salt. In another bowl, combine the oil, lemon, sugar, egg, milk and lemon zest. Mix well. Add this mixture to the dry ingredients and mix just until combined. Divide the batter among 12 muffin cups that have been lined with a cupcake liner.

In a small bowl, mix together the ingredients for the topping until you have coarse crumbs. Sprinkle 1 tablespoon streusel topping on the top of each muffin.

Bake the muffins for 5 minutes at 425 degrees, then, without opening the oven, lower the oven temperature to 375 degrees and bake for an additional 8 minutes.  Makes 12 muffins.

Print Friendly and PDF
Almond Brunch Cake

3/4 c sugar
1 butter, room temperature
1 8-oz can almond paste, broken into pieces
3 large eggs
1 T Amaretto
1/2 t almond extract
1/4 t salt
1/3 c cake flour
1/2 t baking powder
Powdered sugar, for dusting

Preheat oven to 350 degrees 

Butter and flour the bottom and up the sides of an 8 or 9-inch spring form pan. 

Using electric mixer fitted with the paddle attachment, beat 3/4 cup sugar and butter at medium-high speed until very light and creamy, about 5 minutes. Add almond paste, 1 piece at a time, beating until well blended after each addition. Beat in eggs 1 at a time. Mix in Amaretto, almond extract and salt. 

Whisk together flour and baking powder in small bowl; add to batter. Beat just until blended. Pour batter into prepared pan, spreading evenly.  Bake cake until top is golden brown and tester inserted into center comes out clean, about 35 minutes. Cool in pan on rack.  Remove sides of pan and dust with powdered sugar and serve.

Print Friendly and PDF

1/17/23

Sugar Free Red Raspberry Crumble Bars (Note: they are wheat free too)


I've been craving the raspberry crumble bars I make (sugarfree and lowcarb - keto) but hadn't had time to make them or even start to think about being able to (yep, it's been that insanely busy around here for the past 6 weeks or so) but today I was not only still craving them, but accidentally stumbled upon my old post featuring them from June of 2019... I'm taking it as a sign!  I have a lot going on this morning and early afternoon but I'm holding out that around 3:pm I'll be able to sneak in a little kitchen time to get a pan of these into the oven!  SO GOOD.


Red Raspberry Crumble Bars

2 c almond flour
2 T coconut flour
2/3 c Erythritol with Monk Fruit (you can use a granulated sweetener of your choice)
1/4 t sea salt
6 T butter, melted
1 t vanilla
2/3 c sugar free red raspberry preserves or jam of your choice

Whisk together the dry ingredients; almond flour, coconut flour, sweeteners and salt.  Melt the butter in cup in the microwave and add the vanilla to it.  Pour this into the dry mixture and mix with a spatula until it starts to come together.   Press just over half the dough into a greased 8X8 inch pan. 

Bake this bottom crust for about 10 minutes at 350 degrees.  Take it out and let it cool for about 10 minutes. 

Place the preserves in a bowl and microwave for a minute or so to soften the preserves for spreading. Spread the raspberry filling over the crust, getting up into the corners and sides as well.  Now crumble the rest of the topping over it all and press down lightly just to adhere to the raspberry preserves, but don't flatten it.  Return to the hot oven and bake for 25 minutes until turning golden brown.  Remove from oven and let cool completely to cut. 


Repost from June, 2019.

I keep various jams and preserves on hand for my husband's peanut butter and jelly sandwiches, so I had Smucker's brand in the refrigerator.  You can use whichever brands you like.


Melt it a bit in the microwave for easy pouring and spreading over the crust.


Fresh out of the oven!
 

I keep these in the refrigerator - they slice easily and taste... incredible!


Print Friendly and PDF

1/7/23

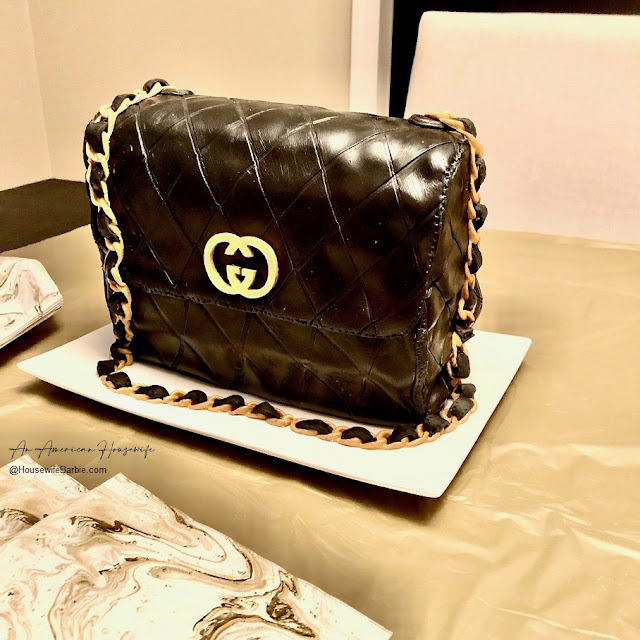
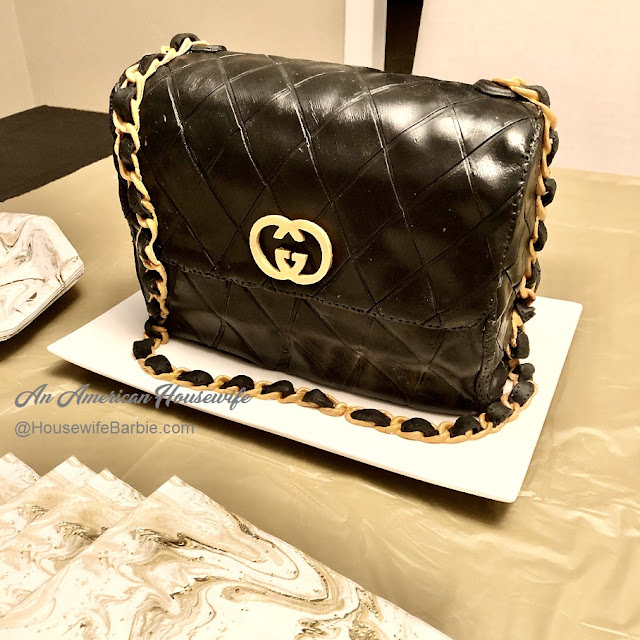
A black leather purse cake! (Or handbag cake if you prefer)


Another Birthday Cake!  As I mentioned in the previous post, this past weekend we had our big family celebration of... all the things.  Our family gathered from across the country and we celebrated 2 birthdays, Christmas and New Years; all between Friday and Monday.

This post is MOSTLY here because I think my oldest daughter might want to make this in the future and I wanted to jot down and save photos of the process for her.  But I keep my blog public so it can help others as well; so maybe someone else (you) would like to see the process I used as well.

I'm not a 'cake maker' and I'm just a Mom who makes birthday cakes for her family.  I saw this cake idea, I had no idea how I'd make it, but I figured I'd look online for a few items and make it up as I went along.  I went to a decorating site I use and put in a search for a "purse logo mold" and this one showed up, so I ordered it.  On the "you might be interested in..." that they add to the page, I saw a mold for chain link.  I had wondered how I'd make those - so I ordered that too.  Then I ordered some yellow gold fondant and some glittery gold edible food dust... just in case I needed it.

Normally I make my fondant but getting a deep black was going to be difficult so I checked and they sold black fondant in a brand I like and tastes good so I ordered a small container of that too. 

And that was it.  I tucked those away without a plan...

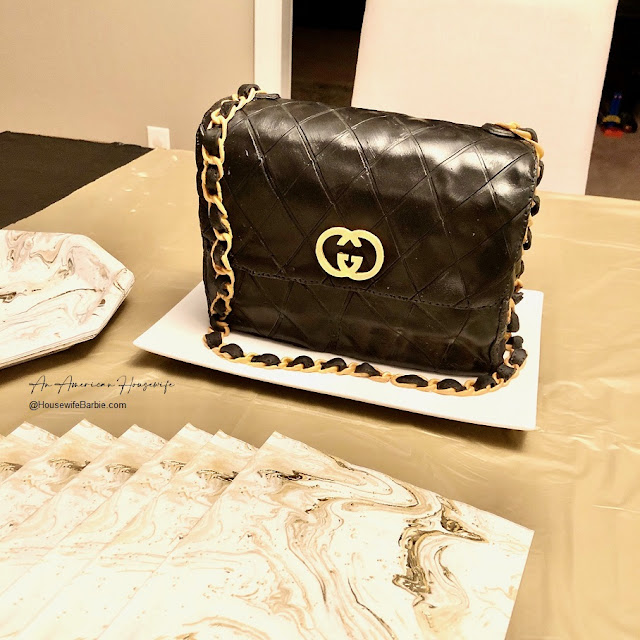
Here are a few more photos of the cake as I set it up on the dining room table - literally MINUTES before they were due to arrive.  The birthday girl and her family plus my son were all arriving after about a 15 hour drive, in which they also had car trouble and stop for a new alternator.  I put this on the table, got the stuff surrounding, and they arrived in less than 10 minutes.  PERFECT because she needed a happy, uplifting 'birthday party' after a long, frustrating drive.

We enjoyed cake, a quick dinner, laughter and hugs... and then everyone went to bed, exhausted.  LOL.


The birthday girl and her cake.


______________________________________________________________________


For this cake I wanted something sturdy to work with and it just so happens the birthday girls favorite cake is Red Velvet so that worked out perfectly!  A couple days before they were due to arrive, I found time during a 2 year olds nap to make the cake so I could fill and freeze it.

In my head I figured a bread pan would make a great cake pan because I wanted that sort of shape. 

I baked the cake in a bread or loaf pan as well as an oval Scandinavian Almond Cake pan but you can also just cut the top of a loaf/bread pan baked cake to be a rounded shape.


I made traditional frosting to go with the Red Velvet Cake because people that pair a true, traditional Red Velvet Cake with Cream Cheese Frosting are committing a cake-baking sin! 
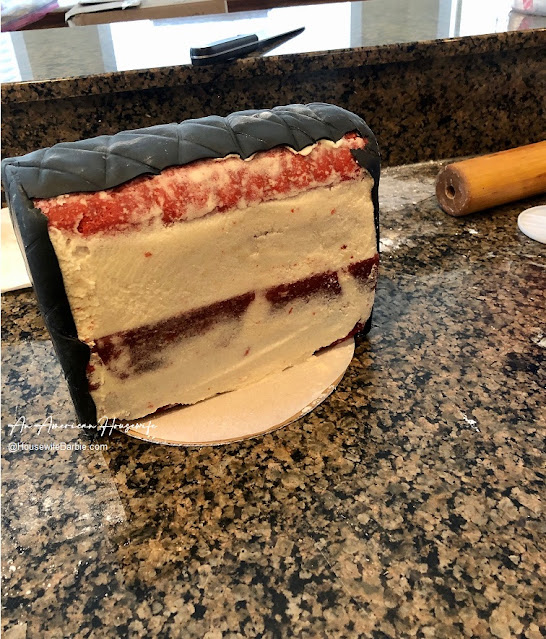
 
The cake was made, the frosting filled between a couple layers and then a little bit of a crumb coat, and it was popped back in the freezer.

On "put it together day" I got out the random things I had ordered, thinking I may or may not use them.

FIRST:  I used some gold/yellow fondant to form the Gucci logo for the front of the cake.  I knew I would have to let it set up to dry and harden a little before I could use it.  I did not make the chain at this time because I knew it would still have to be somewhat soft in order to form to draping... not too hard and not too soft. 

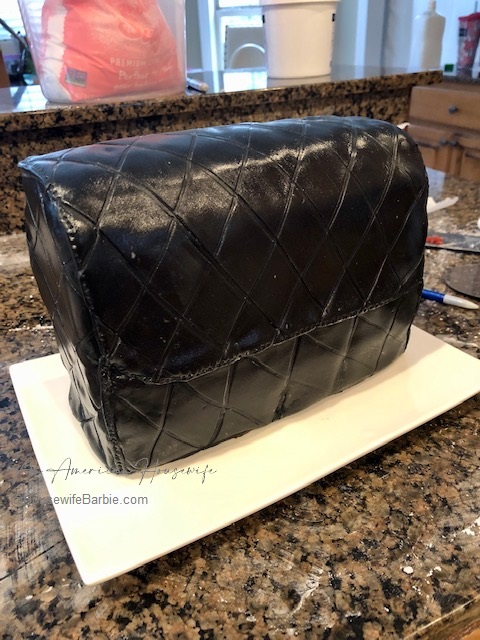
SECOND:  I didn't know what I was doing but I grabbed a hunk of black fondant and started to roll it out.  I measured the cake to get a rough estimate of how wide and high a piece needed to be to cover the back, and a little over the front as well. 

I cut it out and put it over the cake. 

NOTE:  LEARNING CURVE:  I didn't do the diamond pattern first.  I tried to add that after the fondant was on the cake, which was difficult to get even, so for the front I did the pattern first, then draped it on the cake.

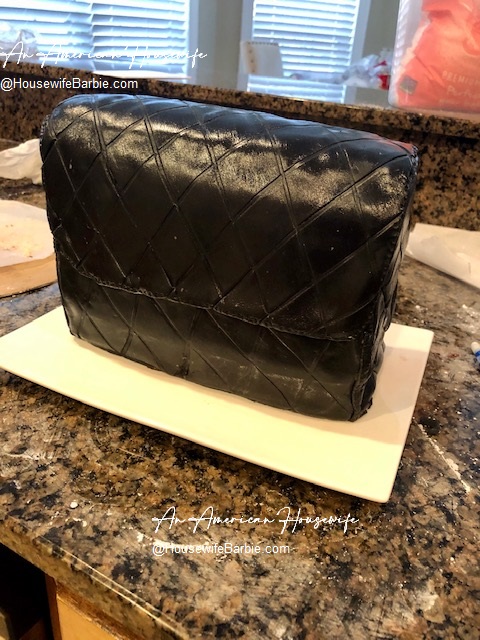
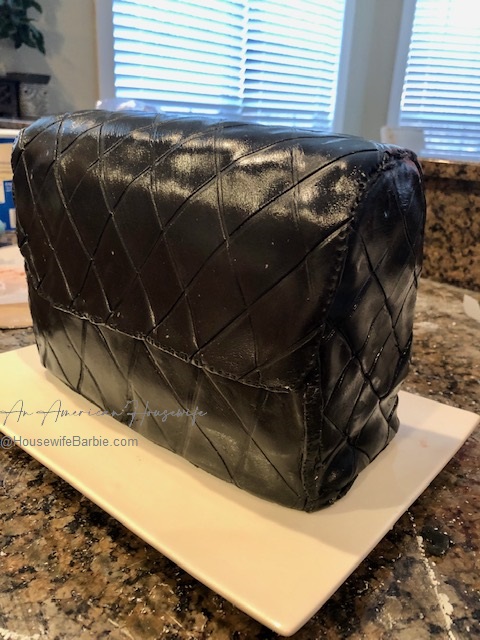
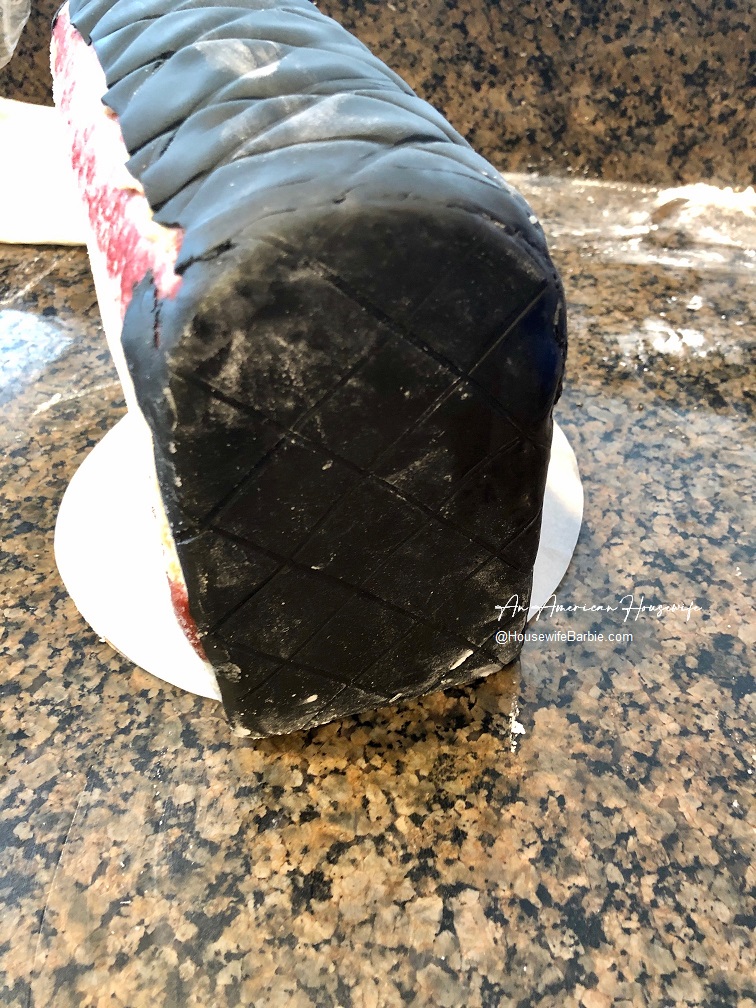
I cut two pieces for the sides in the general size and shape I wanted, and placed them on the cake with a little clear decorating gel to hold them.  Then I used a sharp knife to cut the fondant down a bit so I could smooth it with my fingers to meet the top fondant piece on the cake.  See photo.
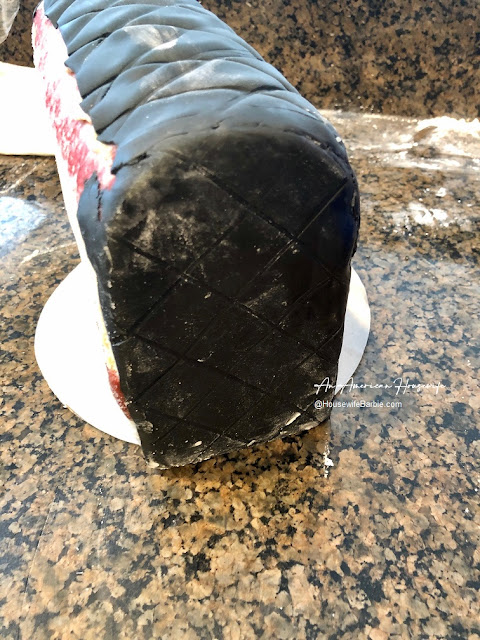


With the back and sides in place, I now had to the front to figure out.
First I did a piece across the bottom front (see photo). 
Then I laid out my fondant and did a guesstimate measure to start the last piece at the top of the cake where a 'seam' would be, and down about half way in the front like a purse flap.


When I was deciding what to use to make the diamond leather pattern for the purse, I tried a couple things, but ended up just flipping my knife over and using that to gently press in lines that overlapped to make the pattern.


I draped the last piece of fondant over the purse cake and....  this was the moment I realized I might actually pull this off!  It was really looking like a purse!


And a couple minutes later my hopes were dashed and I figured I was really screwing it all up because I then attempted the chain links to make the purse strap for the cake and I actually put everything down TWICE and was going to just stop.  I almost just cut black fondant to make a simple black strap... but I'm glad I didn't stop in the end.  I persevered.
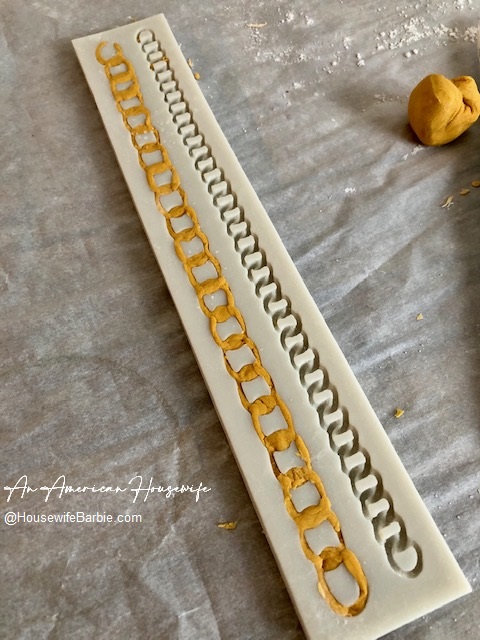


NOTE:  LEARNING CURVE - fondant is really soft for this.  I think a gum paste or something similar would work better and I know professionals have other things they use - but I only had fondant.  I popped out the chain link the best I could. 

I tried using the edible gold to paint it on before placing it on the cake because I didn't want to accidentally get paint on the cake by doing it after... mistake.  This didn't work at all and the fondant just wanted to break.  MAKE THE PURSE STRAPS AND PUT THEM ON THE PURSE FIRST.  And if you can use gum paste or something other than fondant, you will be happy you did.
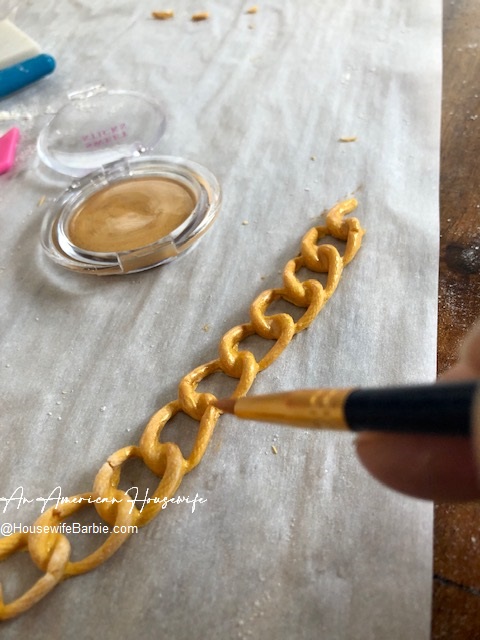
 

While I let the fondant chains sit on parchment for a little bit so they would (hopefully) get hard enough I could pick them up without them falling apart on me... I went back to the cake to attempt to find something to make it look like the seams were sewn.

Maybe they have something to do this design, I have no idea.  But I was grabbing things from all over my kitchen to try, including an icing pick, a straight pin, the head of the straight pin, a long twisted wire, etc. Just use whatever you have in your kitchen to make little indents all over the edges for a fake seam.

And finally... cleaning it up!  On some cakes I just use a brush and brush the extra powdered sugar or cornstarch off; or sometimes get the pesky spots brushed off with a little water, but to make the fondant shiny, I wanted to use shortening. 

I brushed the whole cake with shortening to make it shiny and keep it soft.
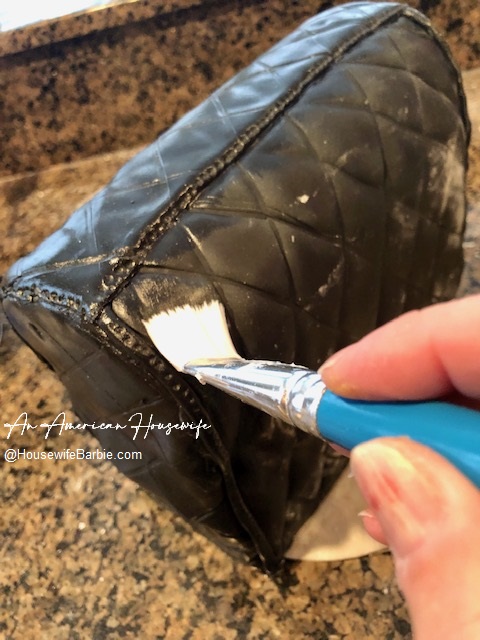


HERE is right after I carefully carried and draped those darn pieces of fondant chain over the cake and down across the front.  I pieced them together as best I could and yes, they were breaking since they hadn't had much time to set up.  I placed a few straight pins in to hold them in place while I got some pieces of black fondant rolled out, and cut them into tiny rectangle shaped pieces about 3/4 of an inch long and a little less than a half inch wide.  Basically about the width of the gold chain links.

Each little piece I poked the indents on, then pinched each end of it and tucked it into the chain links to look like a leather strap was weaved between the gold chain to form the cake's purse strap.

I wanted to make a little circle where the straps attached to the purse, so I grabbed a bottle cap from a random bottle (I think it was a taco sauce bottle) and with a perfectly clean and dry cap, cut out two little circles, with an indent of two tinier circles inside, to which I placed the ends of the purse 'strap' fondant pieces.
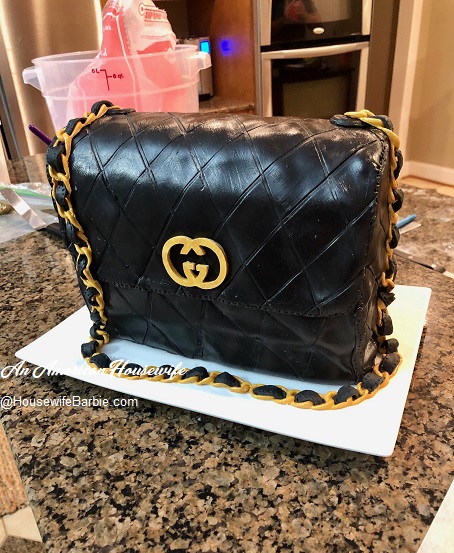

And that's it!  I called it "done" and rushed to get it on the table along with some random items like plates and little gold forks and gold and black napkins - added the birthday gifts and then, they walked in the front door!   :)



Print Friendly and PDF

1/6/23

The Mirror Glaze Ocean Beach Cake with Edible White Chocolate Seashells


This cake didn't have a plan so much as a general idea of what I wanted. 

Last weekend we had a dozen people staying at our home from Friday through Tuesday in order to celebrate 'all the things'.  Christmas, New Year's and 2 birthdays.  I made a purse cake for the first birthday, which we celebrated Friday night.  Saturday was our Christmas.  Sunday was our New Year's and Monday was another birthday.  So it was CHAOS and LOUD and CRAZY and here I was... attempting to make a cake in the midst of the hullabaloo. 

And I had NO PLAN.
And I had NEVER attempted a mirror glaze before.

So there you go.


I had made the cake ahead of time and although it should have been frozen solid, I had no room in a freezer to do so (because of the 12 people staying at the house and all the food I had to have on hand for meals).  Instead, it was in a 'really cold refrigerator'. 

I did make the seashells ahead of time with white chocolate candies.  That's all I had planned or prepped.  A four layer cake and the shells.  Everything else I just decided to 'wing it' when the time came.


Here is a close up up the pretty shells.  I added those around the edge at the last minute to cover the base and to use them up as I had made a handful 'extra' because I didn't know what I would want when I used them.


I added a ribbon I found in the drawer that matched the colors - and then, needing something 'more' to add some texture and color, I sprinkled candy sprinkles around.  I finished LITERALLY just as the birthday girl and her family were walking in the front door!  Ha.


The Cake

The cake recipe has been posted far too many times to count since this website began around 2006.  It's my 'go to' and I love it.  However, it makes enough for about 4 layers depending on the pans you use; so half it if you only need 2 layers.

White Cake

2 boxes white cake mix
2 c flour
2 c white sugar
1 1/2 t salt
2 2/3 c water
1/4 c canola oil
2 t vanilla
2 t almond extract
16 oz. sour cream
8 large egg whites, room temperature

Place all dry ingredients in a large mixing bowl and beat just to blend. Add the water, oil, vanilla, almond extract, sour cream and egg whites and beat on medium speed for 2 minutes. Pour into 2-4 greased and floured pans (shape of your choice, 2  9X13 or 4 smaller round), filling each pan about half full. Bake at 325° F oven until cake tests done in the center. Cool and use as you wish.

__________________________________


The Mirror Glaze - I looked at and ran off recipes for about 5 (?) of them from the web.  They were almost similar - almost exactly similar actually.  I ended up choosing this one because it had the ingredients in grams and ounces instead of just the American 'cups' and such.  I was nervous about my first time making and using a mirror glaze so I wanted to be exact.

All recipe credit goes to ChefIso's website

I followed their directions and because I anticipated I would screw up something and wish I had more glaze, I made the 'large' sized recipe which is far more than I needed, but I didn't care - better safe than sorry.  I followed everything exact - even weighed out my ingredients on my scale for exact grams and ounces. 

Makes glaze for a dozen 10-inch cakes. You can halve or quarter the recipe for a smaller yield.

  • 700 grams white chocolate (24.5 ounces)
  • 300 grams water (10.5 ounces, 1 1/4 cups)
  • 600 grams sugar (21 ounces, 2 2/3 cups)
  • 400 grams condensed milk (14 ounces, 1 3/4 cups)
  • 1 tablespoon vanilla extract
  • 38 grams powdered gelatin
  • optional food dye for colored mirror glaze

(half portion below)

  • 350 grams white chocolate (12.25 ounces)
  • 150 grams water (5.25 ounces, ~1/2 cups)
  • 300 grams sugar (11.5 ounces, ~1 1/2 cups)
  • 200 grams condensed milk (7 ounces, ~2/3 cups)
  • 1 tablespoon vanilla extract
  • 19 grams powdered gelatin
  • optional food dye for colored mirror glaze

Bloom the gelatin in cold water and set it aside while you heat the liquids.
Heat the water, sugar, and condensed milk.
When the sugar is fully dissolved and the liquid is hot, turn off the heat and stir in the gelatin.
Pour this mixture over the chocolate.
Wait about 5 minutes for the chocolate to melt.
Using an immersion blender or a regular blender, blend this mixture until smooth.
Strain this through a sieve and allow to cool, gently stirring every so often to prevent a film from forming on top. Depending on the container you are using and your starting temperature, the cooling can take up to 2 hours, which an ice bath can accelerate.
Your target temperature is about 92°F (33°C). When the glaze is between 90°F and 94°F (32°C - 34°C), it is ready to be poured over the cake. At this point be very careful not to introduce bubbles since the glaze is very viscous and they will not pop on their own.
You must manually pop them or strain the mixture through a sieve. Pour the glacage over the frozen cake
You can pour starting at the sides in a circular motion working towards the center, or start from the center and work out to the sides.
Allow the glaze to chill on the cake for a few minutes.

LEARNING CURVE because I did not have a frozen solid cake:  I did my pour when it tested at 91 degrees and it was still too warm.  By the time I tried to 'fix' it and had mixed and poured a couple more attempts, it was cooler, which would have worked better for me as I wanted it to resemble water.  But the marble effect in the end was good enough.  IF (And that's a BIG IF) I ever work with a mirror glaze again, I'm going to make SURE my cake is frozen solid - which I couldn't do this time and then do a 'test' pour - and if needed, wait until it's just a tad, smidgen bit cooler.  Maybe 87 ish verses the 91 degrees.  

 __________________________________________


*Note - because I was decorating the top of mine and not doing the traditional mirror glaze left plain, I had to put my graham crumbs and little seashells on right away before it set up.

I colored three colors separate at first - a lighter blue, darker navy blue and a white.
I saw on other sites where they pour them separate and 'swish' them with a knife to form water.  Mine didn't turn very well for my first try, and even though it was 91 degrees, it poured too quickly for the look I wanted since my cake was not frozen solid;  so I poured a little more, then mixed the two blues together and poured again.  I added a few back-and-forth pours of white for the waves and then tried to swish... nope.  So I got out the hair dryer and tried to blow it to be wave-ish.  Nope.

In the end I used some leftover white frosting from the filling to form waves and by that time it was set up anyway and I couldn't work with it anymore!  Ha ha.  So it was what it was.


 I had a 6 year old helping me decorate and he had a blast putting down the 'sand' and some of the seashells.  This is my hand placing a few more shells.
 
 
I had a bunch of shells I had made (not really having a plan to start, I just made stuff....)
So I ended up placing shells around the cake at the base as well.  I loved this addition.


Print Friendly and PDF

12/17/22

Cream Filled Vanilla Keto Cupcakes (from my previously posted mix in a jar)


Last week I noticed we had a little bit of sour cream left in the refrigerator container I needed to use up.  Usually my first thought for using up the last of the sour cream before a fresh grocery shopping trip is to make something like chicken enchiladas or another Mexican dish.  But then I suddenly thought about the jar of DIY cake-mixes I had in the pantry.  I knew one of them used a bit of sour cream.

That was perfect, because I also noted I had to use up some heavy whipping cream as well, which I could use for the frosting!

If you follow me on this site or my Instagram, you might recall that I like to make my own mixes for things, and I did a post in 2021 for a few keto cake and cupcake mixes to store in Mason jars in the pantry.   (Link:  here) 

I still had this mix in the pantry, as any time I've wanted to make cake or cupcakes, I would decide to make them completely from scratch and 'save' the jar mix for when I had 'less time' or was out of an ingredient and needed it.  But I really needed to rotate it out because it had been a year, and one of the ingredients in the mix was whey protein powder - and these are not sealed with oxygen absorbers, these are just regular Mason jars with a screw lid.


Cream Filled Vanilla Cupcakes (from my mason jar pantry mix)

2 1/2 c almond flour
1/4 c sweetener
1/2 c vanilla whey protein powder (with zero sugar/carbs)
2 t baking powder
1/4 t salt
1/2 c sour cream
4 egg whites
1/4 t cake batter flavor extract or LorAnn Princess Cake Flavoring
1/2 t vanilla
5-10 drops liquid sweetener (optional)
Sugarfree Sprinkles
Frosting of choice and/or whipping cream with 2 T sweetener per 1 c liquid and 1 t unflavored gelatin

Preheat the oven to 325 and line your 12 count muffin tin with paper liners.
To the dry ingredients, add the sour cream, egg whites, flavoring and drops of liquid sweetener if you opt to use it.  Mix until all blended and divide into your muffin tins.  Bake until golden and firm to a slight fingertip touch (about 25 minutes).  Let cool completely.

If you use your favorite frosting or filling recipe, you can use it as is, or what I prefer, to blend it with some whipped cream.  Up to you.  I used stabilized whipped cream in mine this time. 

Stabilize whipping cream by sprinkling a teaspoon of unflavored gelatin powder over a tablespoon of water in a little container and letting it soften for a few minutes, then pop it into the microwave to soften and 'melt' for about 15 seconds.  Let it cool.   To a cup of cold, heavy whipping cream, add about 1-2 tablespoons sweetener (depending on how sweet you like your whipped cream) and a dash of vanilla, and start to beat it. As it starts to thicken but isn't yet stiff peaks, slowly drizzle the gelatin mixture down the side of the bowl, into the whipping cream, continue to drizzle and whip until it forms stiff peaks. 

I used about 1 1/2 cups of whipping cream, which doubles to about 3 cups when whipped.

Put into a plastic decorator bag with the end snipped off (or use a tip if you wish) and push a bit of filling into each cooled cupcake.  Top with a swirl of whipped cream on the top and sprinkle with sugar free sprinkles if you wish.


Print Friendly and PDF