Showing posts with label Vegetables. Show all posts

2/2/25

Carrot Loaf (a vintage recipe from the 1930's and 1940's)

What a bizarre recipe!  I don't often update this site anymore (maybe in the future if I get more time... right now it's impossible) but I saw this one in an old magazine and just thought it was the most interesting recipe!  Peanuts and tomatoes and carrots?  Oh my.  If you make it you can tell me how it was.  :)

Carrot Loaf

1 c ground carrots
1 c tomatoes
1 c ground peanuts
1 T butter
1 c bread crumbs
4 eggs

Grind carrots, peanuts and bread through your food chopper.  Add tomatoes and butter.  Mix well.
Beat eggs until foamy, then add.
Bake in a greased loaf pan at 350 for 1 hour.


Print Friendly and PDF

4/6/24

Broccoli Cheese Soup


Back in high school I had wrote down a recipe for broccoli soup we had made in Home Economics class (now known as Family Consumer Science).  I've been making it ever since. 

Tonight's dinner version of it used pantry, shelf-stable milk and Velveeta from the pantry as well.  I was prepared to use freeze dried broccoli but was gifted fresh broccoli by a friend so I used that instead (yay!). 

I don't use a recipe as I've been making it so man years, but here is the 'recipe' off the top of my head - all amounts are approximate.  Adjust as you wish.  I usually end up doubling it.  When we had all the kids at home I would triple it.

Broccoli Cheese Soup

2 T flour
2 T butter
3 c milk
dash of tobasco sauce
pepper
1 t chicken base or chicken bouillon (optional)
2 oz Velveeta or cream cheese
1 1/2 c cooked broccoli

Melt butter in a pan on the stove and whisk in flour.  Add a dash of tobasco sauce and pepper to taste.  Add the milk all at once and whisk smooth.  Add the chicken base or bouillon, whisk. Remove from heat.  Add the cheese and broccoli.


Print Friendly and PDF

3/16/24

Food Storage: Beef Stew (made in the Instant Pot this time)


SLOW:  I've posted this recipe many, many times over the years.  It's my favorite beef stew and I typically make it in the crock pot and let it cook 5-6 hours.  It's a no-work recipe that tastes incredible.  However, I've never tried to make it in a 'rush' before.  I've never had to.  Yesterday... I did.  And it turned out great!

FAST:  Yesterday, time got away from us and suddenly I realized my husband had to leave for work in about 25 minutes and we needed to find him a dinner to take, as we had no leftovers to throw together this time. I looked at a package of ground beef I had taken out of the freezer that was lying on the counter, and suddenly decided to see if I could throw this beef stew together SUPER FAST by using the instant pot pressure cooker, but also because since we are using food storage, most of our foods are pre-cooked in various ways already, which would cut down time.

FOODS:  The package of ground beef was one I ground from chuck roast last Fall and food sealed for the deep freeze.  However, I could just as easily used freeze-dried ground beef, canned beef, leftover steak or hamburger, diced beef (either fresh or freeze dried), etc.  I had home canned potatoes and home canned carrots on hand (again, could use freeze-dried, dehydrated, canned, etc.).  I had sliced mushrooms in the freezer, and a package of dehydrated corn I had dehydrated myself as a 'trial' last summer when I bunch leftover from a family vacation. 

I've NEVER tried to make this 'super fast' before using a pressure cooker. But it turned out perfect and so good that I ended up going back for 3rds and we plan to have it today as well. 


Beef Stew

3 c cubed, peeled potatoes  (I used home canned)
4 medium carrots, sliced  (I used home canned)
1 medium onion, cubed  (Use dried minced or freeze dried, but I had one fresh on hand)
2 lb. steak or other beef, cubed or cut to about 1" pieces  (I used frozen ground beef, thawed in the microwave)
2 T oil  (had avocado oil on hand)
3 T flour
2 beef bouillon cubes  (used 1 1/2 tablespoons beef base)
2 c boiling water  (used cold from tap)
1/4 c white vinegar
1/4 c ketchup
1 T prepared horseradish (Horseradish Cream - the kind for sandwiches, looks like mayo)
1 T prepared mustard
1 T sugar
1 c peas  (didn't have, left out)
1 c corn  (used dehydrated - added dry)
1 c fresh sliced mushrooms  (used frozen, bought, sliced and froze last summer/fall)
I added a handful of sliced cabbage as well

Place the potatoes, carrots and onions in a slow cooker.  In a large skillet, brown the beef in oil.  Lay on the vegetables in the slow cooker.  Sprinkle with flour.  In a bowl, dissolve the bouillon cubes in the water and stir in the vinegar, ketchup, horseradish, mustard and sugar.  Pour over meat in the slow cooker.  Cover and cook on high about 5 hours.  Add the peas and corn and mushrooms.  Cook an additional 45 minutes.  Makes about 5-6 servings. 

Yesterdays Instant Pot Fast Version: 
Heated instant pot to saute with oil.  Added partially thawed ground beef, broke up and browned in pot.  Added onions and flour, blended.  Added the potatoes, corn and carrots along with the water, bouillon base, vinegar and ketchup.  Added the horseradish, mustard and sugar, stirred gently.  Topped with the mushrooms.  Put the top on, sealed it and put the timer on to pressure cook on high 20 minutes.

_________________________________________________

The instant pot 20 minute version worked PERFECTLY.  


Print Friendly and PDF

2/26/24

Food Storage: A 'vintage' style chicken stuffing casserole, topped with my favorite pot pie filling


Again, I almost didn't take ANY photo of dinner, but at the last second, grabbed my phone and got one picture right before I finished dishing some up to eat.  :)

This is a mixture of two different recipes I've made for years.  I knew I wanted to use up a bunch of bread I had in the freezer (more on that in a second).  I also had some packages of cooked chicken mixed with the vegetarian chicken from the #10 cans I posted about previously.  The first thing that comes to mind when I want to use up our leftover bread is a simple 'comfort' casserole that is a stuffing/chicken casserole.


Bread from the freezer

Ever since my husband and I were very first married, I've taken the ends of the bread, or bread that is starting to get hard or stale, and popped it into a Ziploc in the freezer to use later in recipes. You should never throw our or waste any food - because you can always make something else from it.


This time we have all kinds of bread to use. And I decided to make a triple batch.  I tripled the batch and then put 2 of them back into gallon sized Ziploc baggies in the freezer for future meals.


This is a spice/herb mixture for the stuffing.
We've never, ever been one to buy the 'Stovetop Stuffing' brand mixes from the store - but that's basically what this is, as the original recipe most people use starts with a box or two of Stove Top.


Choices for chicken

Fresh, frozen, freeze-dried and reconstituted, canned, home canned... whatever you have to work with.


The original grandma recipe is simple:

Stove Top Stuffing Mix(es)
Chicken breasts - boneless
1 can cream of chicken or mushroom soup
1 empty soup can of water per box of stuffing used

Mix the stuffing mix, spices and the water and soup.  Place in a greased casserole dish.
Lay the chicken breasts on and salt and pepper or even add cheese to top.
Bake until the chicken is done.

Serve.


SUBSTITUTIONS I USED TO MAKE IT FROM MY FOOD STORAGE

For the 'stove top' stuffing spice mixture, I threw together a mixture from 3 different 'recipes' of sorts.  It's really just parsley, thyme, poultry seasoning, chicken bouillon, etc.  You can do a quick internet search to find one you like.  I used all dry spices from the cupboard along with some 'chicken base' instead of dry, crushed bouillon cubes or powder.

My bread was of course, from the freezer.  You can also just cut up or tear up your daily homemade bread.  I don't bother drying mine out in the oven, I always use it fresh.

The chicken was reconstituted 'vegetarian' Auguson Farms fake chicken, mixed with some precooked chicken.

I used a lot of bread this time around, but only one can of soup so I decided to make my favorite pot pie filling and top it with that.  That is the creamy filling with some carrots and peas you see in the photo above. 

The filling is from a recipe I've posted many times over the years - my favorite pot pie.   This time I used 1/3 of a can of peas from food storage, along with 1/2 a jar of home canned baby carrots.


Old Fashioned Turkey Pot Pie

1 10 oz. package mixed carrots and pea's or all veggies
1/4 c butter
5 T flour
1/2 t salt
1/4 t poultry seasoning or sage
1/8 t pepper
2 c chicken or turkey stock (or use 2 cups water and 2-3 boullion cubes)
1 c milk
3 c chicken or turkey
1/3 c chopped onion or 4 green onions, chopped completely and cooked until tender in a bit of water
1 c cooked and diced potatoes (or use canned or dice and cook them with the onions)


Prepare the pea's and carrots (or mixed veggies). I like to cook them in the microwave while I prepare the rest. Melt butter in saucepan. Blend in flour, salt, poultry seasoning or sage, and pepper. Gradually add stock and milk. Cook and stir over medium heat until thick and smooth. Add vegetables, turkey and cooked onions and potatoes. Pour into a greased shallow baking dish. Make a biscuit topping and top the vegetable mixture. Bake at 425 degree's for 25 minutes until the top is golden brown. About 6 servings.

Biscuit Topping;

Mix

1 1/3 c flour
1 1/2 t baking powder
1/2 t salt

Cut in
2 T butter
3 T shortening

Add 1/2 c milk (scant) and stir with a wooden spoon until a dough forms. If it's too wet and sticky add one or two more tablespoons of flour. Pat down on a lightly floured surface and roll out to the shape of your baking dish. If you prefer you can cut into wedges or squares and simply top the vegetable mixture that way too. (Up to you!).



Print Friendly and PDF

2/24/24

The old 1942 Victory Garden Plan released to help families put food on their tables during the war

In 1942 the Illinois State Council of Defense released a plan of recommendation to families to plant a 'victory garden' to support food for their families during the war and the shortages.  (You also may want to plant your own foods because of food safety... just sayin'.)

It was met with such success, the Illinois Victory Gardens program's "Food For Victory" was recommended to the United States Department of Agriculture by the Men's Garden Clubs of America as a model plan for the other 47 states to follow.  It was voted the most efficiently organized plan in the nation.

I have had a copy of this plan in my files for years, but with gardening on the brain of pretty much everyone, I thought I'd put it on my site.  I have some personal thoughts about it - as many of these items are not things I nor my family would eat and a couple, I've never cooked with before (endive and Swiss chard) and I've only made rutabaga once in my life. 

For me, I'd replace some of those items I mentioned with potatoes (not sure why they didn't have potatoes on the plan) and more bush beans! 


Stanford University:  https://engineering.stanford.edu/magazine/article/scientists-have-developed-vaccine-protect-tomato-plants

University of California:  https://www.universityofcalifornia.edu/news/grow-and-eat-your-own-vaccines


Print Friendly and PDF

2/12/24

Carrot or Vegetable Casserole (an old, vintage church cookbook style, grandma recipe)


A older, 'vintage' Grandma recipe that I've been making off and on in various ways for years now (since my own kids were itty bitty) that can be varied with whatever you want or whatever you have on hand.

I posted this recipe in 2008 using all carrots from the garden: https://www.housewifebarbie.com/2008/10/carrot-casserole.html

Carrot Casserole

2 pounds carrots, cubed, chunks or sliced
1 c water
1 medium sweet onion
2 T butter, melted
1 1/2 c shredded cheddar cheese
1 c Ritz Crackers, or similar buttery flavor cracker, crushed
salt and pepper to taste
4 slices bacon, cooked and crumbed
2 eggs, slightly beaten
1/2 c more buttery crumbs for a topping (optional)


Combine the carrots and water in a saucepan and cook about 15 minutes until just tender. Drain and mash just a little bit to give it a mixed texture. Saute' onion in butter until translucent but not brown. Combine all ingredients in a greased casserole dish. Sprinkle with 1/2 c crumbs if preferred, bake uncovered at 350 for about 40 minutes until hot completely through and golden.


Later I posted the recipe again using many vegetables I had on hand, like zucchini and yellow squash.

Vegetable Casserole (Use;  Yellow Squash, Zucchini, Onions, Carrots)

2 - 3 cups squash;  either yellow or zucchini or a mixture of both, sliced and cooked just tender
1 medium sweet onion like Vidalia, chopped and added to the squash cooking the last 3 minutes
2 carrots, sliced or grated (if sliced, add to the cooking squash or use a can of sliced carrots if you need to substitute)
1 egg, slightly beaten
3 T butter
1/2 c mayonnaise
1 T sugar or substitute
1 c cheddar cheese, grated
1 - 1 1/2 cups crackers, crumbled such as TownHouse or Ritz
Dash Cayenne pepper
salt and pepper

Put the well drained zucchini or yellow squash and onions into a mixing bowl.  Add the carrots, egg, butter, mayonnaise, sugar, half the cheese, half the crackers crumbs and the cayenne and salt and pepper.  Mix gently.  Put into a buttered casserole dish.  Top with the remaining cheese and cracker crumbs.  Bake at 350 for about 25-35 minutes until warmed through and golden.


Last night for dinner we had this casserole and again, improvising what I was wanting to use up, and what we had to work with.

The carrots are the the final ones in the bag of carrots given to me in November (?).   They are locally grown, and may have originally been part of a food bank, or maybe just gifted to someone.  They don't eat or use carrots and they gave them to someone else.  They also didn't use or cook with them so they gave them to someone who gave them to my daughter.  A whole bag of fresh garden carrots, but she doesn't love carrots and never cooks with them (nor wanted to clean and cut these for fresh with ranch) so she gave them to me.  I've been using a few here and there ever since but they needed to be used up as a couple were starting to get a bit soft. 

So, carrot casserole it was!  I didn't quite have enough, so I grabbed a jar of home canned carrots as well.
I had some leftover green onion tops from a few weeks ago that needed to be used up from the fridge.
The egg was powdered whole egg.
The butter, home canned.
The crackers were dry canned from the pantry (food sealed with a dry canning attachment sealer)
Mayo and spices I have. 
Cheese is from a block of cheddar I had in the deep freezer.  It's my last one, so I'll have to switch to freeze dried in the future when this one is used up.


dry sealed crackers - I used Keebler Butter Flavor

home canned butter - canned back when butter was affordable!

powdered egg

canned baby carrots when I had a bunch to 'use up'

The original plan for this recipe/dish - using up the fresh carrots and some leftover green onion tops


Mixed the egg powder in with the mayo and spices - and water to reconstitute the egg per directions (I think 2 1/2 T)


Lots and lots of cheddar on top as I grated too much but just decided to use it all.  We love cheese so it's all good.


Print Friendly and PDF

2/10/24

Last night's dinner - steak and potatoes, and homemade Texas toast

Draining the 3 jars of potatoes
 

Last night's dinner was a splurge.  After 2 months of hell, we had a tiny bit of good news and I guess I felt the steel band around my chest loosen just enough that I decided to raid our deep freezer and pull out some frozen steaks.  I'm so happy and blessed that prepped and stocked our freezers when we could!  These steaks were from Sam's with a date of August 2023. 

Paired them with the last of a bottle of Dale's Seasoning and Marinade I had in the pantry.  I do have another bottle in the 2-3 year food storage pantry as it's almost exactly like my 'homemade' marinade I've been using since 1996.

Steaks marinating

The potatoes:  Regular readers know that for the past 20+ years we've chosen to be primarily and usually not only sugar free but low carb and typically keto.  But God put it on my heart to can potatoes for the days ahead - so strongly that I couldn't ignore it.   We love potatoes!  We just don't eat them often in our regular daily meals because of the starch and sugar. 

But I knew that if and when we felt it was time to eat from our food stores, I would be so happy to have potatoes!  So can, I did!  They have been so awesome to have on hand over the past 2 months! 


Last night, with the steaks brought out and thawed from the deep freezer, I made roasted potatoes faux 'Lipton Soup Mix' style.  We've been making them this way for about 30 years now - first with the store bought envelopes of the soup mix and over the past 20 years, with the homemade faux version - ever since I learned the ingredients in a lipton onion soup mix and how easy it is to make my own version.

Grilled the steak, roasted the potatoes and cut up the homemade daily bread in nice, thick 1" slices, slathered them with home canned butter and grilled those as well for a side of Texas toast.


I first posted a homemade version of an Onion Soup Mix in February of 2008.  Since then I basically make it the same except no sugar, and I started to add celery seed almost immediately - and sometimes parsley if it was going in a dish that the green flakes added a visual perk to. 

Basically you just need these for a homemade Lipton Onion Soup Mix
 
Dried minced onion - about 1/4 cup
Beef bouillon granules or pounded cubes - I use about 1 or 1 1/2 T beef base or use about 4-5 cubes, crushed
Onion powder - 1/2 teaspoon or so
Celery Seed - 1/4 - 1/2 t will do
Option:  a little sugar or parsley
 
About 10 years ago I started to keep a container of dehydrated onion in my pantry in a jar.  When I can use these, I crumble or chop them instead of store bought dried minced onion because the flavor is better and bumps it up a notch. I don't measure anything anymore, but the above measurements are pretty close.  You can add a dash of sugar if you usually eat sugar as the typical American palate is used to sugar or corn syrup being in literally almost everything so you might be used to it having just a dash (1/8 - 1/4 teaspoon) in your mix.


Toss your diced potatoes with oil, the season mix and some salt and pepper if you wish - bake at 400 until golden brown and as crispy as you like yours.


Print Friendly and PDF

1/24/24

Roast with Dehydrated Mushrooms

Tonight's dinner is in the instant pot, on the slow cooker setting.  It's a mushroom roast and I'll be serving with potatoes, either home canned or mashed from stored potato flakes.  The star of the show however is the mushrooms.  Our family loves mushrooms cooked with our roasts but obviously mushrooms from the store go bad within days so storing them means you have to choose one or more options of storing longer term.

We store mushrooms in 4 different ways.  

The first, obvious and one we don't actually store too many of are canned from the store.  I may have some still in my 2-3 year storage but they are never my first choice.

The second way we store them is freezing.  Because they go bad so quickly, I have always immediately sliced the whole mushrooms or used sliced mushrooms from the store and put them into a food sealer bag and popped them into the freezer.  This is my primary way of using and storing mushrooms on any given day - when not using food storage items.  It ensures I always had fresh mushrooms on hand for pizza, sauces, roasts, soups, etc.

Third:  Freeze dried.  Expensive, but we do have some cans of freeze dried mushrooms in storage.  Freeze dried is the most expensive option to purchase but the quality and flavor and texture is awesome.

Fourth and last, dehydrated!  And that's what I used today.


This is my regular container of dehydrated mushrooms that lives in my kitchen pantry at all times.  I would always restock it when it got low (although of course I'm not restocking it now that we are using food storage and not buying anything at the grocery store). 

To make them, simply slice your mushrooms or buy store bought sliced and place them on the dehydrator trays.  Dehydrate until they are dried out of all moisture but still pliable.  Place into a jar with a lid and let them set for a week or so, shaking them and letting the moisture left in them equalize out.  Check for no excess moisture left in them, mold, etc.  When you see they are still dry and loose, you can make sure they are sealed tightly and start to use them as needed.

No need to rehydrate before use except if you want to use them pizza.  I add them to the dishes directly and they soak up the liquid/water/broth as they cook.  To rehydrate them for things like pizza, just toss them in a bowl of hot water and let them soak for 10-15 minutes or even overnight.  You can drain off the liquid and use them as you would fresh.


Everything thrown into the slow cooker...

Roast

1 can cream of celery soup
onion powder
dehydrated mushrooms
dehydrated or fresh green onions or onions if you wish
2-3 teaspoons beef base or bouillon
1 soup can of water 
1/4 c dry red wine or even balsamic vinegar (optional)
salt and pepper

Slow cooked about 6-8 hours or until it's fall apart tender.


Print Friendly and PDF

2/24/23

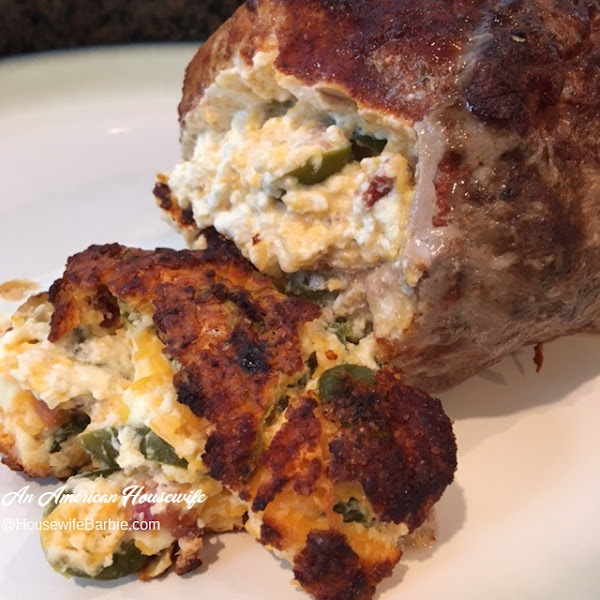
Jalapeno and Cheese Stuffed Pork Loin Roast


(This is based on my pork chop version, which was posted in 2017 - which you can find here:  Jalapeno, Cheese and Bacon Smothered Grilled Pork Chops)

Here is the pork roast right after it came out of the oven, placed on the serving platter, before adding the vegetables for serving....

Basically you can use any amount of the cheese, jalapenos and bacon that you wish.  The same with the size pork loin or pork roast.  Depending on large of one you bought or how many people you are serving.

This pork roast looks fairly small in the photos but easily feeds 4 people.


Cheese, bacon & Jalapeno Pork Roast

Pork Loin or Roast (your choice cut and how large)
cream cheese - I used about 1/2 block or 4 oz. for this small pork roast, which was plenty
cheddar cheese (I used sharp cheddar this time but mild, medium or sharp will work fine)
diced jalapeno peppers - either fresh or bottled - your choice
cooked, crumbled bacon (fresh cooked and crumbled or bagged - your choice)
Optional:  cilantro, garlic or onion powder or even green onions

Form a pocket in the meat:

Lay the pork down on its side and use a knife to slice into the center, making a slice horizontally, but leaving about 1/2 - 3/4 inch on each side and the back/bottom.  Now turn the knife and make a vertical slice up and down, again leaving a bit on the top and bottom so you don't slice all the way through.  I added a couple more slices at angles in order to fill with more cheese filling.

Filling:

The amounts of the cheeses, bacon and jalapeno are up to you and your tastes.  If you don't like spicy foods or have children eating that are not used to spice, cut back on the jalapenos or just use a small can of diced green chili peppers (they are mild). 

We used about 4 ounces cream cheese, 1/3 cup cheddar, 1/4 cup sliced jalapenos, 1 T cooked, crumbled bacon (I just grabbed some of the Hormel real bacon bits I keep in the freezer at all times).  Mash this together and set aside.

Preheat your oven to 325.

Dry Rub: 

You could use any dry rub you like.  For this one I threw together a simple mixture using:
2 T salt
1 T ground coriander
2 T smoked paprika
3 T natural sweetener (most people would use sugar here - we are sugar free)
1/2 T espresso powder
1/2 t rosemary

Stand the pork upright and stuff the cheese mixture in.  Press it in well so it stays. 
Cover the pork roast in your dry rub spice mixture.  Roll and press gently to cover.

Heat a cast iron skillet on the stove with a bit of oil in it.  Now sear the pork roast on all sides except the cheese stuffed side.  Transfer the cast iron skillet (or any oven safe pan) to the oven and proceed to roast until done.  For the roast in my photos it was about an hour. 

(Note:  I also baked it propped 'up' so the cheese filling was on top during cooking.  This isn't necessary but I wanted to keep it all in during cooking and not have it melt/run out.  It naturally falls out when you lay it on the serving platter anyway but this way I kept it all in until serving time.)

PHOTOS BELOW


A simple mixture of cheeses and a bit of real bacon crumbles

   The pocket formed in the pork by slicing with a knife, but not all the way through.
Stuffed and ready for its dry rub marinade

 
All dressed up...
 
Searing in a hot pan
Transferring to the oven to finish cooking for about an hour
Hot from the oven, placed on a serving platter


Grabbed random veggies to throw together to serve with it; spinach, peppers, onions and zucchini squash with some oil, salt and pepper 
So simple yet so good


Print Friendly and PDF

11/7/22

Open can testing of dry-canned potatoes with butter over a year later... and canning more potatoes in these times of food shortages and empty shelves at the grocery

First - just some regular canning of potatoes...  (water and salt)
 
A couple weeks ago I canned more potatoes.  Although I would love to have potatoes at every meal (they are one of my favorite foods and perhaps one of the most versatile foods you can use) we are low-carb and sugarfree most of the time, by choice, so starchy vegetables like potatoes aren't enjoyed as much as I would like.


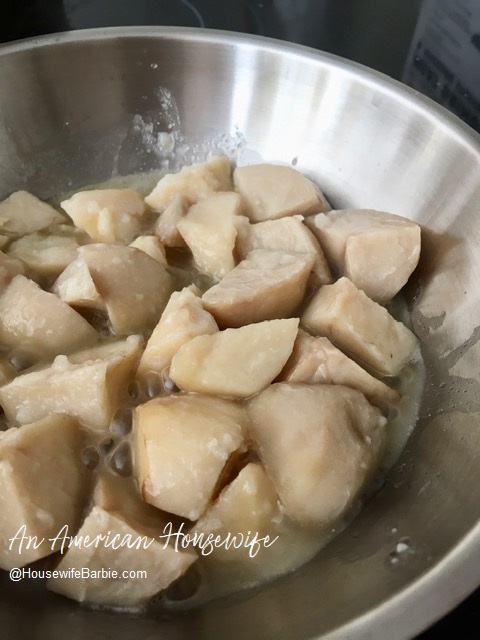
UPDATE TO DRY-CANNED POTATOES:    A few years ago I opted to try dry-canning potatoes instead of the typical way of covering them with water.  Just for fun. I ended up doing some plain and others with butter.  I LOVED them.  (I also dry canned apples.)  I researched it first, and did a couple tests to be sure I felt comfortable with the process, but then I jumped in and did a few batches and ended up adding 'dry canning' them to my regular canning.
 
Now, I can potatoes in all sorts of ways because there are so many ways to use them.  Small, diced, chunks, larger chunks, french fry shape, thin wedges... and some traditional water covered, others dry.  Some with butter, some without.  I grab a certain shape or style depending on what I need them for.

I went ahead and saved one of my dry canned potatoes with butter that had been put up in September of 2021 to open at least a year later.  That was this Fall.  A couple weeks ago I grabbed one to use in dinner that night but made a point to take photos first and do a quick review for An American Housewife.   


The seal was incredibly tight and took a bit of work to get off (a good sign).
Inside the potatoes looked fine and smelled... like potatoes.

 
I dumped them out into a bowl and took a good look... and smell.
They were cold, and straight out of the glass canning jar so the butter was still a bit congealed...

 
Here is a close up.
They tasted good and had a great texture and didn't seem any different from the potatoes tested at the earlier marks of a few months.  We were over a year later and the butter canned dry potatoes were perfect.  They went into the crockpot with dinner that night so I don't have a picture of them after they were heated where the butter is melted and they just look like... well, potatoes.


If you have a pressure-canner (potatoes can't be canned safely by the water bath method) potatoes are one of the cheapest and easiest to put up... and in the event of hard times, they are a blessing!


Print Friendly and PDF