Showing posts with label Thanksgiving. Show all posts

1/17/26

Low Carb Sugar Free Carrot Cake with my Coffee (and cream cheese frosting on it)


We have been enjoying a keto carrot cake this weekend with our coffee as I had to use up some leftover baby carrots from when we had houseguests... I snapped a couple quick pictures with my cell phone to show it as I don't know that I care enough to try to make it look 'pretty' - I literally take a photo just before I'm going to eat it!

I have a version of it I posted back in 2016... Some of those ingredients are not made any longer and others, I don't use anymore or use newer versions.

Here is the carrot cake (sugar free, low carb) I posted back in 2016.  Very similar to the one I typically make now - just a couple changes.  About 10 years ago I started to add heavy cream to my frostings as well - so similar base - but add a huge dollop of heavy cream and you get more volume, a smooth silky frosting, and even better flavor. 

https://www.housewifebarbie.com/2016/05/ 
 
The current cake I've been making for the past almost 10 years though is this one (based on Carolyn Ketchums recipe!).

  
Low Carb Carrot Cake
 
2 c almond flour
1/3 c coconut flour
1/3 vanilla whey protein powder (I use Isopure and have for 20 years)
1 T baking powder
2 t cinnamon
1 t salt
dash of ground cloves
4 eggs
1/2 c avocado oil
1/2 c brown sugar style sweetener
1/2 c granular style natural sweetener
1 1/2 c shredded baby carrots
2 t baking vanilla
optional - a few tablespoons chopped pecans

Grease and line the pans (I use 2, 8" or 9" pans).  Blend together the dry ingredients (flours, powders, seasoning).  

Mix the eggs, oil and sweeteners, add carrots and vanilla.  Beat in the dry ingredient mixture and add chopped nuts if using.  

Divide batter between the 2 pans and bake in a 350 oven for about 20 minutes, until done in the center.  Let cool.  Remove from pans.  

Spread frosting between layers, top and frost all.

For the Frosting I used:

1 stick butter
8 oz. cream cheese
3/4 c powdered natural sweetener (depending on the brand you use some are sweeter than others so adjust to taste.  1 cup of my allulose/splenda/stevia blend is TOO sweet so must cut back to 2/3-ish.)
1-2 t vanilla
dash of salt
Enough heavy whipping cream to taste and amount you need (I use about 3/4 cup)

In a mixing bowl whip the butter and cream cheese and sweeteners with the vanilla.  Slowly pour in the heavy cream while on low speed and increase to medium high.  Beat until it's whippy and spreadable.   Use on your cakes.


Print Friendly and PDF

11/27/25

An American Housewife: Thanksgiving Pies for 2025! A different pie crust this year, and 3 pies; pumpkin, pecan and caramel apple (PIE CRUST RECIPE with sour cream)

I LOVE my regular pie crust and have been making it since my children were itty bitty babies, but this year, I was flipping through an old catalog of King Arthur I found tucked into one of my 1000 recipe binders, and saw a random pie crust recipe that used an addition of sour cream and baking powder.  Two items I don't typically use in my pie crusts.  But I had sour cream on hand that wasn't earmarked for any meal in particular and I was in a grumpy mood in which I did not feel like taking on any of the tasks at hand and making a pie would keep me busy and give me a reason for not doing 'all the things' I should have been doing.  I also had been given a can of caramel apple pie filling by someone who couldn't/wouldn't use it, a year or so ago (which we never use either), and have never used, and will never use... so it's just been sitting in the back of the pantry.  I decided to make a pie, and then gift the pie to someone.  

So that is the back story to why I tried a different pastry recipe this year and why I actually made a caramel apple pie using a store bought can of pie filling - which I've never done before.  I got rid of the odd-can of filling AND tried a new recipe.  

The pie crust made with sour cream and baking powder was... interesting.  Different, but good enough that I made it two more times and made all three (3) pies with it this year.  There is a bit of tang to it from the sour cream, but it's good, flaky, yet durable and easy to work with.

Here is the apple pie I gifted after it was baked... and was well received, and I asked for feedback on the pie crust from.   
 

Going into the oven to bake....


Pie Crusts 2025

2 c flour (Used a mixture of AP and flour I ground myself from soft white wheatberries)
1/2 t salt
1/2 t baking powder
2 sticks butter, cold
1/2 c sour cream

Put the dry ingredients in a food processor bowl (or a plain mixing bowl if you wish to mix by hand).  Give a couple whirls to mix the dry.  Cut the butter into dices, pats or pieces.  For a food processor, add and pulse until it is a crumb mixture.  If by hand, smoosh and blend with your fingers (or use a pastry cutter) until it it is a crumb mixture and bits of butter are throughout the flour.  Add the sour cream last, mixing in by hand or give a couple pulse whirls in the food processor just until the dough comes together.  

Turn out on parchment paper sprinkled with a bit of flour.  Divide dough into 2 disks.  If it's still cold, you can roll out immediately, or just form a disk, wrap in plastic and chill in fridge until you are ready to roll.  Make a circle just a bit larger than your pie dish, and lift in.  Finish the edges however you wish.  Can be pre-baked for cold or custard pies, or freeze them until needed for filling pies - or fill immediately and bake.


Making the pies for Thanksgiving... a traditional pumpkin pie this year except made with part raw, organic honey to cut back on the dreaded corn syrup it traditionally uses.


And pecan... 


Which  you can leave like this after adding the pecans....  or you can quickly decorate the top with a design of whole pecans as well.


Print Friendly and PDF

12/20/23

Homemade Rolls for Thanksgiving, Christmas or just Any Day! (Buns, Rolls, Bread, Pizza Dough, Cinnamon Rolls)


I've posted this recipe on An American Housewife soooo many times.  But I've made it a thousand more than I've posted.  This is the one classic bread dough recipe that always works.  Never fails. Is forgiving on if I want to use a mixture of wheat blends for the flour, want to make it into rolls, buns, cinnamon rolls, garlic bread... anything.

The last time I made bread with it (which was just last week for our houseguests) I was thinking to myself that I've never NOT had this dough turn out.  And I've been making this recipe since around 2000 so... 20+ years now.

I have two classic, wonderful bread dough recipes that I use, but the other one is a little more involved as it uses scalded milk, melted butter, eggs and time for cooling (and 2 risings).  This one is my 'go to' because it's so easy and yet so forgiving and so good.

I typically make this in my KitchenAid stand mixer because it's so easily available (and the bread machine is in a cupboard).  But it comes together even quicker if you make the whole thing in a bread machine start to finish.


Classic White Dough
Can be used for bread, buns, cinnamon rolls, garlic bread, etc.

12 oz. warm water
1 1/2 t salt
2 T butter
4 - 4 1/2 c unbleached bread flour (or use all purpose if that is what you already have)
2 T dry milk powder
2 T sugar
1 3/4 t yeast, dry

Either place this in a bread machine (in the order your machine requires) and run on the dough setting or place into a large KitchenAid style mixer with a bread dough hook and knead/mix for about 5 minutes or use an electric mixer and place the water, salt, sugar and yeast in first;  let it set and proof for about 2 minutes and then add the butter, dry milk and flour.  You can also do this all by hand (if you have really strong arm muscles for the 10 minutes of kneading it will take.)

Typically I make this in my large KitchenAid stand mixer or my old, reliable bread machine.

Let your dough set for about 6-10 minutes after kneading to rest.  

Remove the dough from the machine or the mixer bowl.  FOR BUNS:  Divide it in half.  Then each half into half.  Then each of those halves into half.  This is how you will get fairly equal sized balls.  If making rolls to go with a meal divide them until you have golf ball sized balls.  If using for hamburger buns, stop dividing the dough when they are double that size so they will be large enough for the hamburger patties.  Roll in your floured hands and place on greased or parchment lined baking sheets.

Letting them rise will give you a taller fluffier bun but you can also bake them right away if you are pressed for time and don't mind a dense roll, which works for soups, etc if you really, really need these right away. 

Bake at 375F for approximately 15 minutes but this can be up to 22 minutes depending on the size buns you make, the thickness of your baking sheet and your oven. Bread takes about 27-35 minutes.  When they are golden brown remove them, brush the tops with butter for a softer bun and let cool to warm to serve as rolls or cool completely and serve as hamburger buns.


Because I've made this recipe a thousand times, I've posted it many, many times.  No sense reinventing the wheel, so here are some photos from another post of when it was made into bread. I also had a mixture of home-ground white and red wheat in these, so you can see the little bits of different shades of wheat grain in these.

The first raising

This recipe makes two loaves.  Form and put in a greased pan.

Let raise and then bake until done - about 30-35 minutes.


Print Friendly and PDF

11/7/22

Instant Pot Sugarfree and Low Carb Cinnamon Pumpkin Cake with Streusel Topping

A re-post from almost exactly one year ago!  


Instant Pot Cinnamon Pumpkin Cake with Streusel Topping

Crumb Topping:

1/2  c almond flour 
1 T good quality coconut flour
1/4 c Swerve Brown
1/4 c butter, soft
1/4 t cinnamon

Pumpkin Cake: 
 
1 c almond flour 
1/2 c natural sweetener(s) - I use Erythritol, monk fruit and some allulose mixed
1/4 c vanilla or unflavored whey protein powder (I use Isopure)
2 T coconut flour
2 t baking powder 
1/2 t cinnamon, ginger
dash of cloves and nutmeg
1/4 t salt 
2/3 cup pumpkin puree 
2 eggs
3 T butter, melted
1 t vanilla extract 
 
Glaze
1/4 - 1/3 cup powdered sweetener(s) - I use a mixture of 2-3 I keep in a container in the pantry
1 T cream cheese (optional)
2 tablespoon cream 
1/4 teaspoon vanilla extract 

Place the dry ingredients in a large bowl and whisk to combine. Put the eggs, pumpkin, butter and vanilla in another large bowl and mix until smooth. Stir the wet ingredients into the dry ingredients.

Grease a small cake, bundt or springform pan that fits inside your instant pot.  
 
Pour the batter into the pan.  To make it easier to pull your pan out of the instant pot, use a long piece of aluminum foil, folded over a few times and set the pan in the middle of it, pulling the sides up and over the pan so you can 'lift' it out easily when it's done. (Or if you are lucky enough to use a 'sling' now made for lifting pans out of your instant pot, use that! I don't have one though...)
 
Sprinkle the crumb topping over the batter.  Set a trivet in a 6-quart Instant Pot and pour in 1 cup of water. Place the pan on the trivet, seal the lid, press manual cook, and set the timer for 35 minutes. Let the pressure release naturally. 
 
Open lid and let cool in the instant pot for 10 minutes before removing.

Mix the glaze ingredients together in a small bowl or processor. Drizzle the glaze over the cooled cake.


 Making the crumb topping up


I might add about 1/4 c chopped pecans to this next time.... 


In the pan...


Sprinkled the crumb topping on - but also you can see the foil I use as a 'handle' to lower and raise the pan into the instant cooker.  I think some people cover the whole top with foil as well - I assume to keep the excess condensation from running back onto the cake?  If you are using a springform pan, you'll want to wrap the outside of the pan with foil for sure so no water seeps in through the seams of it.

In the instant pot (or in my case, the Cosori)

  Here is a photo of it 'done' and out of the instant pot, cooling on the stove.


 Ready for the glaze


You wouldn't have to put a glaze on it if you didn't want to.


It's just a basic glaze - sweeteners, a little cream cheese, a bit of cream and a dash of vanilla. 

Was great with coffee - and it freezes well.


Print Friendly and PDF

7/14/22

My all time, classic, never fails bread dough recipe


I mentioned on Instagram, the homemade rolls I made last night and sent with a 'meal package' to a family member.  It's the recipe I've posted many, many times on HousewifeBarbie.com but am putting it here again since I just mentioned it again on my story.

It's a classic, basic recipe that you can play with a bit and it will turn out for you.  I replace some of the white flour with wheat, I add some chives, some garlic or Italian Seasoning.  Sometimes I use the basic recipe as a base for cinnamon rolls or pizza dough (although I like my actual pizza dough recipe better, I have used this one many times as it's just so easy to whip up).

You can make this in your bread machine, completely knead by hand or (as I often do) whip it up in my stand mixer with a bread dough hook.

Brushed with butter after they come out of the oven?  Soft, buttery and oh so good.
 

This particular cut and paste is from my posting in 2009.


Classic White Bread Dough 

  • 12 oz. water 
  • 1 1/2 t salt 
  • 2 T butter 
  • 4 c bread flour or all purpose flour 
  • 2-3 T dry milk (I pour it in but never measure) 
  • 2 T sugar 
  • 1 3/4 t dry yeast (although I don't always measure this either as mine comes from a large jar). One package is 2 1/4 t though so leave about a teaspoon and it's about right. 

Machine:  Place into your bread machine in order listed (water, salt butter, flour, milk, sugar, yeast) unless of course your machine has a different order needed to achieve results (some make you do the dry first). 

I put them in this order in my KitchenAid mixer pulse it to mix for the first minute or so and then left it on the lowest level to knead for about 10 minutes.  Leave it to raise, punch it down, make into bread, rolls, buns, whatever; let it rise again and bake.

For bread it makes 2 loaves - bake about 25-30 minutes at 350.   Buns are usually about 25-27 minutes.


Print Friendly and PDF

7/3/22

Cherry Dessert Trifle Recipe: Grandma's Vintage Cherry Dessert Recipe Meets White Cake and Becomes a Trifle


I love to look 'back' and see what I was doing on certain days in years past.  I did this when I was younger and kept diaries, I've done this with old calendars I've tucked into an office drawer or storage box and I do it with recipes as well.

It is a holiday weekend here in the States but I'm not out celebrating... I'm home.   I'm waiting on a refrigerator delivery.  If you follow me on Instagram, then you already know that story.  They didn't show up yesterday (well, they paused for 10 seconds in the street in front of the house and drove off, claiming no one was home so they didn't have to deliver).   After some phone calls they are supposed to deliver (again) today.  

Sitting here this morning, enjoying morning coffee, I briefly wondered what I was doing 10 years ago and what I was making.  I clicked back to 2012 and saw a yummy dessert I had made.  I blended my Grandma's Cherry Dessert recipe with an 'extra' white cake I had made and came up with this dessert. 

Cherry Dessert Trifle


______________________________________________


Original Post:  July, 2012

Just because I used a from-scratch white cake doesn't mean you have to.  Simple use a white cake of your choice.  You can also play with the filling.  Blueberry, cherry, strawberry...  whatever you wish.  I particularly like cherry pie filling with this and although I do sometimes make my own, I had a can of cherry pie filling in our camping supplies and it was the perfect 'quick' filling I needed.

Cherry Dessert Trifle

1 white cake of your choice
1 can cherry pie filling
1/2 cup (approximate) graham cracker crumbs
2 T melted butter
2 cups whipped cream (you could use spray whipped cream in a can)
1 c heavy whipping cream (or use 2 cups Cool Whip)
2 T sugar
1 package cream cheese

Cut the cake into cubes.  This is sometimes easier if it's frozen first.  But they don't have to be 'pretty' as no one will see them. Place 1 cup of the whipped cream in the bottom of a glass dish.  Top with the can of cherry pie filling and push down a bit into the crevices of the bowl between the cake squares.  Smooth evenly on top.  Mash the graham crumbs with the melted butter and place over the cherry layer.  Mix the whipping cream with the sugar and cream cheese.  Beat smooth.  Spread this over the graham layer.  Top with the last cup of whipped cream.  Add a cherry or strawberry or blueberry for garnish to compliment your filling.  Chill at least 2 hours if you can before serving but up to 6-8 hours.


I think this tastes best with cherry filling

I left off the melted butter this time but it was too powdery. Add the butter to the graham crumbs.

Mixing the cream, sugar and the cream cheese.  I love this layer.


Print Friendly and PDF

6/18/22

An American Housewife: Keto Coconut Custard Cream Pie - (including the pie crust - with a secret ingredient making it simple)


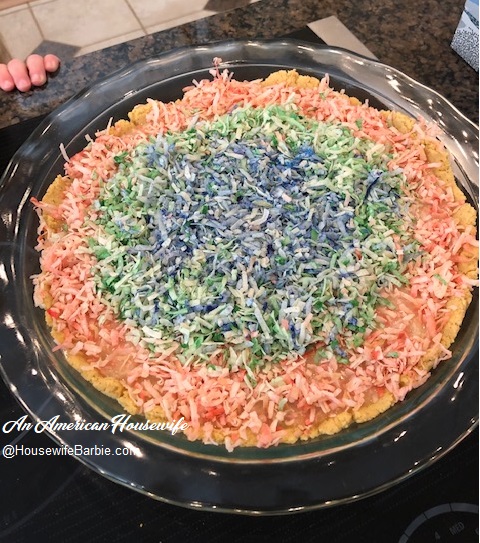
I had a few reasons to make this pie this weekend.  The first being to use up rainbow colored coconut sprinkles in my pantry that were taking up space for months and months now (since I don't cook with coconut flakes often).  The second was to do a trial run using the pancake mix as a pie crust. 

I have a Birch Benders Keto pancake mix in the freezer that basically just lives there rent free (also taking up valuable space) because frankly, I don't really care for pancakes made from it.  I won't waste food though so when I try a keto or sugarfree/low carb food I'm not thrilled with, I find other ways to use it up.  

I was going to make the typical almond flour crust for this but saw the pancake mix and decided to try it.  It worked great!  It was seriously perfect as a pie crust and didn't puff up at all during baking, and wasn't in the least bit pancake like.  I don't care for it as a pancake mix, but I'm happy with using it as a pie crust mix now.


Keto Coconut Pie

Pie Crust:
1 cup Birch Benders Keto Pancake Mix
1 egg
1/4 c softened butter

Filling:
4 eggs
2/3 c natural sweetener of choice (like erythritol/monkfruit mixtures)
1/2 t vanilla
1 t coconut extract
1/4 t salt
1 can Thai Coconut Milk (13.5 oz. can)
1 t xanthan or other keto thickener
3/4 c unsweetened coconut flakes


Mix the keto piecrust mix with the single egg and softened butter in a bowl.  Mix well until it is completely mixed and forms a ball of dough.  Spread and press into a pie plate.  Bake at 350 for approximately 12-15 minutes.  Remove and let cool while you make the filling.

Mix the eggs, sweetener, vanilla and coconut extracts and salt in a bowl, beating well.  

In a small saucepan on the stove, whisk about 1/3 cup of the coconut milk with the thickener.  Stir over medium heat until it starts to thicken.  Slowly drizzle this over the egg mixture in your bowl.  Pour it all back into your saucepan and heat, stirring constantly for another 2-3 minutes, then pour into your pie shell.

Top with the coconut flakes.  Bake at 350 for 35 minutes or until the custard center is 'set' and hardly jiggles when you wiggle the pie plate.  Remove and cool completely on a wire rack.  It will set up more as it cools.


I didn't care about how 'pretty' the pie crust was, so I just pressed it in and baked it quickly.


The filling, ready to pour into the crust


The custard filling


My coconut flakes are multi-colored as I used them for sugarfree 'sprinkles' on cookies previously.


A rainbow colored coconut pie


This is before it went into the oven.  It turned golden brown on parts after baking (see top photo).


Print Friendly and PDF

11/19/21

Fall: Pumpkin Time... this one is another pumpkin cake with streusel topping


Crumb Topping:

1/2  c almond flour 
1 T good quality coconut flour
1/4 c Swerve Brown
1/4 c butter, soft
1/4 t cinnamon

Pumpkin Cake: 
 
1 c almond flour 
1/2 c natural sweetener(s) - I use Erythritol, monk fruit and some allulose mixed
1/4 c vanilla or unflavored whey protein powder (I use Isopure)
2 T coconut flour
2 t baking powder 
1/2 t cinnamon, ginger
dash of cloves and nutmeg
1/4 t salt 
2/3 cup pumpkin puree 
2 eggs
3 T butter, melted
1 t vanilla extract 
 
Glaze
1/4 - 1/3 cup powdered sweetener(s) - I use a mixture of 2-3 I keep in a container in the pantry
1 T cream cheese (optional)
2 tablespoon cream 
1/4 teaspoon vanilla extract 

Place the dry ingredients in a large bowl and whisk to combine. Put the eggs, pumpkin, butter and vanilla in another large bowl and mix until smooth. Stir the wet ingredients into the dry ingredients.

Grease a small cake, bundt or springform pan that fits inside your instant pot.  
 
Pour the batter into the pan.  To make it easier to pull your pan out of the instant pot, use a long piece of aluminum foil, folded over a few times and set the pan in the middle of it, pulling the sides up and over the pan so you can 'lift' it out easily when it's done. (Or if you are lucky enough to use a 'sling' now made for lifting pans out of your instant pot, use that! I don't have one though...)
 
Sprinkle the crumb topping over the batter.  Set a trivet in a 6-quart Instant Pot and pour in 1 cup of water. Place the pan on the trivet, seal the lid, press manual cook, and set the timer for 35 minutes. Let the pressure release naturally. 
 
Open lid and let cool in the instant pot for 10 minutes before removing.

Mix the glaze ingredients together in a small bowl or processor. Drizzle the glaze over the cooled cake.


 Making the crumb topping up


I might add about 1/4 c chopped pecans to this next time.... 


In the pan...


Sprinkled the crumb topping on - but also you can see the foil I use as a 'handle' to lower and raise the pan into the instant cooker.  I think some people cover the whole top with foil as well - I assume to keep the excess condensation from running back onto the cake?  If you are using a springform pan, you'll want to wrap the outside of the pan with foil for sure so no water seeps in through the seams of it.

In the instant pot (or in my case, the Cosori)

  Here is a photo of it 'done' and out of the instant pot, cooling on the stove.


 Ready for the glaze


You wouldn't have to put a glaze on it if you didn't want to.


It's just a basic glaze - sweeteners, a little cream cheese, a bit of cream and a dash of vanilla. 

Was great with coffee - and it freezes well.


Print Friendly and PDF