Pages

6/25/17

Homemade Low Carb Bagels!


This makes an incredible little 'bagel' but also works as a great base for pizza or as a bread for sandwiches.  Tonight for dinner I topped with bacon and avocado.  Yum!


Low Carb Bagels

1 1/2 c (heaped a little) almond flour - fine grain, blanched
1 t xanthan gum
1 T baking powder
2 1/2 c shredded mozzarella cheese
2 oz. cream cheese
2 eggs
Egg whites or water for brushing the tops
toppings - dried onion, poppy seed etc.

In a large mixing bowl place the almond flour, xanthan gum and baking powder.  Mix by hand or mixer just to blend.  Beat the 2 eggs briefly and add them to the bowl.  Do not mix.

In a microwave safe bowl place the mozzarella cheese and cream cheese.  Microwave until the cheese is melted, stirring once.  This can take 2-3 minutes depending on your microwave.  Pour the cheese into the bowl of almond flour mixture and eggs.  Using a bread dough hook, mix and knead until it forms a dough, scraping down the sides often to help blend.  Divide the dough into 8 pieces.

Roll each piece into a short rope and form a circle like a bagel shape.  Place on a parchment lined baking sheet.  Brush the dough with the egg white or water.  Sprinkle on a favorite topping if you are using.  I used poppy seeds and crumbled dehydrated onion.  Bake at 400 for approximately 18 minutes.  Let cool a few minutes and remove to a wire rack to cool completely (and prevent the bottoms from becoming soggy if left on parchment.)


Print Friendly and PDF

6/22/17

Homemade Orange Breakfast Rolls

Originally posted in 2015

The picture above is rolls in the pan before rising or baking.

It's no secret I'm not a big fan of cinnamon rolls - but I do make really, really yummy ones!  I'm not a fan of breakfast in general, but these rolls are so tempting even I will eat one!  Picture a Dreamcicle or a Orange Julius drink in a breakfast roll.


Orange Breakfast Rolls

Dough: You can use a loaf of store bought dough, thaw and roll out to a rectangle approximately 10X15 or make a simple dough like this one;

1 pk. dry yeast (about 2 1/4 t)
3/4 c warm water
1/3 c sugar
1 t salt
1/3 c oil
3 eggs, beaten
1/4 c evaporated milk
4 - 4 1/2 c flour
Real butter, soft
Orange juice concentrate
White sugar
Dried orange peel


Dissolve yeast in the water in a bowl.  Add the rest of the ingredients and knead either by hand or with the dough hook of your electric mixer.  Use more or less flour so the dough is the right consistency and not too sticky or wet.  Knead about 5 minutes.  Place in a greased bowl, cover and let raise until doubled.  Punch down.  Roll out on parchment paper or a floured surface to form a large rectangle.  Aim for about 16-18 inches across and 12-15 wide.

Spread with real butter.
Drizzle with orange juice concentrate.
Spread liberally with white granulated sugar.
Sprinkle with dried orange peel.

Roll up the long way.  Slice into 1 inch slices and place in a heavily greased baking pan or muffin tin.  I used a 'lasagna' pan which is slightly larger than the traditional 13X9" so I made 16 of them (4 across, 4 down).  You could make it into 12 - 16 depending on your pan and how thick you want them.  Place them into the pan.  Cover and let raise in a warm place until double in size (about 3 hours).  Bake at 350 degrees about 15-20 minutes until center rolls are done.  If you want to make them ahead and freeze; let rise about 1 hour and then cover and place in the deep freeze.  When you want to use them, remove from the freezer, let thaw and then let them raise about 1-2 hours past thawing until they double in size.  Bake as directed.

Let them cool a bit and then cover with a simple powdered sugar glaze.
One idea is this;

1 stick butter
4 c powdered sugar
1-2 t dried orange zest
2 T orange juice concentrate

Mix and spread on warm but cooled rolls.


Put into a greased bowl, cover and let rise

After rising and punching down, roll out to a large rectangle and spread with real butter
Sprinkled with dried orange peel

Drizzle with as much or little orange juice concentrate as you wish
 
Rolled up lengthwise and ready to slice into approximately 16 one inch slices to let raise and bake


Print Friendly and PDF

6/18/17

Zapple Pie - Incredible Zucchini Apple Pie (.... Made from Zucchini But You'd Never Know It!)

Although I do have a "print friendly" button option at the end of every post, for the most part when I print off my own recipes I choose to highlight and copy it to a word perfect blank page and print it off.   I've had this site up since 2006 and over the years I kept my eye out for a fun recipe widget but the only ones ever available were for websites on WordPress.  Mine is on Blogger.  And I don't really like WordPress (ok, I hate it) so for all the things about Blogger I can't stand, it's easier to live with than WordPress.  So... with all that background babble, there is one recipe widget for Blogger that I've found that lines up the recipe in a nice way for readers to print... but boy is it a pain for me on my end.

I like to just type the recipe quickly on my site and be done with it.  But I know a lot of people like the little recipe widgets.  So this post is actually a test post.  I decided to do one 'test' post using a recipe card widget and see if I love it enough to go through the hassle of using one every single time...  or not.

I have chosen my zucchini apple pie recipe as the test recipe since this was first posted back in 2006 and it's about time it sees another run.


print recipe

Zapple Pie - Faux Apple Pie Made from Zucchini

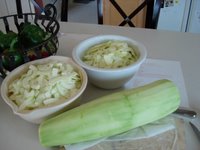
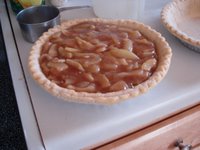
In 2005 and 2006 I had so many zucchini's in my garden I started to make EVERYTHING out of zucchini.  This is SO good and SO like apple pie that it became a family favorite.  Most people cannot tell the difference between this and a 'real' apple pie.

Ingredients
  • 6 cups (approx) peeled, scooped out, quartered and thinly sliced zucchini
  • 1 cup (heaping) sugar or granulated sweetener of choice*
  • 1 t vanilla
  • 4 T butter, real
  • 2 t cinnamon
  • 1/4 t (scant) nutmeg
  • 1/3 cup lemon juice (plus water to make 1/2 cup)
  • 1/3 cup flour
  • pie shell, plus a top crust
Instructions

Preheat Oven: 450.

In a saucepan over medium heat combine the zucchini, sugar, butter, vanilla, cinnamon and nutmeg. Add 2 T lemon juice. Stir to mix and cook until tender, about 10 minutes. Mix the rest of the lemon juice and water with the flour in a cup and stir into the zucchini mixture to thicken. Remove from heat.

Spoon the zucchini filling into the pie shell. Place the top crust on and crimp the edges to seal. Put the pie into the hot oven and close the door. Then reduce the heat to 350. Bake for 25-30 minutes until the top is browned and the filling is bubbling.

*I like to use a mixture of part brown and part white sugar or natural sweetener substitute.  About 3/4 white and 1/4 brown.


http://photos1.blogger.com/blogger/309/492/1600/DSC02234.jpg


Print Friendly and PDF

The Best Homemade Vanilla Pudding (Vanilla Custard Actually) - and SUGAR FREE VANILLA PUDDING - CUSTARD


Homemade Vanilla Pudding


Homemade Vanilla Custard  (Vanilla Pudding)

1/2 c Truvia natural sweetener or a semi-heaping 3/4 cups sugar
3 T cornstarch, heaping
Dash of salt
3 1/2 c milk of choice 
4 egg yolks, beaten and in a small bowl
15 drops liquid natural sweetener (optional but I like the flavor of mixing 2-3 natural sweeteners)
1 T vanilla
1 T butter

In a saucepan on the stove whisk together the dry Truvia sweetener or whatever granulated natural sweetener you are using as well as a dash of salt.  Turn the burner up to medium and start to pour in the milk while whisking.  Bring it to a simmer and then turn down a bit; remove one cup of the liquid.  Drizzle (pour slowly) this liquid into the 4 beaten egg yolks, whisking.  Now drizzle (pour slowly) this mixture back into the pan of milk/pudding on the stove while whisking.  Turn the heat back up to medium and add the liquid sweetener drops at this time if you are choosing to use them.  If you are not using them, you may want to use a little more Truvia, Just Like Sugar or other sweetener to make up for it; it's all up to you and how sweet you like your pudding and custards.

As soon as the mixture starts to slowly boil, turn the heat back down to simmer and let it cook while stirring the whole time, until it becomes thick.  When it's nice and thick (and a texture of 'pudding') you can remove it from the heat and stir or whisk in your vanilla and a pat of butter.  Taste test.  Pour into a large serving dish and place a layer of saran or plastic wrap on the top to avoid a skin forming.  Let it set on the counter for about 20 minutes to cool just a little before placing it into your refrigerator to chill completely cold.  (I also scoop out 1 cup at this time to a bowl... and eat it warm!  LOVE fresh, warm, vanilla custard or pudding).

*NOTE*  You can make this into banana pudding by adding 2 sliced bananas to it before placing the plastic wrap over the bowl.  Be sure they are either on the bottom of the serving dish before pouring the pudding in, or are gently stirred in so they are not touching the air as the air will make them turn brown.


Whisk the dry sweetener or sugar with the corn starch

Add the milk and start to heat while whisking or stirring until it starts to get thick

Mix about 1 cup of the hot liquid into your egg yolks before returning this mixture to your pan

Whisk the egg and milk mixture back in, raise the heat and continue mixing

After it gets nice and thick remove from heat and stir or whisk in the vanilla and a pat of real butter for delicious flavor

Thick, smooth and so delicious!

Mmm.  Homemade Vanilla Custard


Print Friendly and PDF

6/12/17

How to make homemade mozzarella cheese - fairly quick and easy - with lots of photos showing you the steps!


Having this website since 2006, there are many foods I make regularly that have been posted before - and although I do repost some of them and sometimes take new photos and post again just to keep the site active with new posts, most of the time I won't do that - because some recipes get posted 3 or 4 (or 5?)  times over the years.

Today I have to make more homemade mozzarella cheese so instead of reinventing the wheel, it's much easier to repost the recipe.  So, here is one of today's projects - one of about 20 things on my to-do list!  Luckily this is made fairly quickly so I can get on to the other daily tasks. 


Homemade Mozzarella

1 gallon whole milk - not 'ultra' pasteurized
1 t citric acid - dissolved in 1/4 c cold water
1/4 t lipase - dissolved in 1/4 c cold water
1/4 t liquid rennet (or 1/4 of a tablet cheese making rennet) - dissolved in 1/4 c cold water
1 t non-iodized salt (use cheese salt, sea salt, kosher salt, ice cream salt, Himalayan salt, etc.)

Pour the milk into a clean stainless steel pot.
Heat to 55 degrees.
Add lipase water mixture and stir slowly.
Add Citric Acid water mixture and stir slowly.
Heat slowly to 90 degrees. Remove from heat.
Add the rennet water mixture, stir slowly but stir well for 10-20 seconds.
Cover and let stand 5-10 minutes.
During this time the curd should separate from the whey and become a firm jello like layer on top.
After 5-10 minutes check for a clean break with a knife or frosting spatula.
Cut a checkerboard pattern across the curd to cut it into 1 inch cubes.
Swirl the pot a little and put back on heat.
Slowly heat to 105 degrees.  Remove from heat.
Swirl the pan again (no need to stir, but you can if you must).
Slowly spoon out the curds with a slotted metal spoon into a colander sitting inside a large bowl to catch the whey - or if you only have a wire strainer, line it with cheesecloth or a gauzy fabric so the curds don't get stuck in the wires.
Pour the last bit of the curds into the cloth from the pan.
Set the whey to the side, you don't need it for this recipe any longer.
Gently press on the curd to press out a bit more whey liquid.
Place in a microwaveable bowl.
Microwave 1 minute.
Drain again.
Knead and press to get more whey out.
Drain.
Microwave 35 seconds.
Knead and press again and drain.
Add your salt.
Microwave 20-30 seconds more and continue to knead and pull.
You can wear food safe heat resistant gloves if you have them as you are microwaving to get the cheese hot so it will stretch - and you will kind of burn your hands a bit.  It's hot!
You are hoping to be able to stretch it like taffy.
If it breaks more like bread dough, it's not hot enough.  Heat again and stretch again.
If you've reheated 3 times and it's still not quite as stretchy as you would like, that's ok, it will still look and taste great.
Form whatever shape you want (twist or balls, etc.) and plunge them into a bowl of ice water for 5 minutes.
Remove, wrap and refrigerate.


HINTS AND HELPS


You need rennet - liquid or tablet (either vegetable or animal).

Do not use the Junket brand in the grocery store - it's made for custard and you want a thicker curd than that. Get real rennet or you may not end up with a good curd.

Citric acid and lipase - Lipase is kind of optional; some people don't use it, but it adds flavor.


Heat your milk S L O W L Y so you don't scorch the bottom and you never accidentally boil it.


When you mix your citric acid, lipase and rennet with water, do NOT use chlorinated water, as chlorine kills the rennet.  If you do use tap water (which is chlorinated), some people add a bit of milk to it to neutralize it first. I have made it that way and made it without adding milk. I've not found a big difference either way but I've had great results from adding 1/4 t calcium chloride dissolved in 1/4 c water.  Works either way but much better curds with the calcium chloride.


  Have a thermometer.  You HAVE to know the correct temperature of your milk.  Some people have a digital - I bought a super cheapy on Amazon, calibrated it right before starting so I knew it was on target.  


 This is the "clean break" you look for after adding the rennet.
When you insert a knife or icing spatula you can see it is thick, like jello and breaks away from the liquid whey under it.


Cutting across, turning the pan and cutting across the other way gives you cubes.
This is giving the curds more surface area so the whey can separate from it.


Heating to 105 degrees before removing from the heat and starting to drain and knead.


After you heat to 105 and remove from heat, you can let the curds sit for 5 minutes.
During this time have your colander or strainer ready over a bowl to catch whey.
Have your cheese salt ready.  You can also get your bowl of ice water ready.


Starting to remove the curds from the whey.


Pour the last of the curds in.  The yellow liquid is the whey you will be pressing out gently and draining off.


After the 1 minute microwave to heat it, press and drain.


This is after the second microwave, knead and drain.
You can see it all comes together.
Keep heating and pulling until it pulls like taffy.
Yep, it's hot - you'll get burned hands if you don't have food safe gloves.  I didn't own any for the first few times I made cheese and it really burns your hands and it's hard to get it hot enough to 'pull' when you can't touch it.
I finally ordered some from Amazon and I'm so happy I finally caved and bought them.


Shape into whatever shape you wish.  I do balls.  Plunge in ice water 5 minutes.


SO GOOD!  The salt brings out the flavor so you don't need anything else, but you CAN add whatever herbs you wish to it.  (Basil, chives, etc.)


Print Friendly and PDF

6/8/17

Homemade Pizza Sauce and Links to Pizza Baking Stones Available Through Amazon


Pizza Sauce

Olive oil
Butter
1/2 c chopped, yellow onion
1/4 c chopped celery
2 t fresh minced garlic
6 oz. can tomato paste
1 c fresh, diced tomatoes or use diced, canned tomatoes
1 t dried basil
1 t dried oregano
1 t fennel
1/2 t salt
1/4 t pepper
1 t honey or sugar

Cook the celery and onions in a bit of butter and olive oil in a hot pan til tender.  Add the garlic.  Cook about 1 minute so you don't burn the garlic.  Add the tomato paste and diced tomatoes.  Put into a food processor and pulse for a few seconds.  Put back in the saucepan and add the rest of the ingredients.  Simmer slowly for about 20-30 minutes.  Makes about 2 medium to large pizzas.


Print Friendly and PDF

Easy and Quick: DRY YOUR OWN BASIL FROM THE GARDEN (and use the microwave!)


I'm reposting this because it's been awhile and I just made some of this again this morning.  I was making homemade pizza sauce and spaghetti sauce today and used up the last of my homegrown and chopped dried basil.  Luckily my daughter has a pot of it growing on our deck because it's just so easy to grow so it's another one of her 'fun' plants to plant.  I grabbed the leaves off two complete stems, had them microwave dried in less than 2 minutes and ground in one more minute.  My basil container replenished for the next recipe... in under 5 minutes. 

(And the taste and smell of fresh homegrown basil, dried and ground beats the pants off old store bought any day!)


Rinsed, fresh picked basil from the garden.  Placed on a layer of paper towel.
I laid another paper towel on top and microwaved for 1 minute. Checked, added another 30 seconds. Then they were dry!
Depending on your microwave it may take more or less time but they were completely dried in 90 seconds.
I opted to chop this batch and put them into my Basil spice container. Fresh and homegrown!
  

Print Friendly and PDF

6/6/17

Shocking: How much sugar are you eating without knowing it? Sugar content in fruit and beverages might surprise you!

Are you watching how much sugar you are eating?  Whether it's natural or not, you might be surprised at the amount of sugar in foods. 

When I saw these photos on the Sugar Stacks website, I thought it was a great, easy way to get a general idea of the sugar in foods.  They look at the total sugar content and because they want to keep it as simple to understand as possible, they don't differentiate between all the various kinds of sugars;  they just want you to start thinking about the sugar content of foods and how much sugar you might be eating all day without realizing it.   I love this!  And if you are avoiding sugar due to health reasons or follow a low carb, sugar free way of eating, you already know there are certain fruits and vegetables that are better choices than others.  You can visit their site to see even more food choices.


Print Friendly and PDF

6/4/17

LOW CARB PIE CRUST


An American Housewife is where I like to keep collected recipes so I can find them quick and easy, as well share them with my young adult kids.  It makes me crazy when I know I have a recipe posted - sometimes numerous times over the years - but the search box provided  by Google does NOT FIND IT.  Or google had not indexed my pages correctly so it doesn't show up.  Makes me so frustrated! 

A good example of this is just a few minutes ago I needed to find my low carb pie crust.  It took me quite a few clicks to find it and darnit - that's just not cool.  SO I am posting here, again, so Google will index this page and bring it up on my search quickly next time.  Because there WILL be a next time.  This is my go-to low carb pie crust and I plan to make a Key Lime Pie with it this week.  


Low Carb, Flour-Free Pie Crust

1 c Almond Flour
4 T Hodgson Mill Vital Wheat Gluten
2 t xanthan gum
2 T Nature's Best Isopure Unflavored Whey Protein Powder
1 t baking powder
dash of salt
4 T cold butter, cut into small pieces
2 egg yolks
2 T cold water

Combine the dry ingredients in a bowl with a whisk.  Cut in the butter with your fingers and work it in until it's coarse.  Beat the egg yolks with cold water and blend it into the dry ingredients.  When it forms a ball, remove, place on plastic wrap, form a disk, wrap and chill.  Roll out the pie crust (between two pieces of parchment because it's sticky) and place in a large, deep dish pan pan.  Mine wouldn't transfer easily so I pieced it together in the pan and pressed it all into place.  Bake at 350 until golden brown and firm in the center.  Use as you would any pie crust.


Dry ingredients in a bowl


Starting to mix it after the butter is added


Wrap in plastic wrap to chill


Pressed into a deep dish pie pan


Baked to perfection!
Print Friendly and PDF