Showing posts with label Household. Show all posts

3/7/22

How To Clean Pampered Chef Baking Stones: (Photos of my 17+ year old stones.... bought in 2005 and used continuously - today is March/2022)

Before and After... these are also 17 years old by now (MANY cleanings)


If you've been a reader of An American Housewife for a few years, then you'll know that every once in a while I do an update on my stoneware - or how I 'clean' it I should say.  I've also added another brand of stoneware a few years ago so I have 3 baking stones now and they all three (3) live in my oven at all times, full time.  

Yes - even when I'm not baking on them, they are still in the oven full time - mostly just hanging out on the lower racks while 'whatever' else bakes.  They also sometimes do double duty as a 'drip pan' when cheese, grease or apple pie filling, etc. drips down from whatever it is I'm baking.

A well seasoned baking stone is dark brown.  This is a good thing because when they are 'loved' and dark brown, they are non-stick.  And even though they are cleaned by scraping them with the little plastic scrappers, and a quick hot water scrub if needed; once in a while you actually want to 'clean' them.  

I got my stones in 2005(Yes, the  PC baking stones in these photos are from 2005)

By 2007 they were beautiful dark brown and seasoned well.  One day in 2007 I decided spur-of-the-moment to clean the ovens and flipped the self-cleaning feature on while I was crazy-busy doing other things.   

I wrote about it in an old post here: 2007 Post (https://www.housewifebarbie.com/2007/10/how-to-clean-pampered-chef-stoneware.html)

The end result was beautifully clean stoneware.

That's how they've been cleaned ever since.  Literally... since 2007 (and today is March of 2022).

Since 2007, whenever I clean my oven I leave 2 or 3 of the pans in and let them get clean as well.  Note it does take the 'shiny' off the metal racks when you leave them in, but if you actually use your oven and cook with it, you won't have sparkly, shiny 'new' looking racks after a little while anyway.  I sometimes just put a tiny amount of WD-40 on a paper towels and lightly run it over the side of the racks to make them slide nice again.

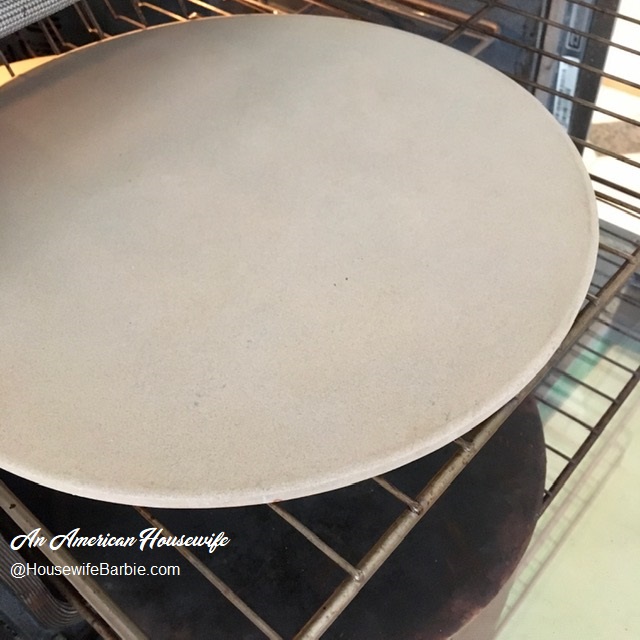
Here is a well seasoned, well used, loved stone.  This is pretty much what they all look like after awhile.


And here is what they come out of the oven looking like... ready to be brushed lightly with a towel to get remnants of ash off and then immediately ready for use again.  

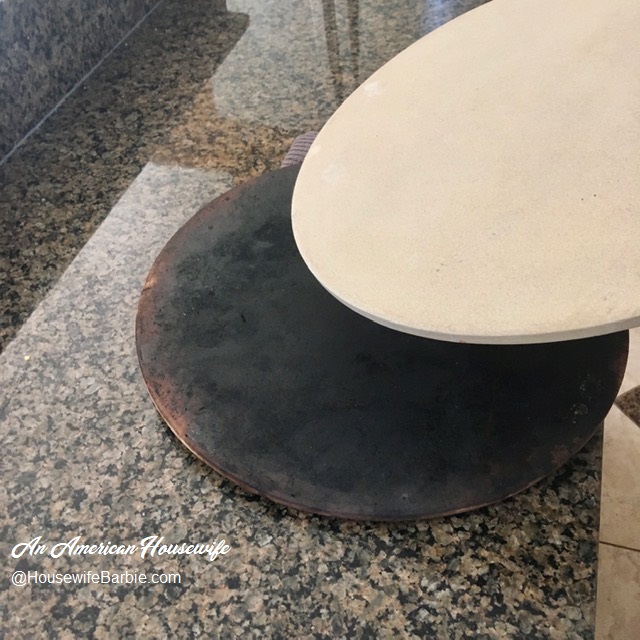
The 'clean' one (with a light bit of gray ash to be gently blown or brushed away) is on top and I placed a regular 'before' stone below it to show the difference of "before and after" simply letting them in the oven during a regular self-cleaning cycle.


Print Friendly and PDF

2/23/22

What 6 large green peppers look like after dehydrating them! Crazy isn't it? - Prep and Pantry work going on right now in the American Housewife Household

Busy!  Not much being posted lately by way of recipes, but a busy toddler, a few unexpected things in 'life' we're dealing with and of course the state of things being what they are right now, I'm also trying to do some canning, dehydrating and 'stocking up' just in case.

If you follow me on Instagram you might have already seen this, but I just love seeing the results of dehydrating foods!  

This is the dried green pepper bits from... SIX (6) large green bell peppers!  

It's so awesome!  After drying, each 1/4 cup of diced pepper basically equals about 1 fresh. 

I store bell peppers in various ways, but for our family, I do a few bags of green peppers frozen, and the rest I dry as I tend to use them in soups and stews, which are perfect for dehydrated (or freeze dried). 

Red and yellow peppers are mostly cut into strips and food sealed and frozen as I use them in stir-fry, and fajita's, etc.  It's super easy to cut them into diced if needed as well from frozen state.

(Just because we are on topic - as a side note, I buy containers of sliced mushrooms and immediately put them into the freezer as they are unless I am using them that night or the next day.   I throw them into soups, stews, the pan to saute', etc. straight from frozen state as well).


Print Friendly and PDF

9/8/21

From my Instagram: I've been dehydrating again... Dehydrating Lime Peels, Whole Limes and Cabbage (UPDATED)

THERE IS A SMALL UPDATE ON MY DEHYDRATOR AT THE END OF THE POST (1/22) 

I (like most all of you) are so so so busy lately that I never find the time to pop in to post - even though I obviously cook and bake daily.  Three or more times a day.  But I often don't bother to take photos - or I start to take them but forget to take a 'finished' product picture - or I do take photos and then they live in my computer files and never see the light of day because.... too busy.

A couple weeks ago I was doing some dehydrating.  I had limes leftover from a weekend of guests, and I didn't want them to go bad before I could get around to using them.  So, I juiced the limes to get the juice for my favorite chicken marinade and then used the peel to get a nice little bottle of dried lime peel.  I like to keep dried lemon peel, lime peel and orange peel on hand for baking and cooking.

I also had extra cabbage on hand - which lasts forever - so I didn't need to hurry really, but there have been times when I wanted cabbage and we didn't have any so I decided to dehydrate a head of it so I'd have it ready in the pantry for beef stew and boiled cabbage, etc.


There really is no recipe for drying cabbage.

You don't have to blanche it or do anything to prep it. 
Just slice into thin strips or small pieces, place them on your dehydrator trays, and let them dry until the pieces are dry, small and ready to put into a mason jar or container of your choice.


For the limes I used half of them to make dried lime peels for the pantry and then used the rest to dry 'whole' and grind up into dried lime powder.  You can buy dried lime powder and dried lime slices online but they are sooo simple to make yourself!  

For the dried peel, just peel the zest off your lime (the green part) and lay them out to dry on your tray.  When they are brittle, you can pop them into your container, or chop them a bit first, or spin them in a small food processor first to chop them quick and easy.

To do the lime slices, just wash your limes well and slice thin.
Lay the slices out and dry until brittle.
They will turn quite dark.
You can use them as is to cook with (laid under chicken and fish is nice!) but I grind mine up and use the dried lime powder in marinades.


I just reuse old spice bottles and repurpose them to whatever I need at the time.
This one now holds dried lime zest.


This is a close up of whole dried limes ground into powder.


In 2022 I upgraded my dehydrator to a larger, rectangle version with shelves and adjustable temperature.  Any dehydrator will do, but I do find the upgrade is easier and better to adjust the temperature so I get the colors of my goods to stay nice and bright.


Print Friendly and PDF

7/26/18

I finally decided on what cherry pitter to buy....


As much as I like to eat cherries, and as many years as we've been married, and as much baking and cooking that I do, you would think I would own a whole bunch of awesome little fancy kitchen do-dads.  And I don't.  As a matter of fact I'm the queen of improvising... because I've never had money to buy fancy do-dads so I always made do without.  I even used a little $8 Hamilton Beach mixer for the first 12 or 13 years of marriage - even when I was making upwards of 1000 cookies each holiday season and doing baking and cooking daily for my family and friends.

But this past week I finally invested in a cherry pitter!  I normally just use a paring knife and cut around the pit if I'm using cherries in a recipe.  I was placing an order on Amazon for something or other (can't remember what it was) but I did a quick search that night of cherry pitters - found one I thought would work well for me and ordered it.  And?  YES I LIKE IT!

Ultimately I'd like to try two more; one of which is a 'multiple' cherry pitter that does a number of them at once; but for starters I got this single pitter.  After I got used to how it works, I found it was quick and simple - I went through an entire bowl of cherries in no time!


The one I chose is the one that looks like a tulip - or a flower.  It's the 'blossom' style: MSC International Joie Blossom Cherry Pitter.  You simply drop your cherry in, press the plunger, let it spring back and then give it a quarter turn to release the spring to 'dump' the cherry into your bowl or container.


A close up of it in action...


Here is what it looks like when there isn't a cherry in it - and this is a good photo to show you why I chose it.  Because the other similar 'plunger' style pitters didn't have the space this one does for my fingers!  Do you see how the petals of the flower blossom curve out?  They gave more space than the shorter and smaller versions of plunger style cherry pitters and I knew that if I was doing an entire bowl of fruit, my fingers would be more likely to slip off as there just wasn't enough to 'grab'.


The only tricky thing to remember is to line up the little notches inside so your plunger will go down through the cherry and then back up.  If they aren't lined up it will block it or lock it.  This is actually how you store it when not in use as well; you push it down, give it a slight turn so the notches don't line up and then it stays in the plunged position for storing in the drawer.


Cherries that have been pitted - quickly and easily!


Ready to be made into my pie filling.... (for a Cherry Crepe Cake - hopefully I'll get around to posting about it soon but... life.)


Print Friendly and PDF

6/12/18

Product Review: Rustic Bedding! Bear and Moose Lodge Themed Quilt Set


Our family has lived all over the United States and enjoyed seeing, adapting and living the differences in states and regions when it comes to foods, fads, fashions, slang and accents; even things like housing structures, buildings, landscaping and decorating.

When I was asked to review the Black Bear Lodge Quilt Set on my website, I smiled as memories of one of our previous homes came rushing back.

The 'lodge' style decor is very popular where we used to live 'up North' in Minnesota - just a hop, skip and jump from the Canadian border. Our home decor included faux stone walls and green plaid borders, a lot of moose and bear accents.  My favorite spot to sneak away to for a fancy coffee drink and 'me' time was a black bear themed lodge just down the road from our home that featured a coffee bar, restaurant and two-story gift shop to meander in when I needed "Mom Time" to myself.  This bedding was reminiscent of the rustic lodge life so popular there.  (The bedding I reviewed for the company is one of the many options in their 'Rustic Bedding' collection.  The Black Bear Lodge Set also has window panels and other coordinating pieces to match as well.)


The quilt set came in 3 different sizes; I chose the Full/Queen as it's a size that works well on most beds and I wasn't sure which room I'd be using it in.  You can see it's machine washable and comes in a protective plastic, zippered cover.


Many times when you purchase affordable and budget-conscientious bedding the quilt stitches are part of the print and are not actually sewed on.  Here is a close up of the stitches; not part of the printed design but are threaded stitches.


The design features both bears and moose in a background of vibrant yet 'rustic' colors including a golden yellow, rustic red and muted bright blue with pale green.  Finished size for the Full/Queen is 86" X 86".


The queen set came with two shams - easily placed over a pillow of your choice using ties to close the back side.


The bedding is thin, lightweight and made to be pretty more than 'warm' functional.  Because their prices are so great, you obviously aren't a quilt like Grandma makes; but these are machine washable so the care is easy and the bedding is 'no fuss'.  I found this set to be perfect for a guest room!  The prices are great for newlyweds or those just starting out in their own apartments that want coordinating pieces to finish the room but have to do so on a tight budget.

Although the rustic bedding I was given to review was the Black Bear Lodge pattern, they have many other patterns to choose from and I love the Colorado Lodge and the Antique Chic Throw they have!

You can check out all their  quilt sets here.

Thanks so much to LatestBedding.com for providing me with the Black Bear Lodge Quilt Set in return for posting my honest thoughts and opinions on my site.  


 __________________________________


Print Friendly and PDF

11/20/17

Homemade Salt Dough Ornaments: (Update to my "not" salt dough Christmas ornaments) - LOVE this dough!


ORIGINAL POST - with 'recipe' from August, 2017

Christmas in August!?  Yes... Christmas ornaments that is!

This morning I had the urge to make Christmas ornaments.  The kind you make with a simple dough, roll and cut out and then bake dry and paint.  I have no idea where this urge came from other than it's been a pretty stressful and busy past two months and I haven't done anything 'fun' since... I don't remember when.  I have done another dough ornament post on An American Housewife, back in 2007 I think (?).  It featured some ornaments I had made 10 years earlier with the traditional salt dough for the ornaments.  I still have those ornaments and they are now 20 years old.  This particular dough today is a softer, non-grainy, pure white dough.  But both (either/or) doughs work well for ornaments.  You can find the other recipe by typing ornament in the search box to your right.


Fun Dough

1/2 c corn starch (I use Argo brand)
1 c baking soda (in the yellow bag/box)
3/4 c water

Blend the cornstarch and baking soda in a pan.  Add the water and stir to mix.  Turn the heat up to medium high and continue to stir.  It will quickly go from looking like white glue to a thick gloop and then suddenly start to come together into a dough (much like cream puff dough).  Turn off the heat as soon as it comes together and push it out onto a flat surface (like a cutting board) to gently start to press it together (*it's hot) to a dough.  Cover with plastic wrap and let it set and cool a little bit.  The plastic wrap keeps the moisture in so it doesn't start to dry out.  After about 5-10 minutes when it's cooled down to work with it a little bit, start to push and pull and knead it back over itself.  When it's completely smooth and feels like a soft play dough, you can wrap it in plastic wrap and let it cool completely for little hands to play with or you can start to use it right away.

Roll it out on a cutting board, silpat, etc. and cut into the shapes you wish.  Use a straw or small round implement to make a hole if you are going to hang them later.  Place on a parchment lined baking sheet and bake in a 170 degree oven approximately 45 minutes to 1 1/2 hours depending on how thick and large you made your shapes.  Or you can let them set to air dry - although you will need to let them dry about 2 days and even longer if they are thick balls, sculptures or if you live where there is high humidity levels.  (My oven is a digital and the lowest setting it can go to is 170.  That is how I came up with that figure.)  Carefully turn your ornaments over (flip them) about half way through the baking time as the parchment paper under them traps moisture.  This dries both sides.  I placed mine on a wire cookie cooling rack for the last 10 minutes of baking but you don't have to do that.  I did a second batch and air dried completely on a wire cookie cooling rack.

When completely dry, paint them if you wish or glue baubles on it, glitter, etc. String a ribbon or string them to hang or finish however you wish!  If you drop it on the floor they will probably break, but just painting them, etc. is no problem as they are not fragile as long as you are not pressing hard, dropping, etc.


The cornstarch and baking soda in the pan

Adding the water and starting to stir, it resembles white glue

The heat starts to turn it to gloop

It quickly comes to a dough - place it on a heat safe surface and quickly press the hot dough to a ball shape

Cover with plastic wrap and let it cool until you can handle it

Use whatever cookie cutter shapes you wish - have a small utensil to make holes for hanging

Knead it a few times to get it smooth

Roll out as thick or thin as you wish - just like cookie dough

Cut whatever shapes you wish


Don't forget to add holes before baking if you wish to hang them later!

Ready to go into the oven

All finished baking!  Just let them cool completely and decorate as you wish


   _________________UPDATE________________


Spur of the moment decision to 'finish' these today.
Using what I had in the house already, I found some random little bottles of craft paint in the junk drawer and a pack of cheap paintbrushes I bought at the dollar store last week.

Without any plan in mind I just started painting stripes of random paint in shades of black, white, gray, silver, beige and bronze.


Had I gone to buy paint for this project I'm sure I would have chosen matte colors; as it was my silver and bronze were both metallic.  But it worked just fine.


Winging it....


Last years Christmas cards had a letter "B" on them (our last name starts with a B) and I had some extra leftover cards so before I threw them away I had snipped out the monogram and threw them into the envelope thinking 'maybe' I'd use them, maybe not.  

I did.

I just put a blob of modge podge on the ornament and squished it down a bit to attach it.


Drying...


Finished with a simple piece of twine - which is the only thing I had on hand in the junk drawer, but happens to have worked out perfectly with the 'weathered wood' look of the dough ornaments.   These will look great on our rustic, natural decor themed Christmas tree this year.


Print Friendly and PDF

3/30/17

Reposting: Using Spent Grain from Craft Beer Making In Dog Biscuit Snacks


Reposted from 2014:

My husband enjoys making craft beers but we both feel guilty throwing out the spent grain after it cooks so we find creative ways to use it.  While composting it works and you can use 1/2 c to 1 c increments in homemade breads - I have started to use it primarily just for dog biscuits.  Our dogs know them as 'snacks' and you have to s-p-e-l-l out the word because yes, they know it and yes, they will immediately run to the laundry room door and wait for their human to go get them their 'snack'.

If your dogs like peanut butter, this has a faint peanut butter smell and taste as they do use about a cup of peanut butter.  My dogs love garlic and I like to give them garlic foods as a natural flea and tick deterrent so a garlic, pizza sauce flavored biscuit is a hit in our house.  I wouldn't use things like cheese in them though, as I assume they would go rancid... although I'm quietly asking myself if a cheese powder would work ok... hmmm.  I may have to play around with that idea!  But for now I use items I can incorporate that can be baked a long time, to a hard, crisp biscuit without going bad, molding or going rancid.  This one works great!

Why are they round?  Because it was easy.  Shape them however YOU want.  Your dog doesn't really care.

Dog Biscuits

4 c 'spent grain' from homemade beer brewing
2-3 c flour
1 c peanut butter or 1 c pizza sauce
2 T fresh minced garlic (optional with the pizza flavor)
2 eggs


Mash everything together (I use my hands) and add more flour a little at a time until it comes together to form a nice ball of dough.  Roll out and cut into shapes or use a scoop and shape into flats with your hands, roll out and cut into squares with a knife... etc.  Completely up to you how you want to shape them.  NOTE:  About 1/2 inch is about as thick as you want to make them as thicker biscuits take longer to bake.

Bake about 30 minutes at 350 and turn your oven down to 225.  Let the biscuits bake a couple hours until completely dried and crisp - the centers need to be crisp and dry like a Milk Bone biscuits or the snacks will go bad if stored at room temperature.  I baked mine about 4 hours, turned off the oven and went to bed, leaving them in the hot oven all night. 


Spent grain


Form a dough ball


Roll out or shape as you and your dogs like best


Bake and bake and bake until completely dry and crisp all the way through

Print Friendly and PDF