Showing posts with label halloween. Show all posts

10/9/15

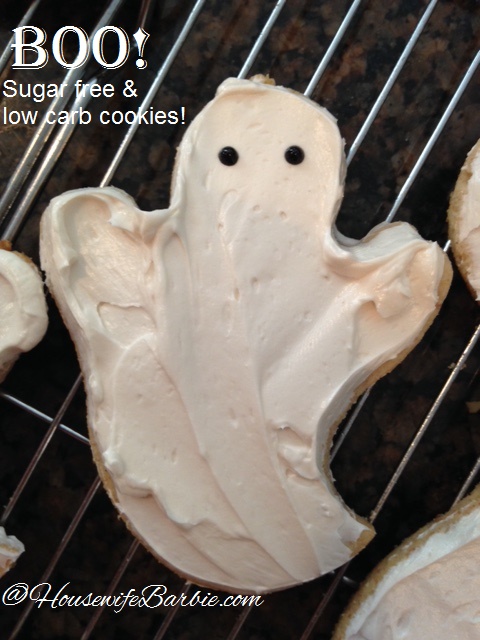
Boo! Sugar Free and Low Carb Cut Out Sugar Cookies for Halloween (or any holiday!)


I tried and posted another version here, but I think I like this current one even better.  This one just uses some different ingredients and doesn't need any cream cheese.  When I made this, I had a 'normal' sugar cookie recipe in front of me (using flour, sugar, butter)  all I did was wing it and played with the ingredients to make it healthier.  I really like the final product and it tastes so similar to a 'regular' cookie that even my college aged daughter is enjoying them - and she usually rolls her eyes at my 'healthy' cookies.

Since we have no food allergies in our family and we don't have to cut out any particular foods - we just do it to eat healthier 'in general' - I did opt to add some whole wheat flour to this recipe.  You can see my cookies have the little tan flakes in them from a bit of whole wheat flour that I liked for the flavor of a traditional cookie as well just making my dough a little sturdier when I was ready to chill and roll as it was a little sticky.  If I was against using any wheat products at all I simply would have added a bit of any gluten-free flour to it.  If  your dough is a little to sticky, add 1/4 cup of whatever your favorite 'go to' flour is in place of wheat.

Cut Out Cookies - sugar free and lower carb

1 1/2 c almond flour
1/4 c coconut flour
1/4 c whole wheat flour
1 egg
1/4 t almond extract
1/2 t vanilla extract
1 1/2 t baking powder
3/4 c Ideal sweetener
5-10 drops liquid sweetener to your level of taste
scant 1/2 c butter with 1 T shortening to make up for the 'scant'

Cream the sweetener, butter and shortening.  In a large bowl mix the dry ingredients well.  Add the egg and extracts to the sweetener/butter mixture.  Add the dry mix and blend until it comes together as a dough.  If it's really sticky, add more of your favorite gluten free flour or a little more whole wheat flour until the stickiness is lessened a bit so you can form a ball and wrap in plastic wrap to chill.  Chill about 30 minutes, remove half the dough.  Return the second half back to the refrigerator.

Preheat oven to 350.  Roll the dough out between 2 sheets of parchment.  Cut out your shapes and transfer them to a baking sheet. I use a Wilton icing spatula to transfer mine.  Use either ungreased or parchment lined pans.  (I did both and my cookies did not stick even on the unlined). 

Place the cookie sheet in the freezer for 3-4 minutes and then place directly into the oven.  Bake for about 9-10 minutes or until you can see the edges just starting to brown.  I find almond meal based cookies to be a little more tender and delicate than wheat cookies and have learned to bake almond flour based cookies a little longer than I have to for all purpose flour based.  I just keep an eye on them and set the time for "one more minute" if I didn't see the edges had any color to them yet.

Remove from the pan and place on wire racks to cool completely.  If your cookies are baked long enough this isn't a problem - they are nice and sturdy but still tender with a perfect 'bite' to them like any good sugar cookie.

Frost with your favorite frosting.

I used a favorite "cake" frosting I whipped up but you can use any you like.

Sugar Free Butter Cream Vanilla Frosting

2/3+ c granular Xylitol  (I use Ideal - see below this post for ordering information)
2 T water
2 large egg whites (separate and use the yolks in another recipe)
1 stick real butter
1 T vanilla extract
 *If you taste test it and find your personal tastes would like it sweeter, use 5-8 drops liquid sweetener

In a saucepan, place the water and Xylitol. Heat over medium high until it comes to 240 degrees.  With normal sugar this would be soft ball stage but because Xylitol and Splenda do not thicken, you cannot test this by traditional soft ball stage.

As you are heating the sugar substitute and water, mix the egg whites in a large mixing bowl.  Beat the egg whites until soft peaks form.  With the mixer running, pour the hot Xylitol mixture down the side of the bowl in a thin stream, mixing into the egg whites.  Beat approximately 5-7 minutes on high until the egg whites resemble a thick and glossy meringue.

Start to add the butter in chunks, about a tablespoon at a time.  Keep the mixer running and whip the mixture about 5-7 minutes more.  If the mixture breaks up when you first add the butter and it looks like cottage cheese, no worries.  Just keep whipping until it's smooth again.  Once the frosting is smooth, add your vanilla and whip again for a few minutes.  If it's a really warm or humid day it might get too warm to work with.  Just refrigerate it for about 7 minutes, whip again.  The cooler temperatures will cause it to harden up again.


Photos from the cookie making process

I added a bit of whole wheat flour as we have no allergies or food restrictions in our house


I like to use a long, thin frosting spatula to transfer the cookies to the baking sheet


Ready for our decorations!


Print Friendly and PDF

6/15/14

Oreo Crunch Bars - Sugar free version this time


Two years ago I started to make Oreo Bars - a black colored bar that was incredible and everyone who tried them, absolutely loved them.  But... they are FULL of sugar.  Needless to say I didn't make them often!  However, Nabisco Oreo came out with a sugar FREE Oreo soon after that and I found that making them with sugar free Oreo's and sugar free marshmallows worked perfectly!  

Now for the bad news.

Apparently, last year Nabisco stopped making sugar free Oreos.  Over the past 9 months or so, I've tried to find them in 4 different stores so I knew they were discontinued but this morning I couldn't find them available online either.

Now for the good news.

You can use Murray Sugar Free Chocolate Sandwich Cookiesand they are just as good!

You can make this recipe without the Bodycrunch Whey Protein Crunchies and it will be a sugar free version of the popular Oreo Bar.  Just use one (1) pkg. of sugar free marshmallows, 1 pkg. Murray Cookies and 1 1/2 T butter.   But the addition of the whey protein crunchies is just rice krispy cereal and really adds to it!  I also add a few drops of vanilla to mine, but that is just a personal option.


Oreo Crunch Bars (sugar free)

1 pkg. Murray Sugar Free Chocolate Sandwich Cookies 
1/2 c Bodycrunch Whey Protein Crunchies
2 pkg. LaNouba Sugar Free Marshmallows
2 T butter, soft

Turn the cookies into fine crumbs by using your food processor and pulsing it off and on until uniform crumbs are formed.  In the meantime, in a large microwavable bowl, place the marshmallows and butter.  Microwave for 1-2 minutes (depending on the age and strength of your microwave) until the marshmallows balloon up to big puffy clouds.  Remove from microwave, stir in the cookie crumbs and crunchies.  Spread and pat in a greased 8X8" pan.  Let set until the firm up (or rush them by chilling them in the refrigerator or freezer).


Sugar free Oreo's are no longer available, but Murray brand is great!

Uniform crumbs


You might also be interested in;

Bodycrunch-Whey Protein Crunchies Natural Flavor, 7.62 Ounce
La Nouba: Sugar Free Marshmallow, 2.7 oz (6 pack)
Body360 Nutritionals Bodycrunch All Natural Whey Protein Crunchies, Cocoa-Unsweetened, 7.62 Ounce


Print Friendly and PDF

10/20/13

Edible Worms for Halloween Fun!

This is a blast from the past, but it's a good one.  Originally posted back in oh, 2006 I think!  But it's getting close to Halloween so let's run it again!


Yes, one year when the kids were younger, I made edible worms. And not pretty red and yellow jello worms, but worms that were a nice ugly color.


They may have looked gross, but totally realistic and tastes good. 

Yes, they taste good - truly! They taste like a dessert of jello and whipped cream.  But OMGosh to see a pile of them is just so gross. LOL. Still - perfect for a Halloween party so? Knock yourself out. They are worth it.

Edible Worms
2 packs (3 oz)  jello (I used peach - but a red jello will give you 'browner' worms)
1 pkg unflavored gelatin
3/4 c heavy cream
3 c water
10-15 drops green food coloring
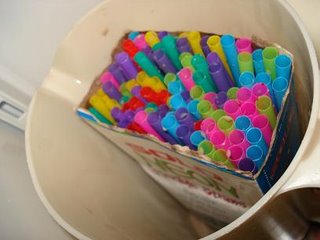
50-100 brand new, flexible straws in a box
Boil the 3 cups of water and mix it with the jello and gelatin in bowl. Let it cool to lukewarm and then add the whipping cream and green food coloring.
Pull the tops of the straws out so the flexible part is elongated.  Jam all your straws back in the container.  Place the cardboard into a tall container like a juice pitcher.  Pour the jello/gelatin mixture to the straw-filled container and let it chill until firm.
After the jello sets you can squeeze the straw with your thumb and forefinger and drag it along the straw to squeeze the worm out.  I've also heard you can hold the straws over warm water and they will slip right out of the straw tube.  Place them in a chilled bowl and serve to hungry party goers!


I chose to put all the straws back into the cardboard container, then placed the box into a juice container.


I removed the cardboard by ripping it and pulling it off. A congealed mess
awaited me... but it smelled yummy! I used peach jello so
it smelled like peaches and cream.
Print Friendly and PDF

10/3/13

A repost for Halloween! Bloody Finger Red Velvet Cake

Life around here is so busy that to be honest I've almost forgotten Halloween is coming up! 

Ok - so here is the first one re-posted again because it's just so easy and so good.  Great for a teen or adult Halloween party (a little much for the tiny wee ones!).


Adding the fingers to the top of a homemade layer cake
and throwing in a couple black plastic spiders we already owned
we had a really cool Halloween dessert!


What a fun dessert for a party for older teens or adults!


Print Friendly and PDF

9/26/13

Candied Caramel Apples

 
I'm not a fan of caramel apples myself, but my husband is.  Every Fall I make sure to whip up some homemade caramel apples for him.
Although I've made gourmet style apples in the past, drizzled in 2 kinds of chocolate and caramel over tiny bits of dark chocolate, toffee and candies, all wrapped in plastic wrap, then pretty cellophane and tied with a ribbon; you don't have to be fancy to be awesome.  These are so easy, it's a great project to do with your kids.  Yes, you may get a little bit messy from the sticky, ooey, gooey caramel, but that's part of the fun! 
Caramel Apples

Apples (washed, dried and refrigerated overnight)
1 package individually wrapped caramels, unwrapped
2 T water or milk
Candies of your choice (optional)
wooden popcicle sticks or craft sticks
parchment or foil

Using cold apples, push a wooden stick into the apple where the stem is (remove it).  Melt your caramels with milk or water either in a microwave or on the stove.  The microwave is easier and less likely to burn.  Microwave about 2 minutes - stirring once or twice during the process.  Have your caramel next to any candies, mini chocolate chips, crushed Oreos, toffee, etc. that you may with to use.  Dip and roll each apple quickly in caramel until well coated. Dip in or sprinkle candies if you wish to use them.  Place on parchment paper or buttered foil and allow to set until the caramel hardens a bit. 


As simple as clean, dry apples, caramels and some candy bits

What will you use? Mini chocolate chips? Candies?


You might also be interested in;


Print Friendly and PDF

11/21/12

Pumpkin Cinnamon Rolls

Ready to go into the oven!


About a month ago I started to crave pumpkin.  However, we didn't have any so my craving just grew in intensity.   Finally, I bought two large 32 oz. (?) cans - the big ones - and I started to put pumpkin in everything.  I started with pumpkin bars of course, but went on to make more pumpkin pasta, pumpkin bread, pumpkin cupcakes.

My latest 'pumpkin' inspired recipe was deciding to add it to my homemade cinnamon rolls.  I made a large double batch so it made two (2) 9X13" pans.  This way I already have Christmas morning breakfast in the freezer and ready to simply take out on Christmas Eve and let them raise in the pan in the refrigerator for a delicious breakfast for our entire family that takes no time whatsoever!


Pumpkin Cinnamon Rolls

1/2 c water
1/2 c milk
1/4 c butter
1/2 c brown sugar
1 t salt
1 t vanilla
1 1/3 c pumpkin puree (not pumpkin pie filling, just pumpkin)
1/2 c warm/barely hot tap water
2 pkg. yeast (or about 4 1/2 teaspoons)
2 eggs
7 c flour
2 t cinnamon
1 3/4 c brown sugar
1 T cinnamon
1 t powdered vanilla (optional if you have it)
1 1/2 sticks butter (about 3/4 c)

In a microwavable bowl, place the water, milk, butter, brown sugar, salt and vanilla.  Microwave for a minute or two until melted.  Add the pumpkin and stir or whisk smooth.  In a mixing bowl pour the warm tap water and add the yeast.  As soon as it's foamy, add the 2 eggs and the pumpkin mixture.  Mix just until blended.

Add about 5-6 cups of the flour and the 2 t cinnamon.  Using your bread dough hook, mixing and kneading.  (I often make my dough in the bread machine as well;  just use your 'dough' setting).  As soon as the flour is incorporated, add the last 1 1/2 cups (or so) until your dough is no longer sticky.  When it is forming a nice ball and isn't sticking, let it machine knead about 4-5 minutes more or take it out and knead it by hand.  Let it rise in the bowl under plastic wrap until doubled in size.  Punch down.  Divide in half.

Mix the last brown sugar, cinnamon, powdered vanilla (if you have it) and butter.  Mix with your fingers (or cut in with two forks) until crumbly.  

Roll out the half dough ball to a large rectangle.  When it's roughly about 12 inches by 16 inches, spread half the topping mixture over it.  Starting with the longer 16 inch side, roll it up and squeeze the end to form a log.  Use a sharp knife or utensil to cut equal slices.  You slice them as thin as 1 inch or as thick as 2-3 inches.  It depends on how thick you like them and how many you need to make!  I like them about 1 1/2" side and get about 12 of them this way.  Place in  a greased baking pan (anything around 9X13" size works fine).  Cover with a piece of plastic wrap and let them double in size.  Bake at 375 (ish) around 20 minutes.  They will be golden brown and bubbling.  Let the rolls cool for at least 7-10 minutes before adding icing if you wish to top them.  Can be served as they are or with an icing recipe or even store bought frosting.

Easy Icing:
Start with 1 to 1 1/2 c powdered sugar. Add 2 T soft butter and about 1 tablespoon heavy cream. Turn on the mixer and mix until completely smooth. If it's too thick add more cream (or milk) but only 1 teaspoon at a time as you don't want to add too much and have 'soup'. Frost the rolls and serve warm.


Print Friendly and PDF

10/15/12

Halloween Cookies! Bloody Witches Fingers!


Awesome 'witches fingers' cookies that taste as good as they look!


So many Halloween ideas this week!  All reposts that I've made before, as you can guess, most of these are 'tradition' around here!  These are not only cool looking, but taste really yummy!  I use almonds for the finger nails and some liquid red food color made them nice and bloody.  


Severed Fingers Cookies

1 tablespoon red food coloring
30 almonds
2 large eggs
1/4 teaspoon vanilla
1/2 cup butter, at room tempature
1/2 cup confectioners' sugar
5 tablespoons granulated sugar
1 pinch salt
1 2/3 cups flour

Place food coloring in a shallow bowl. Toss the almonds into the bowl with the food coloring and stir them until the color is evenly distributed. leave them in the bowl and stir them every so often until the color is as dark as you like.

Separate 1 egg. Set aside the white.

In an electric mixer combine butter, confectioners' sugar, granulated sugar, and salt. Beat on medium speed until well combined. Add 1 whole egg, the extra yolk and the vanilla. Beat until smooth. Add the flour, and mix on low speed just until incorporated. Wrap the dough in plastic, and chill until firm, 20 to 30 minutes.

Divide the dough in half. Work with one piece at a time, keeping remaining dough covered with plastic wrap and chilled. Divide the first half into fifteen pieces. Roll each piece into finger shapes, 3 to 4 inches long. Pinch dough in two places to form knuckles. Score each knuckle lightly with the back of a small knife.


Transfer fingers to parchment lined baking sheets. Repeat with remaining dough.
When all fingers are formed, brush lightly with egg white. Position almond nails; push into dough to attach.
Bake at 350 about 12 minutes.


Forming random finger shapes

After I colored the almonds with food color - it looked like a bloody mess!  ha ha.


Print Friendly and PDF

10/14/12

Edible Worms - Great for Halloween!


This is a blast from the past, but it's a good one.  Yes, one year when the kids were younger, I made edible worms.  And not pretty red and yellow jello worms, but worms that were a nice ugly color.

They may have looked gross, but totally realistic and tastes good. 

Yes, they taste good - truly! They taste like a dessert of jello and whipped cream.  But OMGosh to see a pile of them is just so gross. LOL. Still - perfect for a Halloween party so? Knock yourself out. They are worth it.


Edible Worms

2 packs (3 oz)  jello (I used peach - but a red jello will give you 'browner' worms)
1 pkg unflavored gelatin
3/4 c heavy cream
3 c water
10-15 drops green food coloring
50-100 brand new, flexible straws in a box

Boil the 3 cups of water and mix it with the jello and gelatin in bowl. Let it cool to lukewarm and then add the whipping cream and green food coloring.

Pull the tops of the straws out so the flexible part is elongated.  Jam all your straws back in the container.  Place the cardboard into a tall container like a juice pitcher.  Pour the jello/gelatin mixture to the straw-filled container and let it chill until firm.

After the jello sets you can squeeze the straw with your thumb and forefinger and drag it along the straw to squeeze the worm out.  I've also heard you can hold the straws over warm water and they will slip right out of the straw tube.  Place them in a chilled bowl and serve to hungry party goers!


I chose to put all the straws back into the cardboard container, then placed the box into a juice container.


I removed the cardboard by ripping it and pulling it off. A congealed mess
awaited me... but it smelled yummy! I used peach jello so
it smelled like peaches and cream.


Print Friendly and PDF

10/12/12

Halloween Cake Idea - Red Velvet


Life around here is so busy that to be honest I've almost forgotten Halloween is coming up!   It was easier to keep track of certain holidays when the children were younger.  Now that my kiddos are all getting older and turning into young adults, some of the traditions of itty bitty little children are long gone and even the fun 'bloody' Halloween decor has lost it's fun since my son is off to college!

I decided that a great idea for this month is to re-post some of the Halloween idea's I've blogged in the past.  As a crazy Halloween family, we've done it all!  We even had our house decked out as a full fledged haunted house, complete with a smoke machine!  But... alas.  No more!  My son actually has the smoke machine at college with him and they use it in their dorm!  Ha.

Ok - so here is the first one re-posted again for 2012 because it's just so easy and so good.  Great for a teen or adult Halloween party (a little much for the tiny wee ones!).


A simple addition of a package of realistic looking bloody severed fingers was the perfect addition I needed to pull off a great cake.


Adding the fingers to the top of a homemade layer cake
and throwing in a couple black plastic spiders we already owned
we had a really cool Halloween dessert!


The fingers are plastic - not candles
so they can be washed and reused next year!


What a fun dessert for a party for older teens or adults!

Print Friendly and PDF