Pages

10/29/06

Edible Worms

One word: GROSS

Yes, they taste good - truly! But OMGosh to see a pile of them is just so gross. LOL. Still - perfect for a Halloween party so? Knock yourself out. They are worth it.


I chose to put all the straws back into the cardboard container, then placed the box into a juice container as I knew the cardboard would leak.


I removed the cardboard by ripping it and pulling it off. A congealed mess
awaited me... but it smelled yummy! I used peach jello so
it smelled like peaches and cream.


I couldn't get my oldest daughter to taste them.
She attempted, but when she touched them she said
"EW! They feel like REAL WORMS!" and refused to taste.
I had one nibble... it tasted like jello and whipped cream of course, which I actually don't 'like' whipped cream mixed my jello (never have!)  I can't stomach it, nor any jello/whipped cream dessert, so I didn't eat them. I got the youngest child to taste them.
"Tastes like jello."


Print Friendly and PDF

10/27/06

Severed Fingers Halloween Cookies

A tradition in our family!


Severed Fingers Cookies

1 tablespoon red food coloring
30 almonds
2 large eggs
1/4 teaspoon vanilla
1/2 cup butter, at room tempature
1/2 cup confectioners' sugar
5 tablespoons granulated sugar
1 pinch salt
1 2/3 cups flour

Place food coloring in a shallow bowl. Toss the almonds into the bowl with the food coloring and stir them until the color is evenly distributed. leave them in the bowl and stir them every so often until the color is as dark as you like.

Separate 1 egg. Set aside the white.

In an electric mixer combine butter, confectioners' sugar, granulated sugar, and salt. Beat on medium speed until well combined. Add 1 whole egg, the extra yolk and the vanilla. Beat until smooth. Add the flour, and mix on low speed just until incorporated. Wrap the dough in plastic, and chill until firm, 20 to 30 minutes.

Divide the dough in half. Work with one piece at a time, keeping remaining dough covered with plastic wrap and chilled. Divide the first half into fifteen pieces. Roll each piece into finger shapes, 3 to 4 inches long. Pinch dough in two places to form knuckles. Score each knuckle lightly with the back of a small knife.


Transfer fingers to parchment lined baking sheets. Repeat with remaining dough.
When all fingers are formed, brush lightly with egg white. Position almond nails; push into dough to attach.
Bake at 350 about 12 minutes.


Print Friendly and PDF

10/20/06

Cake Truffles

I'm not supposed to share this recipe with anyone, so keep it under your hat ok?

My kids LOVE these 'truffles' and they are unbelievably easy and fun for kids to do. My 10 year old made them last night to bring to school as a treat for the class today. She doesn't want anyone else to know the 'recipe' since I made this up for them one night due to our (my) penchant for eating dry cake mix as a snack. *wink*


CAKE TRUFFLES

1 box white cake mix
1 container pink vanilla frosting with sprinkles
water

In a large mixing bowl combine the cake mix and the tub of frosting. Mix until the dough is roughly the consistancy of play-doh. Use up to 1 T water if you need to. Depending on the temperature and humidity sometimes I have to use water, sometimes I don't.

Using a small ice cream/dough scoop (the smallest size from Pampered Chef) or make 1 inch balls by hand. You can roll them in the colored sprinkles that come with the frosting, or just add the sprinkles to the dough when mixing. Place on parchment or foil lined cookie sheets. Does not need to be refrigerated.


Print Friendly and PDF

10/15/06

It's Sunday Morning... Go Make Some Pancakes

Pancakes


1 c buttermilk (or sour milk)
2 T oil (or melted shortening)
1 c flour
1 t baking powder
1/2 t salt
1 egg
1 T sugar
1/2 t baking soda

Blend the egg with the buttermilk and oil. Blend the dry ingredients and stir them into the liquids. Beat by hand just until moist. Batter will be lumpy, do not over mix.

Pour 3/4 c mix onto a hot, oiled griddle. When the air bubbles all start to pop it's time to flip it. Cook until a warm golden color. Serve with syrup and butter. Bacon and coffee on the side too of course! *grin*Print Friendly and PDF

10/10/06

Chalupas Anyone?

Tonight we are having chalupas. Fancy shmancy name for a soft shell taco of sorts, but it's really not, as the flavor of the meat and the baja sauce turns it into something altogether different.

To be authentic you can/should make an Indian fry bread to wrap them in, but you can always skip that part by a) buying some, b) buying a pita or wrap or c) using good thick flour tortillas. That is what we are doing since I really wasn't in the mood to 'cook' tonight so I only made the meat and sauce from scratch. Ok, enough with the preliminaries, let's eat!

Chalupas

1 lb. ground beef
1/4 c flour
3/4 c warm water mixed with;
1 T dried onion flakes
1 T chili powder
1 t paprika
1 t salt

Mix the ground beef in a bowl with the flour, chili powder, paprika and salt. Mix well. Add the water and the onion and mix again. Now cook it in a hot skillet, mixing and mashing until browned and 'done'. You want the meat to be more like a paste than 'ground beef' chunks.


Sauce

1/4 red pepper, seeded and chopped
1 jalapeno pepper, seeded, chopped
2 T diced onion
1 c mayonnaise
1 T vinegar
1/4 t fresh ground black pepper
1/8 t garlic powder +
1/8 t cumin +


Mix the peppers and onion with 1 T vinegar in a food processor or blender. Puree. Add the mayo and the remaining ingredients. Puree' smooth. Chill 2-3 hours if possible to allow the flavors to meld before serving.

Using the Indian fry bread or tortillas, build your chalupa with meat, cheese, lettuce, tomatoes and sour cream. Top with the baja sauce and/or salsa.


Print Friendly and PDF

10/6/06

Stuffed Bread Bowl (Sandwich)

NOTE:  This recipe post is from 2006!  Back when food blogs weren't a 'thing' and no one had iphones so all pictures were taken with a regular camera or a little 'flip phone' (remember those!?).  Sorry about the horrible photos.  It's a pretty old post.  But the recipe is AWESOME.  :)


This is an all-time favorite in our household. Originally I made one for a SuperBowl party we were having, but my family started asking for it regularly so it became one of our 'tried and true' recipes that I make at least once a month.

I full-heartedly suggest trying it for your next football get-together.


Stuffed Bread Bowl
Something important to point out is this recipe doesn't have exact amounts, and you need to add/delete what your family likes.


1 round loaf bread - homemade is best but grocery stores carry these all the time now
1 dry package Italian dressing mix*
1/2 c regular mayonnaise
1/2 c sour cream
1/2 c black olives, chopped
1/2 c dill pickle relish (or chopped fine dill pickles)
lettuce
tomatoes
green peppers
onions
smoked ham
turkey
cotto salami
bologna
american cheese slices
provolone slices


Mix the mayonnaise and sour cream together with 1/2 package of the dry Italian dressing, pickle relish and black olives.

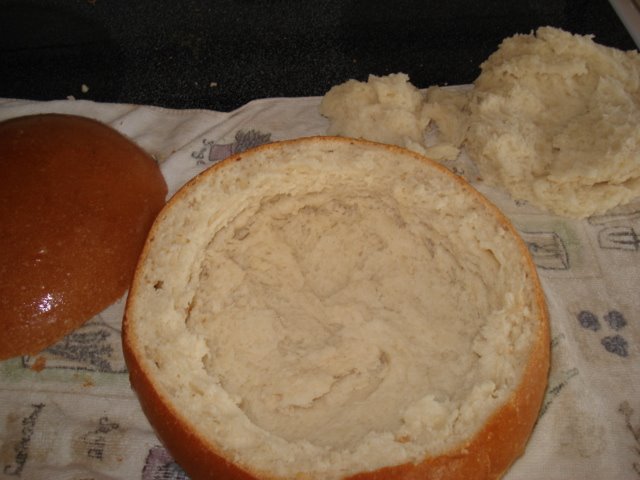
Slice the top 1/3 of the bread bowl off. Remove the inside of the bread bowl leaving one inch of bread around the entire side and leaving at least 1/2 - 1 inch of bread on the bottom.


Save the inside of the bread for other uses such as stuffing, croutons or dice it up, toast it and serve it with a flavored oil for dipping. Whatever you do, just don't throw it away.

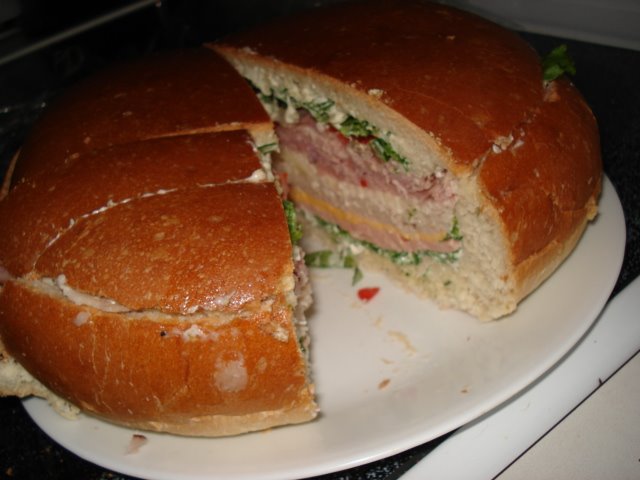
Now, spread the mayo mixture on the inside of the bread bowl and the lid of the bread bowl. Make sure all the insides are covered with a nice thick layer. Using the lettuce, line the bowl and lid completely with the lettuce leaves. After the lettuce is in place, layer the bread bowl with a layer of the deli meat - you choose which one you want to use. Continue to layer the meats and cheeses until you get to the top. I typically layer salami or bologna, then american, then turkey, then provolone then ham. Press each layer down compact into the bowl as you go.

Top your bowl with the green peppers, thin sliced onions, tomatoes, etc. (and anything else you may want to add.) You want to be sure your bowl is filled to the top and can even be up to 1 inch over the top. Now use the bread 'lid' to top it off.


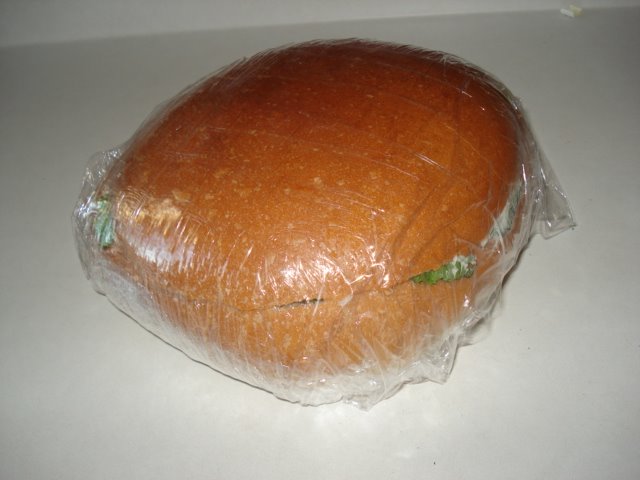
Wrap the entire sandwich tightly (!) in saran wrap. The tighter the better. Refrigerate for at least 2-3 hours and up to about 12. (I've done it for up to 24.) This is BEST if made the DAY BEFORE YOU NEED IT. This mostly is because it helps 'set up' this way and won't fall apart when you slice it.


Unwrap and serve. You can slice it into triangles if you prefer, but we like to make one slice down the center to cut it in 'half' and then I make vertical slices on each half. This makes for easy slicing, serving and eating. You get about 12 servings.


* Italian dressing mix works best but I recently started to buy my spices from Penzeys Spices and last night I used their Creamy Peppercorn dressing base spice. I used 1 tablespoon of spice for 1 cup of mayo/sour cream mixture. It was wonderful and I'll be using either/or from now on as I really like both.Print Friendly and PDF