Showing posts with label I own this. Show all posts

12/16/22

Emergency Storage: Opening up a 10 year old can of Red Feather Butter


Back when I first started to worry about having a bit of emergency food on hand in storage, I bought a couple cans of Red Feather canned butter.  It went into the 'long' term storage pantry. Since we don't use this butter for every day I didn't (and don't) rotate it out. 

There are a few items that are difficult to store long term because the cans they are in degrade.  This includes items such as butter, tomatoes and pineapple.  I was thinking about the butter and how it was at the 10 year limit I had heard others mention in discussing its lifespan.  I put it on my task list to go into the long term storage foods and find the cans of butter to check them.

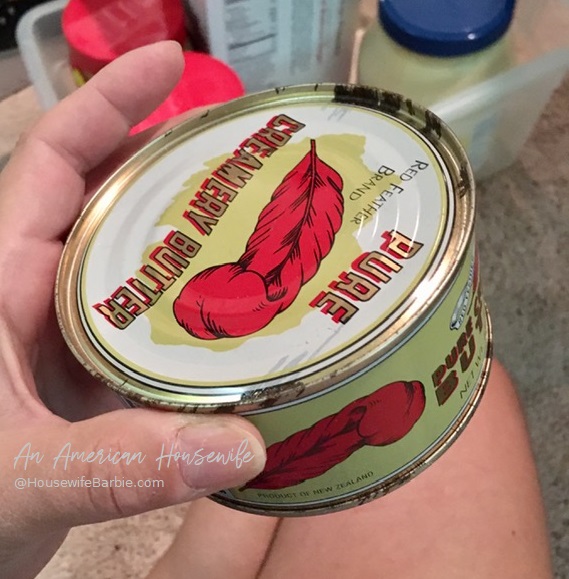
What I found was YES the cans had started to degrade.  You can see the edges were discolored although I couldn't see, nor feel anything actually leaking.  They were completely dry, not greasy and had no discernible smell or scent. 

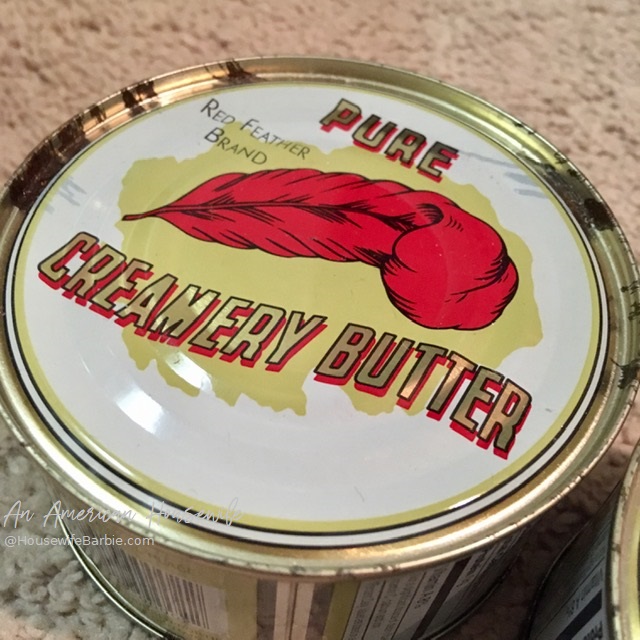
The outside of a can of 10 year old Red Feather Butter

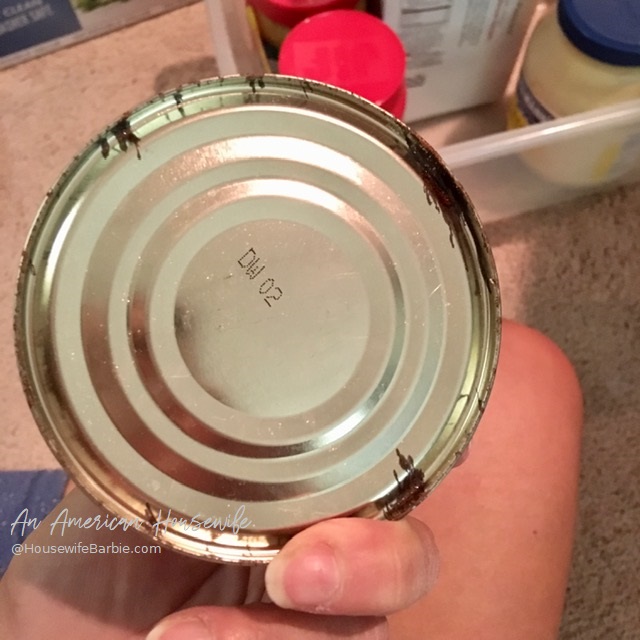
When you buy this brand canned butter, note there is never a 'best buy' date on the can.  Typically they are simply marked with something like DW02 which I've not been able to find out what it means and it's stamped on cans from all different years, so it's most likely where it was canned (?) but it's not a date. 

10 year old Red Feather Butter

In this picture (above) you can see the only spot I was really concerned about would be the larger, more bubbled (?) rusty spot on the right hand side. The other rusty spots didn't concern me. 

(NOTE the cans have been stored in a temperature controlled, dark environment away from excessive temperature changes, high heat, nor any sunlight this entire time.)


Looking at the outside of the can, I was pretty sure it was going to be bad inside... but I was going to open it up and have a look anyway.


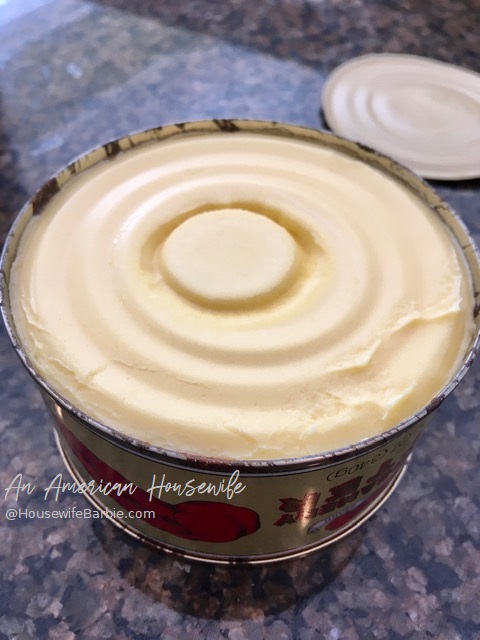
Surprise!  It wasn't bad!  Here is a photo under the lid when I first opened it.

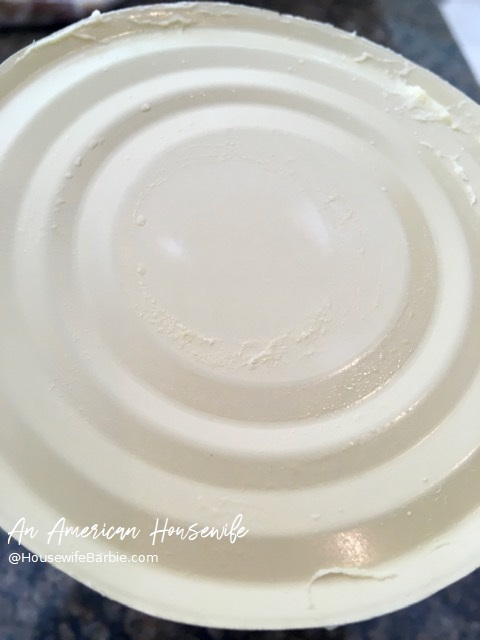
The inside lid of a 10 year old can of Red Feather Butter
 

Here is a picture I snapped upon first opening the can
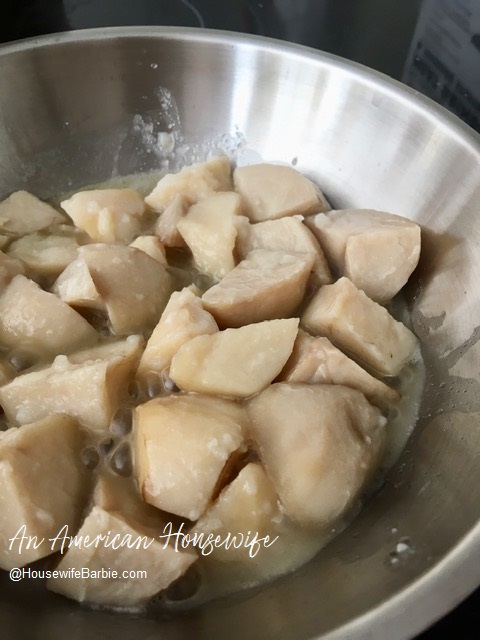
An opened can of 10 year old Red Feather canned butter - a taste test
I scooped out the butter onto a plate.  Where the butter (and my rubber scraper) rubbed against the can it smeared with a bit of the dark rusty spots but the butter itself was still pure.  (See below).  I used a paper towel and wiped off the discoloration and decided to do the taste test.


Having home-canned my own butter I already knew that when you heat the jars or cans of butter to render them safe for canning and get a good seal, the butter is 'cooked' and in turn, the flavor changes a little, and gets stronger.  Sometimes home canned butter will turn a darker yellow depending on the heat and length of cooking time. 

This butter was a golden yellow, and stronger smelling than grocery store butter, but not like it had started to go rancid. The outside of the can was questionable, the butter inside was still clean, creamy and smooth.

My Final Thoughts:   The state of the can made me leery of course, and in 'good times' and 'times of plenty' I'd probably have been tempted to toss the degraded cans out without opening.  Butter is very expensive right now though, and I opened them to taste test, so I did.  It is stronger smelling and tasting than brand new, refrigerated butter from the store; while noticeable on things like toast, bread and rolls, when used in cooked foods or to season vegetables, it was fine. 

I'm not sure how long it would take before the oils took on a truly rancid flavor; perhaps within this year or next they would to the point of being 'yuck'?  There is no mistaking the smell and taste of oils and fats that have gone rancid so you would know immediately if your butter had turned.

I feel as the 10 year mark was probably longer than I would suggest storing them before rotating out though.  Personally I think I'm putting a self-imposed limit of 5 years on our Red Feather Butter from here on out. 


Print Friendly and PDF

11/7/22

Open can testing of dry-canned potatoes with butter over a year later... and canning more potatoes in these times of food shortages and empty shelves at the grocery

First - just some regular canning of potatoes...  (water and salt)
 
A couple weeks ago I canned more potatoes.  Although I would love to have potatoes at every meal (they are one of my favorite foods and perhaps one of the most versatile foods you can use) we are low-carb and sugarfree most of the time, by choice, so starchy vegetables like potatoes aren't enjoyed as much as I would like.


UPDATE TO DRY-CANNED POTATOES:    A few years ago I opted to try dry-canning potatoes instead of the typical way of covering them with water.  Just for fun. I ended up doing some plain and others with butter.  I LOVED them.  (I also dry canned apples.)  I researched it first, and did a couple tests to be sure I felt comfortable with the process, but then I jumped in and did a few batches and ended up adding 'dry canning' them to my regular canning.
 
Now, I can potatoes in all sorts of ways because there are so many ways to use them.  Small, diced, chunks, larger chunks, french fry shape, thin wedges... and some traditional water covered, others dry.  Some with butter, some without.  I grab a certain shape or style depending on what I need them for.

I went ahead and saved one of my dry canned potatoes with butter that had been put up in September of 2021 to open at least a year later.  That was this Fall.  A couple weeks ago I grabbed one to use in dinner that night but made a point to take photos first and do a quick review for An American Housewife.   


The seal was incredibly tight and took a bit of work to get off (a good sign).
Inside the potatoes looked fine and smelled... like potatoes.

 
I dumped them out into a bowl and took a good look... and smell.
They were cold, and straight out of the glass canning jar so the butter was still a bit congealed...

 
Here is a close up.
They tasted good and had a great texture and didn't seem any different from the potatoes tested at the earlier marks of a few months.  We were over a year later and the butter canned dry potatoes were perfect.  They went into the crockpot with dinner that night so I don't have a picture of them after they were heated where the butter is melted and they just look like... well, potatoes.


If you have a pressure-canner (potatoes can't be canned safely by the water bath method) potatoes are one of the cheapest and easiest to put up... and in the event of hard times, they are a blessing!


Print Friendly and PDF

3/7/22

How To Clean Pampered Chef Baking Stones: (Photos of my 17+ year old stones.... bought in 2005 and used continuously - today is March/2022)

Before and After... these are also 17 years old by now (MANY cleanings)


If you've been a reader of An American Housewife for a few years, then you'll know that every once in a while I do an update on my stoneware - or how I 'clean' it I should say.  I've also added another brand of stoneware a few years ago so I have 3 baking stones now and they all three (3) live in my oven at all times, full time.  

Yes - even when I'm not baking on them, they are still in the oven full time - mostly just hanging out on the lower racks while 'whatever' else bakes.  They also sometimes do double duty as a 'drip pan' when cheese, grease or apple pie filling, etc. drips down from whatever it is I'm baking.

A well seasoned baking stone is dark brown.  This is a good thing because when they are 'loved' and dark brown, they are non-stick.  And even though they are cleaned by scraping them with the little plastic scrappers, and a quick hot water scrub if needed; once in a while you actually want to 'clean' them.  

I got my stones in 2005(Yes, the  PC baking stones in these photos are from 2005)

By 2007 they were beautiful dark brown and seasoned well.  One day in 2007 I decided spur-of-the-moment to clean the ovens and flipped the self-cleaning feature on while I was crazy-busy doing other things.   

I wrote about it in an old post here: 2007 Post (https://www.housewifebarbie.com/2007/10/how-to-clean-pampered-chef-stoneware.html)

The end result was beautifully clean stoneware.

That's how they've been cleaned ever since.  Literally... since 2007 (and today is March of 2022).

Since 2007, whenever I clean my oven I leave 2 or 3 of the pans in and let them get clean as well.  Note it does take the 'shiny' off the metal racks when you leave them in, but if you actually use your oven and cook with it, you won't have sparkly, shiny 'new' looking racks after a little while anyway.  I sometimes just put a tiny amount of WD-40 on a paper towels and lightly run it over the side of the racks to make them slide nice again.

Here is a well seasoned, well used, loved stone.  This is pretty much what they all look like after awhile.


And here is what they come out of the oven looking like... ready to be brushed lightly with a towel to get remnants of ash off and then immediately ready for use again.  

The 'clean' one (with a light bit of gray ash to be gently blown or brushed away) is on top and I placed a regular 'before' stone below it to show the difference of "before and after" simply letting them in the oven during a regular self-cleaning cycle.


Print Friendly and PDF

2/23/22

What 6 large green peppers look like after dehydrating them! Crazy isn't it? - Prep and Pantry work going on right now in the American Housewife Household

Busy!  Not much being posted lately by way of recipes, but a busy toddler, a few unexpected things in 'life' we're dealing with and of course the state of things being what they are right now, I'm also trying to do some canning, dehydrating and 'stocking up' just in case.

If you follow me on Instagram you might have already seen this, but I just love seeing the results of dehydrating foods!  

This is the dried green pepper bits from... SIX (6) large green bell peppers!  

It's so awesome!  After drying, each 1/4 cup of diced pepper basically equals about 1 fresh. 

I store bell peppers in various ways, but for our family, I do a few bags of green peppers frozen, and the rest I dry as I tend to use them in soups and stews, which are perfect for dehydrated (or freeze dried). 

Red and yellow peppers are mostly cut into strips and food sealed and frozen as I use them in stir-fry, and fajita's, etc.  It's super easy to cut them into diced if needed as well from frozen state.

(Just because we are on topic - as a side note, I buy containers of sliced mushrooms and immediately put them into the freezer as they are unless I am using them that night or the next day.   I throw them into soups, stews, the pan to saute', etc. straight from frozen state as well).


Print Friendly and PDF

1/25/22

Vintage Cookie and Candy Recipes: by Karo Syrup and Mazola Corn Oil "Fancy Cookies - Festive Candies - Delicious Goodies For Giving" circa 1956

 
This morning I was going through some of my cookbook 'booklets' to find a certain one I wanted, but I spied this one and had to pull it out and glance through it.  Oh, these old vintage booklets and recipe books from my Grandmother and Mother-in-law make me smile.   

This is one printed and distributed by Karo Syrup and Mazola Corn Oil in 1956. 


Quick Popcorn Balls
Sherry Christmas Cakes
Quick Party Punch
Holiday Punch


Crunchy Ginger Cookies
Fruit-Nut Bars
Sugar Cookies
Rich Fudge Brownies


Candy Apples
Butterscotch
Vanilla Fudge
Refrigerator Fudge

 
Lebkuchen
Chocolate Squares
Swedish Date-Nut Bars
Pecan Bars
 
Holiday Pie
Glazed Sweet Potato Pie
Mazola "No Roll" Pastry Shell
 
Fruit Cake
Glazed Hungarian Coffee Cake (yeast dough version)

   No-Cook Fondant
Peanut Butter Kisses   

I love how it says on the last page:


For other delicious recipes featuring Karo Syrup and Mazola Oil write:
Jane Ashley, Home Service Department
Corn Products Refining Company
17 Battery Place
New York, New York 4 

(Note the zip code... "4")


Print Friendly and PDF

12/31/21

Vintage Candy Recipes from the 1941 Candy Booklet: "The Candy Book"


When December started, I thought it might be fun to feature some vintage candy recipes from my collection.  I got as far as scanning a couple of the pages and then life took a different turn.  We had some unplanned things pop up and priorities changed; holiday baking and goodies took a backseat to life and of course, posting vintage recipes from an old 1941 candy booklet was so far down the priority list that it literally was off my radar.

I now have zero interest in posting this fun vintage recipe run that I had planned.  I happened to see these unused files on my laptop today and realized I should probably just post all of them here along with the images - in one post.  This way, if anyone in the universe is looking for any of these old vintage candy recipes that their grandmothers or great-grandmothers (or even great-great-grandmothers) made, they can be found.  

If you right click on the image and open it in its own browser window it will be very large and easily readable if you are having trouble reading the print in the current fit-to-page size.

Cocoa Fondant Fudge
Condensed Milk Candy
Whipped Cream Fudge
Caramel Cream Squares
Malted Milk Nut Dainty
Nut Kisses
Baked Fruit Fudge


Barley Sugar
Brittled Almonds
Horehound Candy
Tropical Nuggets
Ginger Bars
Stick-Jaw
Butterscotches
Almond Butter Crunch
Rice Flakes Candies


Fruit Creams
Gingerees
Peppermint Creams
Baltimore Layer Candy
Maple Creams
Maple Brittle
14-Minute Maple Candy
Maple Molasses Gems


Coconut Caramels
Coconut Drops
Coconut Dainties
Coconut Cones
Coconut Straws
Coconut Squares
Simple Cooked Marzipan
Uncooked Marzipan


Make Up And Use Later Marzipan
Marzipan Goodies
Golden Marzipan
Honey Glazed Cherries


Chocolate Fudge
White Fudge
Almond Fudge
Chocolate Maple Fudge
Sour Cream Candy
Molasses Fudge
Panocha
Maple Panocha
Coffee Panocha


Gumdrops
Pralines
Turkish Paste
Rainbow Candy


Print Friendly and PDF

7/21/21

One Simple Step to Clean Your Pampered Chef Pizza Stone


I have blogged about this in the past - the first time was in 2007 - it's how I clean my Pampered Chef Pizza Stones. 

It's easy.  I keep them in the oven when I set it to 'self-clean'.

They go in dark, they come out clean and beige.  If they are heavily soiled or dark, I'll have to wipe the ash off with a paper towel.

No, really.  That's all I do.

As a matter of fact, the photo above shows my stones - Pampered Chef Pizza Stones that were bought in 2005.  

I've been cleaning them in my oven on 'self-clean' regularly since 2007.
It's now 2021.

When I first started to clean them this way in 2007 I'd have to season them again by making something a bit greasy but that was easily;  I'd just bake buttery croissants them.  That was usually enough to re-season.

(This is not how I'm telling you to clean yours; that's up to you.  It's how I clean mine.  All three of them.  For the past 16+ years.)

_______________________


My stones literally live in the oven all the time.  They stay in when I bake other items (usually) and they work as a drip pan of sorts as well, which is great.  Because they are about 18 years old, they are well seasoned and turn a nice dark, almost black color very quickly even with just a couple uses.  The are the beige stone color right out of the oven, but the darkness returns within a couple uses - again, because they are so well seasoned after so many years.  When I first started to clean on self-clean back in 2007, I'd have to re-season them to get that non-stick awesomeness.  Usually I'd just make something like canned, store-bought croissants on them as they were 'greasy' enough to season the pan for me for future uses.  But after a few years, I didn't need to do anything with them after cleaning. 

To clean them in between the deep cleanings, I just use the little plastic scraper to scrape them.  Sometimes some really hot water but never soap.


Print Friendly and PDF

3/11/21

Easter is Coming! Perfect Hard Boiled Eggs - Easy Peeling - And Natural Easter Egg Dye


Plain and simple:   For easy peeling of hard boiled eggs simply use eggs that are not new.  

When you know you will want to make or use hard boiled eggs for deviled eggs, egg salad, chef's salad, etc. just plan to purchase your eggs at least one or two weeks ahead. 

When you make them, they will peel easily.  Period.  No matter how you make them.  The simple truth is just don't use super fresh eggs.  That's it.

But here is another great hard-boiled hint:  Use your pressure cooker!  (Your 'instant pot' for those who are confused). Once I started to use my instant-pot style cooker to make our hard boiled eggs, I've never gone back to boiling them in a pan on the stove. 

A cup of water (or whatever your brand calls for), and a raised inner pot to keep the eggs off the direct heat of the bottom; and manual set for 8 minutes.  Let it set there, naturally releasing pressure for a couple minutes while you get a bowl of cold/ice water ready (about 3-4 minutes) and then quick-release to get your eggs out, put them in the cold water and let them sit for 5 minutes or until they cool down.

That's it.


As a side-note:

I found this natural egg dye list on the internet years ago and saved it to my personal files.
I don't know if I saved it to my files/recipes here on HousewifeBarbie.com yet
so for my personal use and also my now-young-adult daughters who might
want a quick and easy color guide for their Littles - here it is!


Yellow onion skins = orange
Blueberry and beets = purplish
Red cabbage with baking soda = gorgeous teal
Turmeric = bright yellow
Yellow onion with no vinegar = orange
Red cabbage with no vinegar = light baby blue
Beets = pink
Red cabbage, no vinegar, left overnight = medium pool blue
Red cabbage, quickly dyed = barely there baby blue
Yellow onion left overnight = dark burnt red
Raspberries = light pale purple
Coffee = brownish orange


_____________________________________________


Print Friendly and PDF

1/18/21

A basic homemade sugar scrub recipe and two ideas for scents that I used: Lemon Orange and Apple and a jar of my favorite - Vanilla Peppermint


This morning I had 10 minutes free so I decided to quickly whip up some sugar scrub for the shower.  Originally I didn't plan to put it on my recipe site so I didn't even have my phone with me in the kitchen.  At the last second I decided I might want to, so I grabbed my cell phone and snapped pictures - these are those.

Although there is a very basic 'idea' recipe for sugar scrubs... you don't really need a recipe.  What you need is a few basic products (only two really... the rest are all optional) and other than that, additions are completely up to you and your nose.

A Basic Sugar Scrub

  • 1 c white granulated sugar
  • 1/2 c oil of your choice (olive, coconut and almond are popular choices) 
  • Essential oils 
  • Extracts 
  • Almond Oil 
  • Tea Tree Oil 
  •  Dried orange/lemon peel 
  • Himalayan Salt
  • Coffee Grounds
  • Lavender etc. or spices like cinnamon

Blend the sugar and oil - add 15-20 drops of your favorite essential oil scent, and/or 1/2 t of your favorite extract and mix.  Smell test and add according to your personal likes.  If you think it's too dry, add a tablespoon of oil, if it's too moist, add a tablespoon of sugar, stir, and add until you are happy with the texture.   

Spoon in to a jar with a tight lid.  Small wide mouth mason jars are perfect.

_______________________________________

Here is when I first started to grab items from my kitchen.

I chose coconut oil for one blend because I have a lot of it and I really don't like cooking with it.  I am low carb/keto and a lot of recipes call for it but I am one of those people who can taste coconut  in anything... even if it's a small amount.  I like some coconut candies but I really really don't like using coconut oil or coconut flour for the most part.  So I decided to use it as the base of a sugar scrub.


To the coconut oil sugar scrub I wanted to use something with orange and lemon.  I would have loved a lavender orange or lavender lemon but I don't have lavender oils or dried real lavender right now so instead, I went with....


1/2 c warmed coconut oil, a half cap full of dried lemon peel, a half cap full of dried orange peel, 1 cup of white sugar, and 1/2 t apple extract.  I added the apple after pondering the lemon/orange/coconut.  It needed one more thing to offset it just a touch and I decided apple was perfect.

It was. If I had to describe this one... it smells similar to an orange Julius drink.


I love the bits of dried lemon peel and orange peel.  It's really pretty!

  ________________

But now, my favorite!

My personal favorite is vanilla peppermint.

I didn't want to use coconut oil for this one so I used avocado oil as it was right in my pantry.  I have peppermint oil on hand and I used the Watkins (good) vanilla from my cupboard.  I used sweet almond oil in this one and would have loved to use the sweet almond oil for the whole base, but it's expensive and I didn't want to use my entire little bottle up, so I opted to use just 1 T.  I also added a tablespoon of himilayan salt to this one.  It has healthy properties but honestly I was hoping the pink salts would color the scrub as well; it didn't really, and I don't want to use food colors in my natural scrubs so I left it as is.

My Peppermint Vanilla Scrub

1 cup sugar, just shy of 1/2 cup avocado oil, 1-2 T sweet almond oil, 25 drops peppermint oil, 1/2 t vanilla extract and 1 T Himilayan salt.


NOTE:  the difference in the consistency and texture.  The top is more whippy and thick as it's made with a coconut oil base.  The bottom is more liquid as it's an avocado and almond oil base. They make no difference in use, but you may prefer one over the other.


Print Friendly and PDF