Pages

1/31/23

From my Instagram: Homemade Taco Sauce

If you are clicking here today because you saw my post on the crunch wrap supremes and homemade taco sauce I was making today, here is the taco sauce!

No sense in re-creating the wheel as I've posted this recipe numerous times in the past.  Here is a re-post of one from 2021. 


2021...


It takes less than 10 minutes and I can make 4 bottles worth in one recipe!  

I've been making this for 20 years. I used to put it into small mason jars or re-purposed dressing jars, iced coffee bottles, etc.  but a number of years ago they started to sell Taco Bell sauce in the grocery store and once in a while I'd buy it.  I then save the bottles and reuse them.  

I'm doing this from memory but it's so easy and follows a 4-3-2-1 pattern, I'm sure you'll memorize it in a minute as well!


Taco Sauce

3 c water
3 t corn starch

Place in a sauce pan on the stove, turn on the heat to medium high and whisk. When it's all mixed in, add;

1 - 6 oz. can tomato paste
4 t chili powder
3 T white vinegar
2 t salt
1 t cayenne pepper powder

Whisk over medium high heat just until it starts to bubble and thicken, turn down to simmer and simmer for a few minutes before removing from heat and letting cool down before you pour it into whatever containers you wish.


There is a video on my story on Instagram today that includes me whisking and stirring the taco sauce on the stove.

Here are some random photos I took quickly with my cellphone of me whipping up a batch quickly while the baby was playing and giving me a few minutes to do so! 


Sauce is done - filling the bottles


 _____________________________________


Print Friendly and PDF

1/29/23

White Chicken Chili - A creamy version

Is a really crappy, quick, low quality photo snapped on my phone really quickly better than no photo at all?


Creamy White Chicken Chili

2 T butter or oil
1 med onion, chopped
1 green pepper, chopped
fresh minced garlic
2 lb. chicken (either ground or diced pieces)
1 T cumin
1 T chili powder
1 t oregano
salt and pepper to taste
3 small cans green chilies, diced
1 can, rinsed and drained black soy beans (for keto chili) or regular black beans for non-low carb
1 c chicken broth
1 c heavy cream
8 oz. cream cheese
1-2 T fresh lime juice

Cook the onions and green pepper in the butter or oil until translucent and soft.  Add the garlic (1-4 teaspoons depending on much you like).  Cook 1 minute more.  Add your chicken pieces and cook until they are done (about 8 minutes should do it).  Add in the spices.  Stir.  Add the green chilies and beans if you are using any; add the broth and heavy cream.

Cut the cream cheese into pieces and add, simmering and stirring until they are melted.  Add about 2 T fresh lime juice - I never measure, I just squeeze and sometimes it's probably closer to 3 T.  Simmer on low until you serve it.  Don't let it boil since it has cream in it.

Serve as is, or sprinkle with some shredded cheddar on top or even some cilantro.


Print Friendly and PDF

1/27/23

The Best Homemade Batter for Fish, Shrimp and Chicken (repost)

I posted this on my site in 2008.  I reposted in 2017 but here it is 2023 and I'm popping it up here again because I want to move it 'to the front' so I can find it quickly later this week when I make it again; and because it's THAT good. 

Here is something 'new' I did in 2022 with this recipe though - I made a big batch of these, precooked them, cooled them and then sealed them up tight with my food sealer, 2 to a package.  I popped them into the deep freezer and every single time I grabbed a package out for a meal I smiled.  I love these; loved how easy they were to reheat and crisp up for a new meal and I didn't have to deal with frying or grease. 

My stash of food sealed, frozen fish are gone now, as of last week and I'll be making more soon.  My all-time favorite fish batter ever. 
 
 
Originally posted in 2008 - Reposted for 2017 and then again, now in 2023.

If you were to ask me what my favorite type of food is, it would be seafood.  It doesn't matter if it's crab, lobster, shrimp, fish, oysters, mussels or anything in between.  Seafood in some form, three times a week would be about perfect for me.  And this fried fish batter?  One of my favorites. 

This is a recipe I originally posted back in 2008 but a lot of you might not have been a reader back then.  It is not only so very good, but you can use cod fillets, which are very affordable!

Home Fried Fish

1 c self rising flour
5 t prepared mustard
2 t sugar
2 t salt
1 egg
1 c water
1/2 t onion powder
2 lbs. fresh or frozen/thawed Cod filets or chicken strips, etc.

Mix everything but the fish/chicken.  Heat a container of oil 2-3 inches deep to about 350-400 degree's.  Dip each filet into the batter and quickly place in the hot oil.  Cook until golden brown, about 5 minutes.  Drain on paper towels. 


Print Friendly and PDF

1/24/23

Chicken Bacon Ranch Sliders (hot sandwiches)


Posted a similar version of this previously, because I make it different ways; there isn't really just one way to make it.  I found these unused photos in my files from last Fall and decided to post it because it shows another way to make these from the previous post.  In the last one, the cheese was mixed into the chicken/mayo mixture.  This time I just sprinkled it over top.  Last time I mixed everything and put the ranch dressing on top.  

This is a really good recipe if you want to use your freeze-dried chicken from food storage.  Just reconstitute the chicken in water or chicken broth and continue with the recipe as written.  Play with the recipe as you want - I just wanted to put it here as a reminder of something yummy to make when I'm browsing my site and getting ideas for dinner that week; and also for my adult kids of course.  This is a keeper!


Chicken Bacon Ranch Sliders

Cooked, diced chicken breasts - 2 or 3 depending on the size of yours
1 fresh tomato
1/2 c mayonnaise
1/2 c ranch dressing of choice
Cooked, crumbled bacon
Cheddar Cheese, shredded
Hamburger Buns (regular, keto, low carb, whatever your family uses)
Butter

To the cubed chicken breasts add the 1/2 c mayonnaise, 1/2 c ranch dressing of cohice, fresh tomato diced, and about 1/3 c crumbled cooked bacon pieces.  Mix. If it's too dry add a little more mayo.  Adjust the amount of tomato and bacon to what you like.

Use some butter to heavily butter a baking pan.  Place the bottom bun in the buttered pan.  Top with scoops of the chicken mixture.  Cover the sandwiches with cheddar and bake just until the cheese is melted, remove, top with the bun, brush the tops with some of the butter and pop it back into the oven and bake about 10 minutes until heated through.

Extra chicken filling mixture is a perfect casserole, just tuck in along side the sandwiches to bake or just make more sandwiches with it.    The size of the pan you use depends on how many sliders you are making. Make more sandwiches, use the filling as a casserole or shred a bit and use as a dip for crackers.


Print Friendly and PDF

1/23/23

Sugarfree Homemade Slushees (or Slurpees - different areas call them different things and I've lived all over the country so I use both!)


I'm a slurpee-slushee-Icee kind of girl... but I almost never, ever buy them because they are full of sugar.  I've think I've only had 2 or 3 in the past 10 years.  Instead, I typically make due with crushed ice and water-flavor drops or sugarfree flavored syrups, which is fine. But when I want the real deal, or as close to the real deal as I've come here at home, and still be sugar-free this is the one I use.

This weekend I've been on a homemade slushee kick at night and craving them.  This is actually a really good way to use up some of those 'odd' flavor oils and extracts that come in a variety package  that you had to buy because you needed 'one' of the flavors and the rest just sit in the cupboard, or you randomly bought because they looked good, or were a good sale.  (This is why I have cherry flavor - it came in a variety pack that I needed the peppermint oil in, and the grape flavors were on clearance and I thought they sounded good but I've never, ever used them for anything other slushees.)

I WISH I could do a home version of the Icee.  Blue Raspberry is my favorite but Icee's are made with a special machine to get their texture, if you blend this one on high until it's frothy it's kinda close, but basically made, these are more of a slurpee/slushee.

👉These are typically made with Club Soda but I don't have any right now.  What I DO have is a few cans leftover from Christmas entertaining of sugar-free Sprite.  This was a great way to use those up (we don't drink them, but were for entertaining guests).  You can use Sprite or 7-up if you don't have club soda.

Play around with flavors; I have grape and black cherry Kool-Aid powder packets on hand so that is what I make.  You could do Lime or Orange or whatever flavors you wish.  Just make sure your flavor extracts 'match' or compliment your Kool-Aid flavor. 

Last hint:  I like to add a little bit of citric acid to mine sometimes as I love sour things more than sweet and a sweet/sour slushee is yummy when you like things like sour gummies, etc.

This makes one large or 2 small slushees

SUGAR FREE SLUSHEE

1 cup or mini-can club soda or sugar free sprite or 7-Up
1/4 c granulated sweetener (I like to use erthritol and monk fruit blends)
1/4 t (scant) dry Kool-Aid powder mix (grape and cherry shown in my photos)
1/4 t (scant) extract or oil flavorings - taste test to see what your level of flavor is preferred
1 1/2 c (or so) crushed ice
A good blender

Put the soda, sweetener and flavorings into a blender and blend or pulse smooth. Add the ice and continue to pulse or blend a little bit until all the bigger chunks of ice are uniform and tiny.  Pour into a large cup (about 12 oz) or make 2 smaller.  Taste test to know next time if you like to add more or less of the powder, extract or sweetener.  Also, if you like sour candies/drinks try adding about 1/2 t of citric acid granules to kick it up a notch.


My grape sugarfree slushee... ready to enjoy last night while I watched episodes of Friends on my computer


Blending the mixture to crush the ice uniformly....  you can taste test at this point and add a little more powder, extract or even sweetener if you think it needs more of something.  I like the amounts as they are written above but everyone has different tastes!


I don't measure the ice, I just fill the cup with crushed ice from the refrigerator and toss it in.  This is about 1 1/2 cups as it's a 12 oz. to-go coffee cup.


These oils keep forever and never go bad... but you still want to use them up, right?  Ha.  This is my grape flavoring.


The dry Kool-Aid packets... here is grape and black cherry.


I like the flavor of mixing more than one natural sweeter so I keep a container in my pantry where I dump in new bags of sweetener(s).  Use what you like.


I bought these for some of the house guests we had here at Christmas last month.  We don't drink them so they were leftover, but because I don't have club soda in the pantry right now, these work well.


You can use extracts if you have them (the bigger bottles that you find in the baking aisle at your local grocery store, or you can use flavored oils, which are more intense so you can use a little less.  I like strong flavors so I use the oils since I have them on hand anyway, but I also have emulsions and extracts I use too depending on what flavor I want that day.  


Print Friendly and PDF

1/18/23

STRAWBERRY CRUMBLE BARS - keto, low carb, sugar free

STRAWBERRY CRUMBLE BARS - keto, low carb, sugar free and so good.  


Last night I decided I'd make some raspberry crumble bars to have here as snacking options for the next couple days. 

Incredibly yummy... even if I don't bother to take out perfectly cut squares and prop them up for a social media worth "photo shoot" - Meh. 


STRAWBERRY CRUMBLE BARS

I used the dry ingredients from my keto white cake mix recipe:

3 c good quality, blanched, fine grained almond flour
1/3 c whey protein powder - vanilla or unflavored (I only use zero carb, zero sugar)
2/3 c sweetener, granular (I like erythritol and monk fruit blended versions)
2 t baking powder
1/2 t baking soda
1/2 t salt

Then I used the wet ingredients from my raspberry crumble recipe, increased amounts a bit:

9 T butter, melted
1 1/2 t vanilla or mixture of almond extract and vanilla extract
2/3 c sugar free strawberry preserves, jam or other filling of your choice
Grease or line a 9" pan with parchment.  Preheat the oven to 350.

Whisk together the dry ingredients.  Melt the butter in cup in the microwave and add the extract to it.  Pour this into the dry mixture and mix with a spatula until it starts to come together - the consistency of a crumbly play-doh.   Press just over half the dough into a greased 8X8 inch pan. 

Bake this bottom crust for about 10 minutes at 350 degrees.  Take it out and let it cool for about 10 minutes. 

Place the preserves or jam in a bowl and microwave for a minute or so to soften the preserves for spreading. Spread the filling over the crust, getting up into the corners and sides as well.  Now crumble the rest of the topping over it all and press down lightly just to adhere to the filling, but don't flatten it.  Return to the hot oven and bake for 18-25 minutes until turning golden brown.  Remove from oven and let cool completely.

You can eat them as they are or add a simple glaze made from about 1/3 c powdered or confectioner sugar-free sweetener, a dash of vanilla, 1/2 teaspoon soft butter and a teaspoon or 2 of milk or cream - make as thick or thin as you like with the cream amount.  You can spread lightly on the bars or drizzle.  Let set, cool in the refrigerator or serve right away.


Print Friendly and PDF

SugarFree and Low Carb Caramel Bars....


I mentioned this one yesterday when I was going to make raspberry bars; it's the same recipe with different fillings.  Any jam, pie filling, pumpkin, caramel, etc.  I thought I'd repost this caramel version (I think the original post was back in 2019?).   Just makes it easier to find.


Caramel Bars - Sugar Free and Low Carb

2 c almond flour
2 T coconut flour
2/3 c Erythritol with Monk Fruit (granulated sweetener of your choice)
1/4 t sea salt
6 T butter, melted
1 t vanilla
1/2 c sugar free caramel sauce like Smuckers Sugar Free Caramel

Whisk together the dry ingredients; almond flour, coconut flour, sweeteners and salt.  Melt the butter in cup in the microwave and add the vanilla to it.  Pour this into the dry mixture and mix with a spatula until it starts to come together.   

Press just over half the dough into a greased 8X8 inch pan.  Bake this bottom crust for about 10 minutes at 350 degrees.  Take it out and let it cool for about 10 minutes.  

Drizzle the caramel sauce all over the crust, getting up into the corners and sides as well.  Now crumble the rest of the topping over it all and press down lightly just to adhere to the caramel but don't flatten it.  Return to the hot oven and bake for 25 minutes until turning golden brown.  Remove from oven and let cool completely to cut.  (I was craving these immediately so I used a fork and ate it warm from the pan... it would be great over vanilla ice cream this way too!)  And then this morning, when they were totally cool, I sliced them into bars... and had one for breakfast with my coffee. 

You can add extra salt sprinkled over the caramel layer if you like 'salted caramel' desserts.  I thought they were delicious as is.


Print Friendly and PDF

1/17/23

Sugar Free Red Raspberry Crumble Bars (Note: they are wheat free too)


I've been craving the raspberry crumble bars I make (sugarfree and lowcarb - keto) but hadn't had time to make them or even start to think about being able to (yep, it's been that insanely busy around here for the past 6 weeks or so) but today I was not only still craving them, but accidentally stumbled upon my old post featuring them from June of 2019... I'm taking it as a sign!  I have a lot going on this morning and early afternoon but I'm holding out that around 3:pm I'll be able to sneak in a little kitchen time to get a pan of these into the oven!  SO GOOD.


Red Raspberry Crumble Bars

2 c almond flour
2 T coconut flour
2/3 c Erythritol with Monk Fruit (you can use a granulated sweetener of your choice)
1/4 t sea salt
6 T butter, melted
1 t vanilla
2/3 c sugar free red raspberry preserves or jam of your choice

Whisk together the dry ingredients; almond flour, coconut flour, sweeteners and salt.  Melt the butter in cup in the microwave and add the vanilla to it.  Pour this into the dry mixture and mix with a spatula until it starts to come together.   Press just over half the dough into a greased 8X8 inch pan. 

Bake this bottom crust for about 10 minutes at 350 degrees.  Take it out and let it cool for about 10 minutes. 

Place the preserves in a bowl and microwave for a minute or so to soften the preserves for spreading. Spread the raspberry filling over the crust, getting up into the corners and sides as well.  Now crumble the rest of the topping over it all and press down lightly just to adhere to the raspberry preserves, but don't flatten it.  Return to the hot oven and bake for 25 minutes until turning golden brown.  Remove from oven and let cool completely to cut. 


Repost from June, 2019.

I keep various jams and preserves on hand for my husband's peanut butter and jelly sandwiches, so I had Smucker's brand in the refrigerator.  You can use whichever brands you like.


Melt it a bit in the microwave for easy pouring and spreading over the crust.


Fresh out of the oven!
 

I keep these in the refrigerator - they slice easily and taste... incredible!


Print Friendly and PDF

1/9/23

Buffalo Hot Wings with Homemade Buffalo Wing Sauce


This is a 'quick and sloppy' post - in which I literally am uploading a couple photos from my old cell phone - not even brightening them to make up for the ugly yellow lighting in the kitchen.  I really just want to make sure I get the wings recipe posted - although I'm sure I've posted it a couple times previously over the years; when your site has been active since about 2006, there are a lot of recipes for the search engines to wade through - and many of my pages are not google indexed for weird reasons that I have no idea about or how to fix... so it is what it is.

When I post recipes it's usually for my own personal collective use, but often they are with a particular child of mine in mind.  I want them to be able to find the recipe(s) when they need or want them.  This one is for my son.

Buffalo Hot Wings

Chicken wings and drumettes - as many as you wish
1 c hot sauce like Frank's or Crystals
1/3 c oil (olive, canola, vegetable)
1 t cayenne powder
1-2 t minced fresh garlic
1-2 t sugar or sweetener
1/2 t worchestershire sauce
fresh black pepper - about 1/8 - 1/4 t
1 egg yolk
2 t water
2-3 T cornstarch or 1/2 t xanthan powder

Cook the wings as you like (oven, grill, etc.)  While your wings are cooking according to package directions or your preference, make the sauce.  In a saucepan, mix the hot sauce, oil, cayenne pepper (optional - can leave out for less hot wings), garlic, sugar and worchestershire and pepper.  Whisk or stir briskly and heat until it comes to a slow boil.  As that is heating blend the egg yolk with water and corn starch.  Whisk in to the hot mixture and stir as it thickens.

Take the chicken wings/drummies and baste, spoon or pour some of the sauce over all, as heavy as you wish.  Return to the oven and bake or broil a few minutes until the sauce is nicely adhered and a bit drier.  Remove from the oven and serve - goes well with celery and ranch dressing and/or salads.  Serve the extra sauce in a dish along side for dipping the wings in.


Print Friendly and PDF

1/7/23

Spicy Shrimp Queso Dip


This week is 'Use Up All the Food" Week in our household.  This means using up all the foods we bought for our celebration(s) last weekend before we get back to our normal eating of typically low carb and sugarfree.  Last night was opening and using a bag of tortilla chips, as well as a package of 'queso' Velveeta cheese.  The dish trying to use both of those is obvious but I also wanted to start using up a bag of frozen shrimp that we've had in the deep freeze forever so.... shrimp queso it was!

This is being posted for my youngest daughter who wants me to make this for her, but I am making sure to post it so she can make it herself!  Ha.  

I didn't measure anything, so everything is estimated or just use as much or little as you like - like jalapenos; lots if you love them, little if you don't. 

And cheeses - use whatever you have on hand in your refrigerator.  Monterey Jack or Colby Jack would be yummy but I didn't have those - I ended up using White Queso, Smoked Provolone, Cream Cheese and then some mozzarella, which I only used to sprinkle on top because there was literally a cup of it sitting on the counter and I didn't want to put it back in the package in the refrigerator.  I actually liked it better without as it was on top and formed a cheese crust on top while the rest was all melted and blended.  Yours?  Play with your food - do what you like.

Spicy Shrimp Queso

A mixture of spices to blacken your shrimp:  black pepper, salt, smoked paprika, garlic powder, a little garlic salt
Onion, diced
Tomato, diced
jalapenos, diced
fresh garlic
Velveeta, Cream Cheese, Mont. Jack cheese, Colby Jack Cheese, Mozzarella, Provolone, cheddar... whatever!
Shrimp

Toss the shrimp in the spices while you heat a cast iron pan and add just a bit of oil until very hot.  Add the shrimp in a single layer and cook quickly to blacken and crisp.  Remove to a plate.  Turn down heat and add a little more oil to the pan; toss in about 1/2 cup or so of onion and fresh tomatoes.  Cook briefly and add garlic and jalapenos.  Cook for a minute or two and then add all the cheeses.  Stir off and on til melted.  While cheese is melting, chop the shrimp, leaving a few whole.  Add the chopped shrimp to the cheese in the pan.  Top with shrimp.  Bake at 400 for about 8 minutes.  Serve with tortilla chips.


Mixture of spices


Blackened in a cast iron skillet 


Some tomatoes, onion, jalapeno and garlic


Adding lots of cheeses


Melted smooth


Chopped shrimp into the cheese


Topped with a few of the whole shrimp 


Into the oven to warm through for about 5-8 minutes til bubbly.


Print Friendly and PDF

A black leather purse cake! (Or handbag cake if you prefer)


Another Birthday Cake!  As I mentioned in the previous post, this past weekend we had our big family celebration of... all the things.  Our family gathered from across the country and we celebrated 2 birthdays, Christmas and New Years; all between Friday and Monday.

This post is MOSTLY here because I think my oldest daughter might want to make this in the future and I wanted to jot down and save photos of the process for her.  But I keep my blog public so it can help others as well; so maybe someone else (you) would like to see the process I used as well.

I'm not a 'cake maker' and I'm just a Mom who makes birthday cakes for her family.  I saw this cake idea, I had no idea how I'd make it, but I figured I'd look online for a few items and make it up as I went along.  I went to a decorating site I use and put in a search for a "purse logo mold" and this one showed up, so I ordered it.  On the "you might be interested in..." that they add to the page, I saw a mold for chain link.  I had wondered how I'd make those - so I ordered that too.  Then I ordered some yellow gold fondant and some glittery gold edible food dust... just in case I needed it.

Normally I make my fondant but getting a deep black was going to be difficult so I checked and they sold black fondant in a brand I like and tastes good so I ordered a small container of that too. 

And that was it.  I tucked those away without a plan...

Here are a few more photos of the cake as I set it up on the dining room table - literally MINUTES before they were due to arrive.  The birthday girl and her family plus my son were all arriving after about a 15 hour drive, in which they also had car trouble and stop for a new alternator.  I put this on the table, got the stuff surrounding, and they arrived in less than 10 minutes.  PERFECT because she needed a happy, uplifting 'birthday party' after a long, frustrating drive.

We enjoyed cake, a quick dinner, laughter and hugs... and then everyone went to bed, exhausted.  LOL.


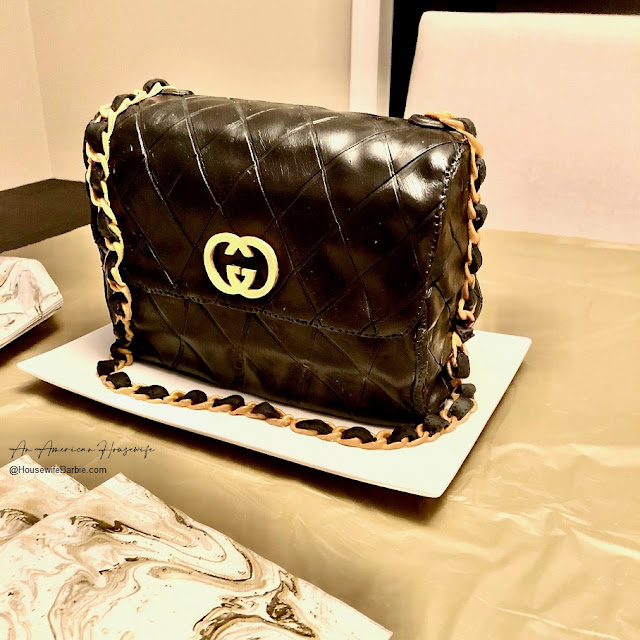
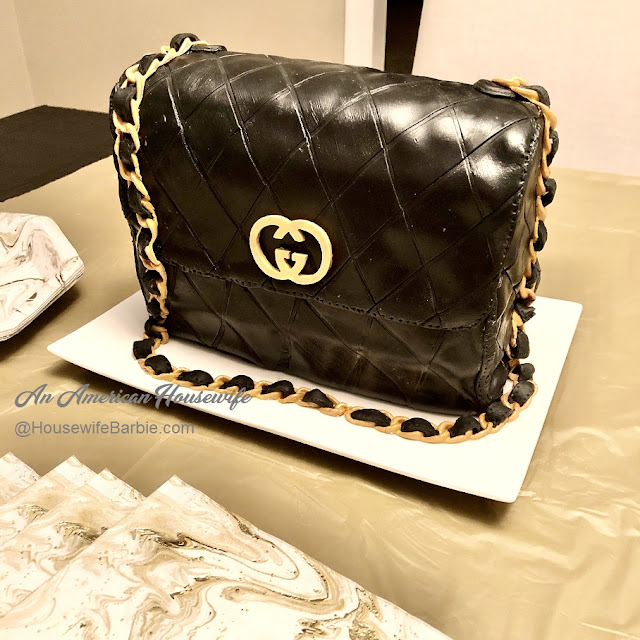
The birthday girl and her cake.


______________________________________________________________________


For this cake I wanted something sturdy to work with and it just so happens the birthday girls favorite cake is Red Velvet so that worked out perfectly!  A couple days before they were due to arrive, I found time during a 2 year olds nap to make the cake so I could fill and freeze it.

In my head I figured a bread pan would make a great cake pan because I wanted that sort of shape. 

I baked the cake in a bread or loaf pan as well as an oval Scandinavian Almond Cake pan but you can also just cut the top of a loaf/bread pan baked cake to be a rounded shape.


I made traditional frosting to go with the Red Velvet Cake because people that pair a true, traditional Red Velvet Cake with Cream Cheese Frosting are committing a cake-baking sin! 

 
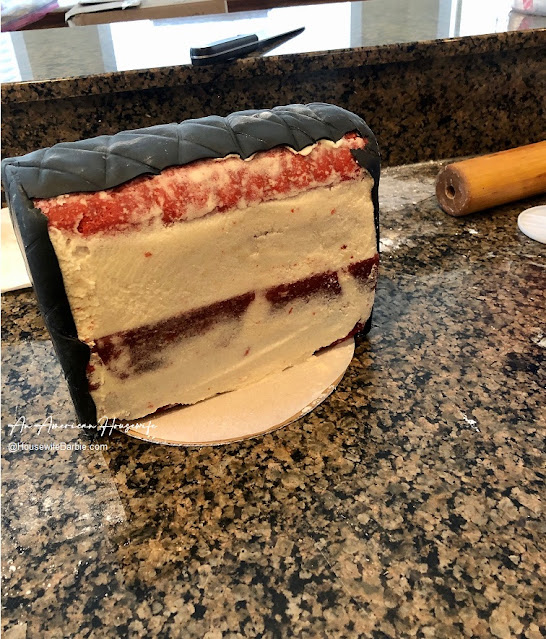
The cake was made, the frosting filled between a couple layers and then a little bit of a crumb coat, and it was popped back in the freezer.

On "put it together day" I got out the random things I had ordered, thinking I may or may not use them.

FIRST:  I used some gold/yellow fondant to form the Gucci logo for the front of the cake.  I knew I would have to let it set up to dry and harden a little before I could use it.  I did not make the chain at this time because I knew it would still have to be somewhat soft in order to form to draping... not too hard and not too soft. 

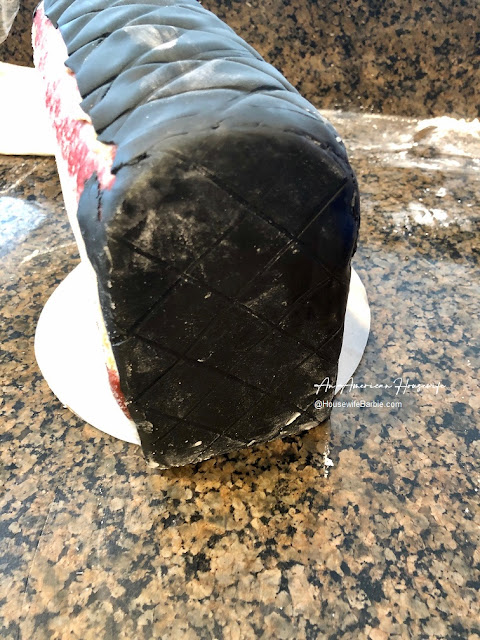
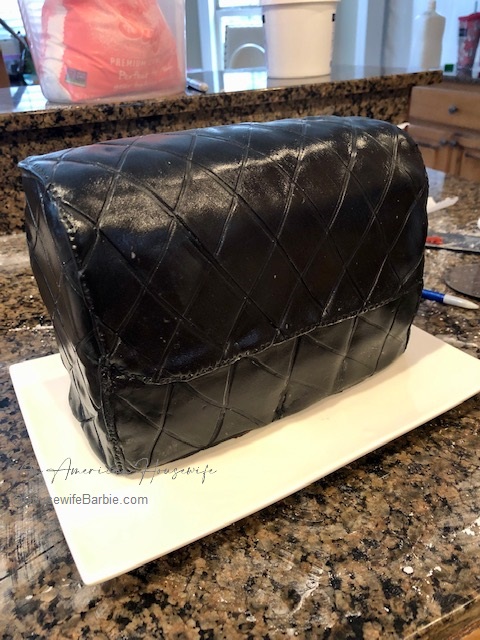
SECOND:  I didn't know what I was doing but I grabbed a hunk of black fondant and started to roll it out.  I measured the cake to get a rough estimate of how wide and high a piece needed to be to cover the back, and a little over the front as well. 

I cut it out and put it over the cake. 

NOTE:  LEARNING CURVE:  I didn't do the diamond pattern first.  I tried to add that after the fondant was on the cake, which was difficult to get even, so for the front I did the pattern first, then draped it on the cake.

I cut two pieces for the sides in the general size and shape I wanted, and placed them on the cake with a little clear decorating gel to hold them.  Then I used a sharp knife to cut the fondant down a bit so I could smooth it with my fingers to meet the top fondant piece on the cake.  See photo.


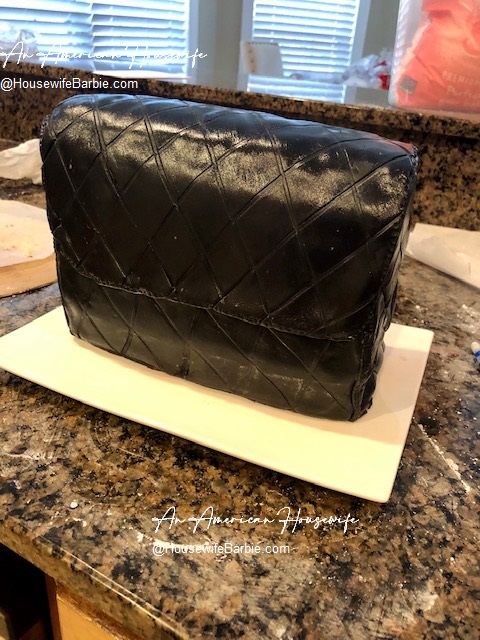
With the back and sides in place, I now had to the front to figure out.
First I did a piece across the bottom front (see photo). 
Then I laid out my fondant and did a guesstimate measure to start the last piece at the top of the cake where a 'seam' would be, and down about half way in the front like a purse flap.


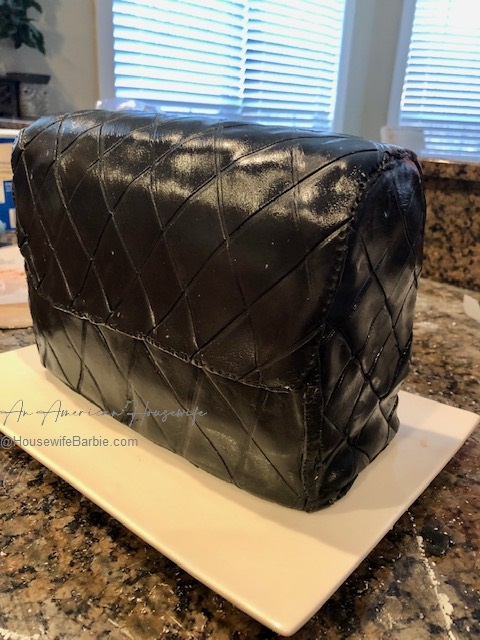
When I was deciding what to use to make the diamond leather pattern for the purse, I tried a couple things, but ended up just flipping my knife over and using that to gently press in lines that overlapped to make the pattern.


I draped the last piece of fondant over the purse cake and....  this was the moment I realized I might actually pull this off!  It was really looking like a purse!


And a couple minutes later my hopes were dashed and I figured I was really screwing it all up because I then attempted the chain links to make the purse strap for the cake and I actually put everything down TWICE and was going to just stop.  I almost just cut black fondant to make a simple black strap... but I'm glad I didn't stop in the end.  I persevered.


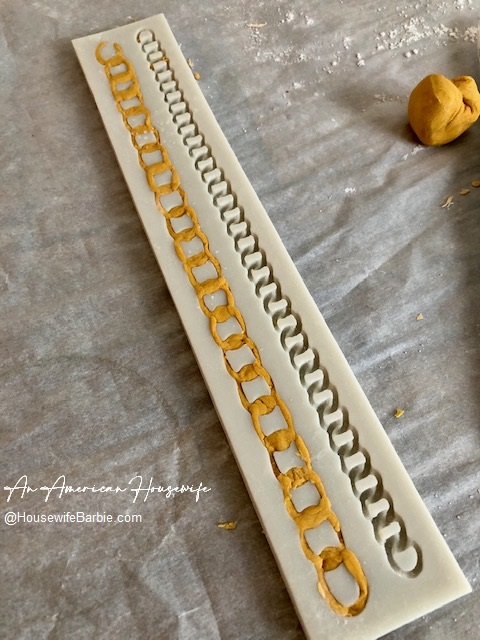
NOTE:  LEARNING CURVE - fondant is really soft for this.  I think a gum paste or something similar would work better and I know professionals have other things they use - but I only had fondant.  I popped out the chain link the best I could. 

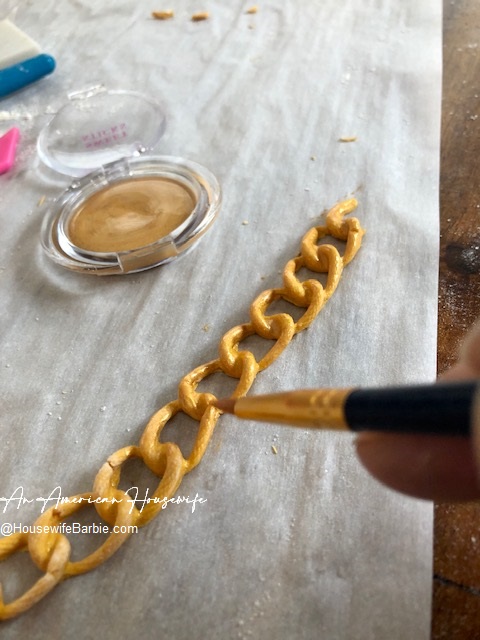
I tried using the edible gold to paint it on before placing it on the cake because I didn't want to accidentally get paint on the cake by doing it after... mistake.  This didn't work at all and the fondant just wanted to break.  MAKE THE PURSE STRAPS AND PUT THEM ON THE PURSE FIRST.  And if you can use gum paste or something other than fondant, you will be happy you did.


While I let the fondant chains sit on parchment for a little bit so they would (hopefully) get hard enough I could pick them up without them falling apart on me... I went back to the cake to attempt to find something to make it look like the seams were sewn.

Maybe they have something to do this design, I have no idea.  But I was grabbing things from all over my kitchen to try, including an icing pick, a straight pin, the head of the straight pin, a long twisted wire, etc. Just use whatever you have in your kitchen to make little indents all over the edges for a fake seam.

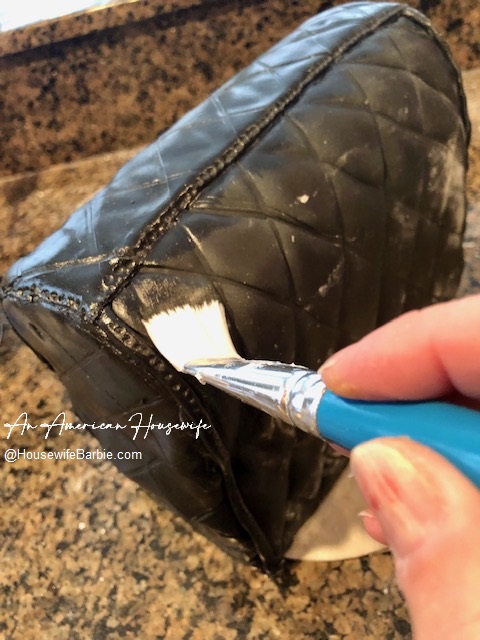
And finally... cleaning it up!  On some cakes I just use a brush and brush the extra powdered sugar or cornstarch off; or sometimes get the pesky spots brushed off with a little water, but to make the fondant shiny, I wanted to use shortening. 

I brushed the whole cake with shortening to make it shiny and keep it soft.


HERE is right after I carefully carried and draped those darn pieces of fondant chain over the cake and down across the front.  I pieced them together as best I could and yes, they were breaking since they hadn't had much time to set up.  I placed a few straight pins in to hold them in place while I got some pieces of black fondant rolled out, and cut them into tiny rectangle shaped pieces about 3/4 of an inch long and a little less than a half inch wide.  Basically about the width of the gold chain links.

Each little piece I poked the indents on, then pinched each end of it and tucked it into the chain links to look like a leather strap was weaved between the gold chain to form the cake's purse strap.

I wanted to make a little circle where the straps attached to the purse, so I grabbed a bottle cap from a random bottle (I think it was a taco sauce bottle) and with a perfectly clean and dry cap, cut out two little circles, with an indent of two tinier circles inside, to which I placed the ends of the purse 'strap' fondant pieces.


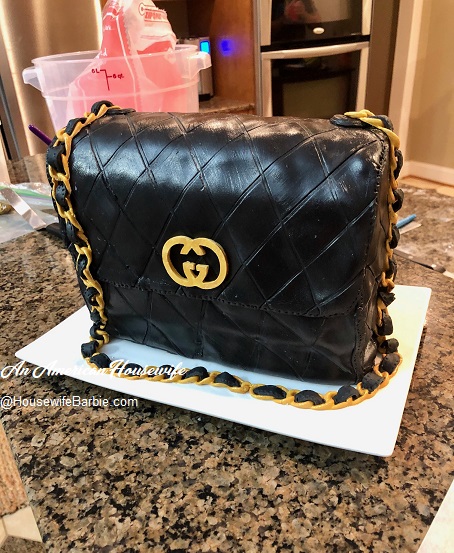
And that's it!  I called it "done" and rushed to get it on the table along with some random items like plates and little gold forks and gold and black napkins - added the birthday gifts and then, they walked in the front door!   :)


Print Friendly and PDF