Showing posts with label dehydrating. Show all posts

1/30/24

Tonight's dinner was chicken and black bean soft tacos

No photos, because I was in the kitchen, my cell phone was in the office and I just didn't feel it was important to get it just to take a picture of some cooked chicken with black beans.  

Dinner:  Chicken and Black Bean Soft Shell Tacos

  • Chicken - precooked breasts and thighs, and food sealed for the freezer a couple months ago
  • Black Beans - canned
  • Seasonings - from the pantry.
  • Salsa - homemade canned (recipe posted on the site numerous times over the years, see right side bar)
  • Lettuce
  • Sour Cream
  • Tortillas - from the freezer.


I did not put any cheddar cheese out tonight and it apparently wasn't missed.  Nothing was said anyway.


Print Friendly and PDF

1/24/24

Roast with Dehydrated Mushrooms

Tonight's dinner is in the instant pot, on the slow cooker setting.  It's a mushroom roast and I'll be serving with potatoes, either home canned or mashed from stored potato flakes.  The star of the show however is the mushrooms.  Our family loves mushrooms cooked with our roasts but obviously mushrooms from the store go bad within days so storing them means you have to choose one or more options of storing longer term.

We store mushrooms in 4 different ways.  

The first, obvious and one we don't actually store too many of are canned from the store.  I may have some still in my 2-3 year storage but they are never my first choice.

The second way we store them is freezing.  Because they go bad so quickly, I have always immediately sliced the whole mushrooms or used sliced mushrooms from the store and put them into a food sealer bag and popped them into the freezer.  This is my primary way of using and storing mushrooms on any given day - when not using food storage items.  It ensures I always had fresh mushrooms on hand for pizza, sauces, roasts, soups, etc.

Third:  Freeze dried.  Expensive, but we do have some cans of freeze dried mushrooms in storage.  Freeze dried is the most expensive option to purchase but the quality and flavor and texture is awesome.

Fourth and last, dehydrated!  And that's what I used today.


This is my regular container of dehydrated mushrooms that lives in my kitchen pantry at all times.  I would always restock it when it got low (although of course I'm not restocking it now that we are using food storage and not buying anything at the grocery store). 

To make them, simply slice your mushrooms or buy store bought sliced and place them on the dehydrator trays.  Dehydrate until they are dried out of all moisture but still pliable.  Place into a jar with a lid and let them set for a week or so, shaking them and letting the moisture left in them equalize out.  Check for no excess moisture left in them, mold, etc.  When you see they are still dry and loose, you can make sure they are sealed tightly and start to use them as needed.

No need to rehydrate before use except if you want to use them pizza.  I add them to the dishes directly and they soak up the liquid/water/broth as they cook.  To rehydrate them for things like pizza, just toss them in a bowl of hot water and let them soak for 10-15 minutes or even overnight.  You can drain off the liquid and use them as you would fresh.


Everything thrown into the slow cooker...

Roast

1 can cream of celery soup
onion powder
dehydrated mushrooms
dehydrated or fresh green onions or onions if you wish
2-3 teaspoons beef base or bouillon
1 soup can of water 
1/4 c dry red wine or even balsamic vinegar (optional)
salt and pepper

Slow cooked about 6-8 hours or until it's fall apart tender.


Print Friendly and PDF

12/17/23

Homemade Beef Jerky - Diving into Dehydrating

This document was extracted from "So Easy to Preserve", 5th ed. 2006. Bulletin 989, Cooperative Extension Service, The University of Georgia, Athens. 


Jerky

Partially freeze meat to make slicing easier.  Slice meat no thicker than ¼ inch. 

Trim and discard all fat from meat because it becomes rancid quickly. 

If a chewy jerky is desired, slice with the grain. Slice across the grain if a more tender, brittle jerky is preferred. A tenderizer can be used according to package directions, if desired. The meat can be marinated for flavor and tenderness. Marinade recipes may include oil, salt, spices and acid ingredients such as vinegar, lemon juice, teriyaki, or soy sauce or wine.

Jerky Marinade

  • 1 1/2 - 2 pounds of lean meat (beef, pork or venison)
  • 1/4 cup soy sauce
  • 1 tablespoon Worcestershire sauce
  • 1/4 teaspoon each of black pepper and garlic powder
  • 1/2 teaspoon onion powder
  • 1 teaspoon hickory smoke-flavored salt
Combine all ingredients. Place strips of meat in a shallow pan and cover with marinade. Cover and refrigerate 1-2 hours or overnight. Products marinated for several hours may be more salty than some people prefer. If you choose to heat the meat prior to drying to decrease the risk of foodborne illness, do so at the end of the marination time. To heat, bring strips and marinade to a boil and boil for 5 minutes before draining and drying. If strips are more than ¼ inch thick, the length of time may need to be increased. If possible, check the temperature of several strips with a metal stem-type thermometer to determine that 160ºF has been reached.

Drying the Meat

Remove meat strips from the marinade and drain on clean, absorbent towels. Arrange strips on dehydrator trays or cake racks placed on baking sheets for oven drying. Place the slices close together, but not touching or overlapping. Place the racks in a dehydrator or oven preheated to 140ºF. Dry until a test piece cracks but does not break when it is bent (10 to 24 hours for samples not heated in marinade). Samples heated in marinade will dry faster. Begin checking samples after 3 hours. Once drying is completed, pat off any beads of oil with clean, absorbent towels and cool. Remove strips from the racks. Cool. Package in glass jars or heavy plastic food storage bags. Vacuum packaging is also a good option.
If the strips were not heated in marinade prior to drying, they can be heated in an oven after drying as an added safety measure. Place strips on a baking sheet, close together, but not touching or overlapping. For strips originally cut 1/4 inch thick or less, heat 10 minutes in an oven preheated to 275ºF. (Thicker strips may require longer heating to reach 160ºF.)

Making Jerky from Ground Meat

Jerky can be made from ground meat using special presses to form or shape the product. Disease-causing microorganisms are more difficult to eliminate in ground meat than in whole meat strips. (If ground meat is used, follow the general tips for safe handling of meat and poultry, above.) Be sure to follow the dehydrator manufacturer’s directions when heating the product at the end of drying time. Again, an internal temperature of 160ºF is necessary to eliminate disease-causing bacteria such as E. coli O157:H7, if present.

Storing the Jerky

Properly dried jerky will keep at room temperature two weeks in a sealed container. For best results, to increase shelf life and maintain best flavor and quality, refrigerate or freeze jerky.


Print Friendly and PDF

5/13/22

Homemade Canned Salsa and How to Quick Dry Fresh Basil


If you planted basil this spring, it's probably already 'ready' because it's one of the easiest herbs to grow and grows so well and so fast!  I have done a few posts on it already and don't need to reinvent the wheel again but the photo above is a link to one of those posts if you are interested.

Another recipe posted many times on my site since I started it in 2006 is our family favorite canned salsa.  We have 3 salsa recipes we tend to like and make often; this recipe (below) is the one I use for canning and have for over 20 years now.


Homemade Salsa


10 Cups of peeled, seeded and chopped tomatoes
5 c chopped onions
3 sweet banana peppers, diced
4 jalapenos, seeded and diced
2 t minced garlic
1 green pepper, chopped
1/2 red pepper, chopped
1 1/4 c vinegar
2 T chili powder
2 1/2 t salt
1 1/2 t cayenne pepper
1 T sugar

To peel/skin your tomatoes easily just put them in boiling water. Skins will split in 10 seconds - 2 minutes. Remove as soon as the skin splits and lay on a clean towel to cool until you can handle them comfortably - or you can dip them into a bowl of ice water if you wish. Some tomatoes won't split but they are still ready;  if it has been in the water for over a minute, lift it out and look at it and feel it. If it looks tight and ready to burst, yet it feels like a water balloon, then remove it to cool. It's ready.  The second your fingers or a knife touch the skin it will probably split on contact.  Tomatoes can be seeded and the juice canned separately or you can use the whole tomato in your salsa and skip that process.  Up to you.

Mix all the ingredients for your salsa and simmer 1-3 hours.

While simmering, be sure to either run your jars and lids and seals through an extra hot dishwasher cycle or boil them in another pot of water so they are hot and sterilized when you are ready to use them.  Ladle salsa into the jars with about 1/2 inch head space at the top.   Wipe the edges completely clean with a clean cloth and place the lid on it and then the ring.  You don't have to tighten them hard - just a quick twist to hold the seal/lid on during the process.  Simmer them in a water bath for 25 minutes for pints, 35 for quarts.   (Originally this old time recipe did not call for a water bath.  The heat from the salsa and the jar will seal the lid.  However, I always water bath can them.)

Remove from the water, set on a towel on the counter and let them cool at room temperature.  You will hear popping noises.  That is the lids sealing.  When completely cooled, store in your pantry or cupboard. 


Print Friendly and PDF

2/23/22

What 6 large green peppers look like after dehydrating them! Crazy isn't it? - Prep and Pantry work going on right now in the American Housewife Household

Busy!  Not much being posted lately by way of recipes, but a busy toddler, a few unexpected things in 'life' we're dealing with and of course the state of things being what they are right now, I'm also trying to do some canning, dehydrating and 'stocking up' just in case.

If you follow me on Instagram you might have already seen this, but I just love seeing the results of dehydrating foods!  

This is the dried green pepper bits from... SIX (6) large green bell peppers!  

It's so awesome!  After drying, each 1/4 cup of diced pepper basically equals about 1 fresh. 

I store bell peppers in various ways, but for our family, I do a few bags of green peppers frozen, and the rest I dry as I tend to use them in soups and stews, which are perfect for dehydrated (or freeze dried). 

Red and yellow peppers are mostly cut into strips and food sealed and frozen as I use them in stir-fry, and fajita's, etc.  It's super easy to cut them into diced if needed as well from frozen state.

(Just because we are on topic - as a side note, I buy containers of sliced mushrooms and immediately put them into the freezer as they are unless I am using them that night or the next day.   I throw them into soups, stews, the pan to saute', etc. straight from frozen state as well).


Print Friendly and PDF

1/30/22

Dehydrating Zucchini for the pantry! Spiralized Zucchini and Half Rounds.


Dehydrating zucchini takes almost zero prep because you do not blanch it or do anything special to it unless you want to take one extra little step - which I do.  Because zucchini has a lot of moisture in it, I sprinkle a tiny bit of sea salt on the slices or spirals and let them set out on paper towels or the dehydrating racks for about a half hour before I pat them dry and put them into the dehydrator.  This leeches out some of the liquid before the process starts.


Zucchini that needs to be used up!

DEHYDRATING ZUCCHINI

  • Wash and pat dry your zucchini
  • Slice, dice, spiral in whatever cuts your family uses most
  • Lay the slices/spirals/dices out on paper towels or the dehydrating racks and sprinkle a tiny bit of salt over to start leeching some of the excess moisture out
  • After about 30 minutes, pat the zucchini dry with a paper towel and place into your dehydrator
  • Dehydrate at 125 degrees for approximately 6-10 hours or so, depending on your appliance and the size and thickness and style of your slices/spirals.  They are done when they are completely dried
  • Place them loosely in a glass jar with a lid and let them sit for at least 4-5 days this will even out the moisture content in all the slices
  • Store in an air tight jar - you can use an oxygen absorber or vacuum seal with your food vac attachment if you wish

Do not reconstitute them before using.  Zucchini should be added at the last second to your soup or meal as it will soak up the liquid right away and be perfect for serving.  

The spirals are great to leave as is for soups or crumble them up to add to your batter for zucchini bread or muffins!  Crumbled, they are just like you shredded them fresh.  You only have to use about 1/3 of a cup of dried to equal a whole cup of fresh! 

_____________________________________________

Here are some of the spirals I cut going into the dehydrator... I also did half slices, which is my 'go to' cut for most of our zucchini dishes. 

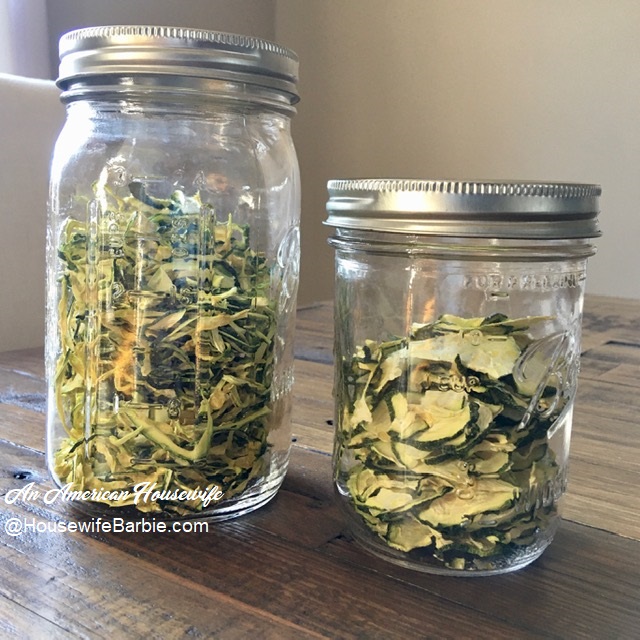
All the zucchini you see in the top photo dehydrated down to these two small jars. 

Dehydrated Zucchini - spirals and half rounds
Dehydrated Zucchini

 Print Friendly and PDF

1/23/22

From my Grandmother's Recipe Box - Homemade Grape Nuts

 
____________________________________________


Homemade Grape Nuts

3 1/2 cup whole wheat flour
1 cup dark syrup
2 cup buttermilk
1 teaspoon soda
1 teaspoon salt

Mix well and bake in a slow oven.  Cool.  Cut in squares and dry in oven.  When it is good and dry, grind it.


Print Friendly and PDF

1/11/22

From my Instagram: Sugar Free (keto) Meringue Sprinkle Cookies


As with many sugarfree recipes there are some important notes.... 

The first note is the sprinkles.  If you want your meringue cookies to be sugarfree, you have to use sugarfree sprinkles.  Granted, there are so few sprinkles on each cookie, if you aren't cutting sugar because you have to, but simply because you want to cut down a little in your everyday foods, then you could certainly use regular sprinkles.  But if you can't do sugar at all; then you must use sugarfree.

Another note:  if it's a humid or wet day where you live and are making these, the egg whites are a bit cranky and might not want to whip up quite as well as they do on dry, hot, sunny days.  You can add cream of tartar to help, and use room-temperature eggs to help overcome this.  If all else fails and you have some meringue powder in the cupboard, add a tablespoon of that to your egg whites.  They will whip right up after that.

There are a couple more important little notes but I'll talk about those below in the recipe.


Admittedly... I don't actually use a recipe when I make these.  You don't really need one, because the basic idea is about 2 egg whites to each 1/3-1/2 ish cup of sugar or sweetener.  That's it. 

You can add vanilla or almond flavor (the two most used) if you wish.  But because egg whites can be a little temperamental, you can help them whip up to a nice stiff batter by adding a little cream of tartar, and it helps to whip them at room temperature - not straight from the refrigerator.   You can leave them out on the kitchen counter overnight if you want to make these in the morning.
 
 
Keto Sugar free Meringue Cookies
 
4 large egg whites 
1/4 t cream of tartar* 
little dash of salt - optional
3/4 c sugar free powdered sweetener*
1-2 t flavor extract of choice* 
 
Bake these on parchment paper.  In a bowl, with an electric hand mixer, beat the egg whites until they are frothy.  Add a bit of the cream of tartar and/or salt if you are using it to help the meringue whip.  Add your flavor extracts of choice (more on that below) and add the powdered sweetener by sprinkling as you continue to whip or mix, until stiff peaks form.

Spoon the mixture into a piping bag with any large star tip or if you don't have one, you can just put into a bag or baggy and cut the end off to pipe little circle mounds.  Pipe little stars or mounds until the batter is used up. Sprinkle the tops if you wish.  (You can also add a bit of food color to the batter if you want them colored or striped or even tie-dye.) 

Bake at a very low temperature (from 170 - 220 degrees but no higher)  for about 40-50 minutes depending on how large your little mounds/stars are. You can 'test' them by gently lifting a couple off the parchment.  They might be a tad bit moist in the center yet but basically will lift off the parchment easily.  If they are sticky or don't lift at all, give them another 5-6 minutes and check again.

When they basically lift off for you, just turn the oven off and prop open the oven door to vent, and just let the meringue cookies cool in the oven.   After about an hour you can remove them from the parchment and place them on a rack to cool completely.  They can be stored in an airtight container on the counter after that.


 _________________________________________
 
 
*if you want to use a meringue powder instead of cream of tartar that works great too.   Just add a tablespoon of the meringue powder (without sugar added) to your egg whites and beat stiff.  

*Amount of sweetener is up to you.  You can taste test and add more if you wish.  A cup of sweetener to 4 egg whites is great, but use less if you don't like your meringues very sweet.  Also - the kind of sweetener makes a difference in not only taste but how they whip up.  Using allulose doesn't work as well as powdered erythritol.

*The two favorite extract flavors for these are usually vanilla and/or almond extract.  I used a bit of vanilla, a bit of almond and a tiny smidgen of 'cake batter' flavor.  I didn't care if my meringues turned out a little yellowish so I used regular vanilla and not the 'clear' that I would have if I cared.  Also, the 'cake batter' flavor is yellow so that made the finished baked meringues a little yellow tinged too.


If you skipped the notes above - my finished meringues turned a bit 'yellow' because I didn't care if they were white after baking (they were just for us to munch on) so I didn't bother using up my good "clear" vanilla extract on them... Ha ha. 

I also added a touch of 'cake batter' flavoring which is yellow and makes the finished product a bit yellowish because of it.  


Print Friendly and PDF

9/8/21

From my Instagram: I've been dehydrating again... Dehydrating Lime Peels, Whole Limes and Cabbage (UPDATED)

THERE IS A SMALL UPDATE ON MY DEHYDRATOR AT THE END OF THE POST (1/22) 

I (like most all of you) are so so so busy lately that I never find the time to pop in to post - even though I obviously cook and bake daily.  Three or more times a day.  But I often don't bother to take photos - or I start to take them but forget to take a 'finished' product picture - or I do take photos and then they live in my computer files and never see the light of day because.... too busy.

A couple weeks ago I was doing some dehydrating.  I had limes leftover from a weekend of guests, and I didn't want them to go bad before I could get around to using them.  So, I juiced the limes to get the juice for my favorite chicken marinade and then used the peel to get a nice little bottle of dried lime peel.  I like to keep dried lemon peel, lime peel and orange peel on hand for baking and cooking.

I also had extra cabbage on hand - which lasts forever - so I didn't need to hurry really, but there have been times when I wanted cabbage and we didn't have any so I decided to dehydrate a head of it so I'd have it ready in the pantry for beef stew and boiled cabbage, etc.


There really is no recipe for drying cabbage.

You don't have to blanche it or do anything to prep it. 
Just slice into thin strips or small pieces, place them on your dehydrator trays, and let them dry until the pieces are dry, small and ready to put into a mason jar or container of your choice.


For the limes I used half of them to make dried lime peels for the pantry and then used the rest to dry 'whole' and grind up into dried lime powder.  You can buy dried lime powder and dried lime slices online but they are sooo simple to make yourself!  

For the dried peel, just peel the zest off your lime (the green part) and lay them out to dry on your tray.  When they are brittle, you can pop them into your container, or chop them a bit first, or spin them in a small food processor first to chop them quick and easy.

To do the lime slices, just wash your limes well and slice thin.
Lay the slices out and dry until brittle.
They will turn quite dark.
You can use them as is to cook with (laid under chicken and fish is nice!) but I grind mine up and use the dried lime powder in marinades.


I just reuse old spice bottles and repurpose them to whatever I need at the time.
This one now holds dried lime zest.


This is a close up of whole dried limes ground into powder.


In 2022 I upgraded my dehydrator to a larger, rectangle version with shelves and adjustable temperature.  Any dehydrator will do, but I do find the upgrade is easier and better to adjust the temperature so I get the colors of my goods to stay nice and bright.


Print Friendly and PDF

3/6/17

Using your Food Storage: Healthy, All Natural Peanut Butter - Homemade from Peanut Powder

This post is sponsored by Valley Food Storage


There is a good feeling that comes with making your own foods from scratch; not to mention knowing just what is IN your foods.  No preservatives, chemicals or artificial anything!

One of the items I always have on hand is peanut powder.  I keep this on hand not only in our emergency storage, but I use it my daily cooking - (My Chocolate Peanut Butter Protein Bars - yum!)

Valley Food Storage is a company specializing in long term storage food.  Most of their items are packaged for up to 25 year storage in optimal storage conditions; but their foods are also terrific for every day use, traveling and camping or hiking.  They are always adding new products to their line and reached out to me to test a couple of their freeze dried items as well as their peanut powder.

What I loved right off the bat was the really long ingredients listing.

Ingredients: Peanuts

That's it. Peanuts.

Opening the package I really loved how finely ground it was! Unlike another brand I've used in the past (and no longer buy) that was grainy, this is fine grained and smells so fresh!

The true test of any peanut powder isn't how it works in things like smoothies or baked goods because the flavor and texture can be masked by other products.  No, the real test is to see if it makes a good everyday peanut butter!  I need it to be smooth, fresh tasting, delicious and so good I could eat it with a spoon, not just on a sandwich.

To re-hydrate into peanut butter you use equal portions of powder and water to start.

Here is 2 Tablespoons of Valley Food Storage Peanut Powder mixed with 2 Tablespoons water....  quickly mixed with a spoon.  Wow.  It was mixing so quickly and easily, but best of all?  Smooth!


After you have it mixed, you can leave it as is with nothing else in it for a really healthy version but you will probably want to add a couple items to make the flavor 'pop' and taste more like the peanut butter we Americans are all accustomed to.  Our regular 'off the store shelf' peanut actually adds a number of items including corn syrup (sugar), salt, oils, etc.

I suggest adding just two items;  salt and either a natural sweetener or honey!   You will want to do taste tests on how much you want to add but a good starting point for 2 T powder mixed with 2 T water is a shake (dash) of salt and about 1/2 teaspoon honey or sweetener.  Mix.  Let it set for a minute or two for the flavors to meld together a bit.  Now taste test.  Add a little more sweetener if you wish or a few more grains of salt.  Again: the normal American is used to peanut butter that has a lot of sweeteners in it so you may have to teach your body what true homemade, healthier and less sweet versions taste like.


I found this peanut powder to be so good!  I actually ate it all with a spoon and didn't even make it into a sandwich or anything else. 

Not only did I think it was really good, but it's now my current #1 favorite brand for purchasing.  It blows my previous brands out of the water in fresh taste and texture.


If you like crunchy style peanut butter so chop up some dry roasted peanuts with your food chopper or your food processor (just PULSE quickly do not let it run!) and add the amount you wish to your homemade peanut butter.


Print Friendly and PDF

8/1/16

Nature's Candy: Dehydrating fresh pineapple (only 1 ingredient needed)


The photo is silly with little sunshine's because it's a screen shot of my snapchat picture I put on my storyline for my family that day. 

Dehydrating pineapple slices is so quick and easy - I found I do not need any other ingredients at all.  You don't need to dip them in a lemon juice mixture or use citric acid or anything.  Just slice and dry!  

Dehydrated Pineapple

1 fresh pineapple

Clean and core your pineapple.  Slice it into either small 1" pieces or thin slices, depending on what you like best.  The idea is to have your pieces or slices pretty uniform in size and thickness.  Dehydrate according to your machine; ours does not have a temperature control, just a simple 'on' and 'off'.  It takes about 6-7 hours dry time for our machine.   Flip the slices or pieces over half way through cooking. I also like to rotate the trays as they dry faster on the bottom rack than the top.  Remove slices to a plate to cool as they become dehydrated. 

Eat immediately or put in plastic baggy or vacuum food seal. 


Print Friendly and PDF

6/8/16

Drying Garden Basil


Basil is one of the easiest things to grow - it grows 'like a weed' usually!  And soon you have these beautiful little basil leaves ready to be used in your pasta dishes, your Italian sauces, your chicken or potato dishes... but because it does grow so well, you probably have more basil than you need.  No worries.  It's so easy to dry and store no matter how you choose to dry it.


Choose your basil from the garden
Rinse gently in cool water and pat dry or let air dry on a paper towel
If you have cut long stems of basil, simply tie the end with twine or string, or use a rubber band and hang a small bunch in a cool, dry place like your pantry. Within a week or so depending on your humidity level, your basil will be dry and ready for use.
If you have leaves;  
  • Microwave individual leaves on a paper towel with another paper towel covering, for 1 minute. Check your leaves, remove any smaller leaves that are dried and microwave the rest for another 30 seconds if needed.  They should be dried by now, if not, continue in 15 second increments.  
  • Oven: turn your oven on it's lowest setting.  I don't use this way because my ovens lowest setting is 175 and I find it's easier to microwave for 1 1/2 minutes or use my dehydrator.  Place on a paper towel on a baking sheet in the oven at your lowest setting and watch, turning over if need be, for anywhere from 8 minutes to 20 minutes depending on the temperature of your oven.
  • Dehydrator:  Place individual leaves on your racks,do not allow leaves to touch.  If you have an herb setting, use it.  Most lower cost dehydrators just have "on" and "off" so turn it on, your basil leaves should be done in about 2-4 minutes.  The longest mine have ever taken was 8 minutes and that is when they were put in the dehydrator wet from being rinsed.
  • If it's not too humid, you can also just place them on paper towels on the counter or in the sun coming through the window to  air dry.

Crush or crumble into your air tight container and use in your recipes.  I keep mine in an old BASIL spice jar I bought a few years ago at the grocery store and just keep refilling it as needed.  I do the same with our dill, red pepper flakes and cumin containers!


Print Friendly and PDF

4/9/15

Homemade Canvas Food Dehydrator Tray Liners


I didn't purchase a food dehydrator of my own until my husband saw them on sale at Lowe's for just under fifty bucks, so it's probably not a surprise I certainly am not going to pay the high price companies want for food dehydrator trays!  However, they are needed!  The holes of a food dehydrator let tiny pieces of dried food fall through them and believe me, diced carrots get tiny! (And peas and blueberries and many other dried goodies!).

The first thing I did was march down to a local store and buy a few sheets of clear plastic canvas.  Walmart has them, but Michaels was closer to me that day so I got mine there for about $.59 each.  If you don't have a store near you, I'll link to a couple random options from Amazon at the bottom of this post.

I simply laid two canvas pieces out on the counter, drew around them with a marker (I used a highlighter first, as it was right next to me in a kitchen drawer and I was too lazy to walk through the house to the office to get a Sharpie.  However, I realized if I wanted to let others know how to do this, I better use a marker that showed up on the photos!  So I did grab a Sharpie for a couple of the pictures.)

Lay the canvas side by side on the counter.
You can tape them in place in the corners if you find they are moving too much on you to trace.
Trace around both the outside of the tray and then the inside circle as well.

Use scissors to cut the canvas into half circles.
Cut on the *INSIDE* of the line around the larger outside circle.
Cut on the *OUTSIDE* of the line on the inner circle.

Fit to your tray.
You may have to trim some of the edges to make it fit.
When it lays flat inside your tray, both flat around the outside and inside edge, your are done!

Washable, sturdy, and will allow your fruit and vegetables to dry without falling through the holes of the dehydrator trays.


Use sheets of plastic canvas.  I chose clear so there is no color added.


Laying the two canvas pieces side by side and placing the dehydrator tray over them - equal on both sides, directly down the center - to trace both the outer edge and the inner circle.


Trace around the outside edge - being careful the canvas doesn't move around - so you get a perfect half circle.
You will cut around the INSIDE of this trace line.


Carefully trace the inner circle as well.
You will cut around the OUTSIDE of this smaller trace line.


After you make your first trays you can actually use them as a pattern to trace additional liners and not have to use the tray to trace around each time.  This makes it a little easier.


Remember to cut inside the line as it needs to fit INSIDE your tray -  You will probably have to try to fit, trim, fit, trim, to get it to fit perfectly.


Two liners placed on the dehydrator tray!


Print Friendly and PDF

4/7/15

Packing and Storing Dried Foods - Diving into Dehydrating!


Dried foods are susceptible to insect contamination and moisture reabsorption and must be properly packaged and stored immediately. First, cool completely. Warm food causes sweating which could provide enough moisture for mold to grow. Pack foods into clean, dry insect-proof containers as tightly as possible without crushing.

Store dried foods in clean, dry home canning jars, plastic freezer containers with tight-fitting lids or in plastic freezer bags. Vacuum packaging is also a good option. Pack foods in amounts that can be used all at once. Each time a package is re-opened, the food is exposed to air and moisture that can lower the quality of the food and result in spoilage.

Pack food in amounts that will be used in a recipe. Every time a package is re-opened, the food is exposed to air and moisture that lower the quality of the food.

Fruit that has been sulfured should not touch metal. Place the fruit in a plastic bag before storing it in a metal can. Sulfur fumes will react with the metal and cause color changes in the fruit.

Dried foods should be stored in cool, dry, dark areas. Recommended storage times for dried foods range from 4 months to 1 year. Because food quality is affected by heat, the storage temperature helps determine the length of storage; the higher the temperature, the shorter the storage time. Most dried fruits can be stored for 1 year at 60ºF, 6 months at 80ºF. Vegetables have about half the shelf-life of fruits.

Foods that are packaged seemingly "bone dry" can spoil if moisture is reabsorbed during storage. Check dried foods frequently during storage to see if they are still dry. Glass containers are excellent for storage because any moisture that collects on the inside can be seen easily. Foods affected by moisture, but not spoiled, should be used immediately or redried and repackaged. Moldy foods should be discarded.

Conditioning Fruits


The moisture content of home dried fruit should be about 20 percent. When the fruit is taken from the dehydrator, the remaining moisture may not be distributed equally among the pieces because of their size or their location in the dehydrator. Conditioning is the process used to equalize the moisture. It reduces the risk of mold growth.

To condition the fruit, take the dried fruit that has cooled and pack it loosely in plastic or glass jars. Seal the containers and let them stand for 7 to 10 days. The excess moisture in some pieces will be absorbed by the drier pieces. Shake the jars daily to separate the pieces and check the moisture condensation. If condensation develops in the jar, return the fruit to the dehydrator for more drying. After conditioning, package and store the fruit as described above.

Determining Dryness of Vegetables


Vegetables should be dried until they are brittle or "crisp." Some vegetables actually shatter if hit with a hammer. At this stage, they should contain about 10 percent moisture. Because they are so dry, they do not need conditioning like fruits.


This document was extracted from "So Easy to Preserve", 5th ed. 2006. Bulletin 989, Cooperative Extension Service, The University of Georgia, Athens. Revised by Elizabeth L. Andress. Ph.D. and Judy A. Harrison, Ph.D., Extension Foods Specialists.


Weston Food Dehydrator, 4-Tray
Waring Pro Professional Dehydrator
FoodSaver  Vacuum Sealing System


Print Friendly and PDF