Showing posts with label zucchini. Show all posts

2/12/24

Carrot or Vegetable Casserole (an old, vintage church cookbook style, grandma recipe)


A older, 'vintage' Grandma recipe that I've been making off and on in various ways for years now (since my own kids were itty bitty) that can be varied with whatever you want or whatever you have on hand.

I posted this recipe in 2008 using all carrots from the garden: https://www.housewifebarbie.com/2008/10/carrot-casserole.html

Carrot Casserole

2 pounds carrots, cubed, chunks or sliced
1 c water
1 medium sweet onion
2 T butter, melted
1 1/2 c shredded cheddar cheese
1 c Ritz Crackers, or similar buttery flavor cracker, crushed
salt and pepper to taste
4 slices bacon, cooked and crumbed
2 eggs, slightly beaten
1/2 c more buttery crumbs for a topping (optional)


Combine the carrots and water in a saucepan and cook about 15 minutes until just tender. Drain and mash just a little bit to give it a mixed texture. Saute' onion in butter until translucent but not brown. Combine all ingredients in a greased casserole dish. Sprinkle with 1/2 c crumbs if preferred, bake uncovered at 350 for about 40 minutes until hot completely through and golden.


Later I posted the recipe again using many vegetables I had on hand, like zucchini and yellow squash.

Vegetable Casserole (Use;  Yellow Squash, Zucchini, Onions, Carrots)

2 - 3 cups squash;  either yellow or zucchini or a mixture of both, sliced and cooked just tender
1 medium sweet onion like Vidalia, chopped and added to the squash cooking the last 3 minutes
2 carrots, sliced or grated (if sliced, add to the cooking squash or use a can of sliced carrots if you need to substitute)
1 egg, slightly beaten
3 T butter
1/2 c mayonnaise
1 T sugar or substitute
1 c cheddar cheese, grated
1 - 1 1/2 cups crackers, crumbled such as TownHouse or Ritz
Dash Cayenne pepper
salt and pepper

Put the well drained zucchini or yellow squash and onions into a mixing bowl.  Add the carrots, egg, butter, mayonnaise, sugar, half the cheese, half the crackers crumbs and the cayenne and salt and pepper.  Mix gently.  Put into a buttered casserole dish.  Top with the remaining cheese and cracker crumbs.  Bake at 350 for about 25-35 minutes until warmed through and golden.


Last night for dinner we had this casserole and again, improvising what I was wanting to use up, and what we had to work with.

The carrots are the the final ones in the bag of carrots given to me in November (?).   They are locally grown, and may have originally been part of a food bank, or maybe just gifted to someone.  They don't eat or use carrots and they gave them to someone else.  They also didn't use or cook with them so they gave them to someone who gave them to my daughter.  A whole bag of fresh garden carrots, but she doesn't love carrots and never cooks with them (nor wanted to clean and cut these for fresh with ranch) so she gave them to me.  I've been using a few here and there ever since but they needed to be used up as a couple were starting to get a bit soft. 

So, carrot casserole it was!  I didn't quite have enough, so I grabbed a jar of home canned carrots as well.
I had some leftover green onion tops from a few weeks ago that needed to be used up from the fridge.
The egg was powdered whole egg.
The butter, home canned.
The crackers were dry canned from the pantry (food sealed with a dry canning attachment sealer)
Mayo and spices I have. 
Cheese is from a block of cheddar I had in the deep freezer.  It's my last one, so I'll have to switch to freeze dried in the future when this one is used up.


dry sealed crackers - I used Keebler Butter Flavor

home canned butter - canned back when butter was affordable!

powdered egg

canned baby carrots when I had a bunch to 'use up'

The original plan for this recipe/dish - using up the fresh carrots and some leftover green onion tops


Mixed the egg powder in with the mayo and spices - and water to reconstitute the egg per directions (I think 2 1/2 T)


Lots and lots of cheddar on top as I grated too much but just decided to use it all.  We love cheese so it's all good.


Print Friendly and PDF

2/24/23

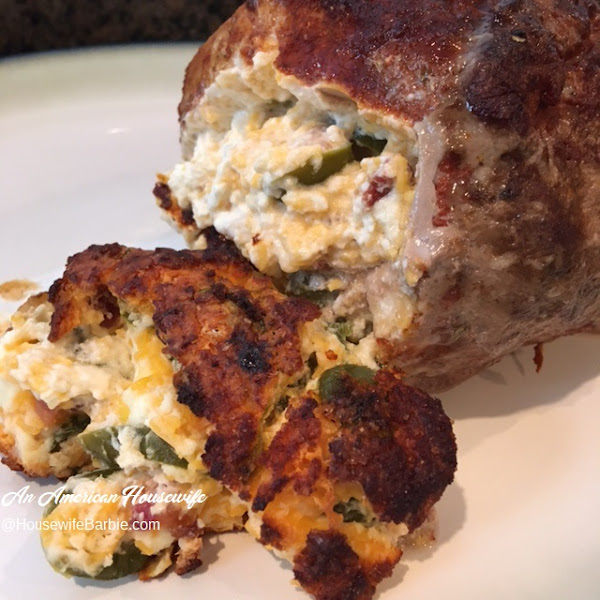
Jalapeno and Cheese Stuffed Pork Loin Roast


(This is based on my pork chop version, which was posted in 2017 - which you can find here:  Jalapeno, Cheese and Bacon Smothered Grilled Pork Chops)

Here is the pork roast right after it came out of the oven, placed on the serving platter, before adding the vegetables for serving....

Basically you can use any amount of the cheese, jalapenos and bacon that you wish.  The same with the size pork loin or pork roast.  Depending on large of one you bought or how many people you are serving.

This pork roast looks fairly small in the photos but easily feeds 4 people.


Cheese, bacon & Jalapeno Pork Roast

Pork Loin or Roast (your choice cut and how large)
cream cheese - I used about 1/2 block or 4 oz. for this small pork roast, which was plenty
cheddar cheese (I used sharp cheddar this time but mild, medium or sharp will work fine)
diced jalapeno peppers - either fresh or bottled - your choice
cooked, crumbled bacon (fresh cooked and crumbled or bagged - your choice)
Optional:  cilantro, garlic or onion powder or even green onions

Form a pocket in the meat:

Lay the pork down on its side and use a knife to slice into the center, making a slice horizontally, but leaving about 1/2 - 3/4 inch on each side and the back/bottom.  Now turn the knife and make a vertical slice up and down, again leaving a bit on the top and bottom so you don't slice all the way through.  I added a couple more slices at angles in order to fill with more cheese filling.

Filling:

The amounts of the cheeses, bacon and jalapeno are up to you and your tastes.  If you don't like spicy foods or have children eating that are not used to spice, cut back on the jalapenos or just use a small can of diced green chili peppers (they are mild). 

We used about 4 ounces cream cheese, 1/3 cup cheddar, 1/4 cup sliced jalapenos, 1 T cooked, crumbled bacon (I just grabbed some of the Hormel real bacon bits I keep in the freezer at all times).  Mash this together and set aside.

Preheat your oven to 325.

Dry Rub: 

You could use any dry rub you like.  For this one I threw together a simple mixture using:
2 T salt
1 T ground coriander
2 T smoked paprika
3 T natural sweetener (most people would use sugar here - we are sugar free)
1/2 T espresso powder
1/2 t rosemary

Stand the pork upright and stuff the cheese mixture in.  Press it in well so it stays. 
Cover the pork roast in your dry rub spice mixture.  Roll and press gently to cover.

Heat a cast iron skillet on the stove with a bit of oil in it.  Now sear the pork roast on all sides except the cheese stuffed side.  Transfer the cast iron skillet (or any oven safe pan) to the oven and proceed to roast until done.  For the roast in my photos it was about an hour. 

(Note:  I also baked it propped 'up' so the cheese filling was on top during cooking.  This isn't necessary but I wanted to keep it all in during cooking and not have it melt/run out.  It naturally falls out when you lay it on the serving platter anyway but this way I kept it all in until serving time.)

PHOTOS BELOW


A simple mixture of cheeses and a bit of real bacon crumbles

   The pocket formed in the pork by slicing with a knife, but not all the way through.
Stuffed and ready for its dry rub marinade

 
All dressed up...
 
Searing in a hot pan
Transferring to the oven to finish cooking for about an hour
Hot from the oven, placed on a serving platter


Grabbed random veggies to throw together to serve with it; spinach, peppers, onions and zucchini squash with some oil, salt and pepper 
So simple yet so good


Print Friendly and PDF

1/30/22

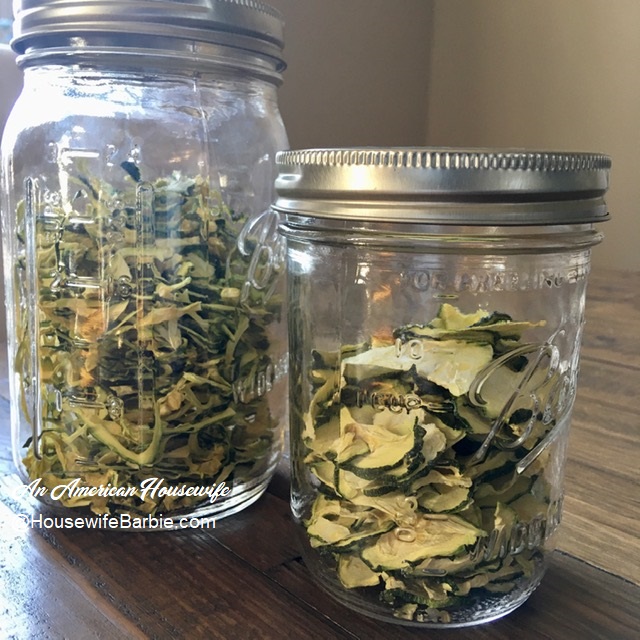
Dehydrating Zucchini for the pantry! Spiralized Zucchini and Half Rounds.


Dehydrating zucchini takes almost zero prep because you do not blanch it or do anything special to it unless you want to take one extra little step - which I do.  Because zucchini has a lot of moisture in it, I sprinkle a tiny bit of sea salt on the slices or spirals and let them set out on paper towels or the dehydrating racks for about a half hour before I pat them dry and put them into the dehydrator.  This leeches out some of the liquid before the process starts.


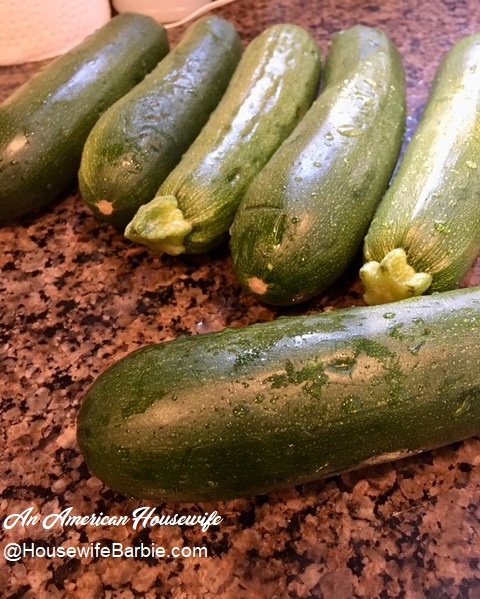
Zucchini that needs to be used up!

DEHYDRATING ZUCCHINI

  • Wash and pat dry your zucchini
  • Slice, dice, spiral in whatever cuts your family uses most
  • Lay the slices/spirals/dices out on paper towels or the dehydrating racks and sprinkle a tiny bit of salt over to start leeching some of the excess moisture out
  • After about 30 minutes, pat the zucchini dry with a paper towel and place into your dehydrator
  • Dehydrate at 125 degrees for approximately 6-10 hours or so, depending on your appliance and the size and thickness and style of your slices/spirals.  They are done when they are completely dried
  • Place them loosely in a glass jar with a lid and let them sit for at least 4-5 days this will even out the moisture content in all the slices
  • Store in an air tight jar - you can use an oxygen absorber or vacuum seal with your food vac attachment if you wish

Do not reconstitute them before using.  Zucchini should be added at the last second to your soup or meal as it will soak up the liquid right away and be perfect for serving.  

The spirals are great to leave as is for soups or crumble them up to add to your batter for zucchini bread or muffins!  Crumbled, they are just like you shredded them fresh.  You only have to use about 1/3 of a cup of dried to equal a whole cup of fresh! 

_____________________________________________

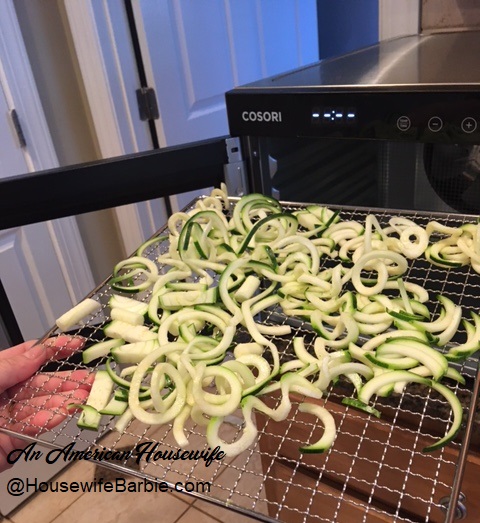
Here are some of the spirals I cut going into the dehydrator... I also did half slices, which is my 'go to' cut for most of our zucchini dishes. 

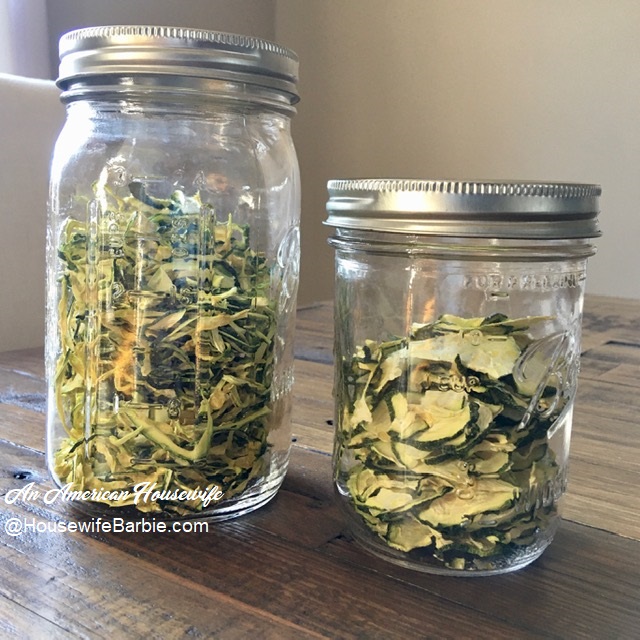
All the zucchini you see in the top photo dehydrated down to these two small jars. 

Dehydrated Zucchini - spirals and half rounds
Dehydrated Zucchini

 Print Friendly and PDF

9/17/21

Salmon and Zucchini Sheet Pan Dinner


When I use my regular un-marinated salmon our go-to seasoning is indubitably lemon pepper!  A simple drizzle of olive oil brushed on, with lemon pepper and perhaps a light sprinkle of salt.  When it comes out of the oven, I dot it with real butter and let it melt, resulting in our favorite way to season salmon.  

Typically we like to grill our salmon (same seasoning) but when I want an easy-peasy, quick dinner I make it into a sheet pan dinner.  Surround the salmon with sliced zucchini and yellow squash, also drizzled with olive oil or avocado oil, and sprinkle with fresh cracked black pepper and salt, or a little of the lemon pepper as well.

Into the oven at 375 for about 20-25 minutes until the salmon is done and turning golden.  That's it! How easy is this?


Either use marinated salmon or plain that you season yourself. Place on a greased/oiled/or parchment covered pan.  I always use foil for easy clean up.


 Into the oven with you!


Print Friendly and PDF

7/25/21

Zucchini Side Dish - (Using up yellow squash and zucchini -use as a side dish or a main entree)


Reposting this one as I go through photos in my file folders.... This dish isn't one that really has a 'recipe' so much as a throw it all together type thing.

When you eat low carb for years there are certain items you automatically always seem to have on hand, and for us, it's yellow squash and zucchini.  The problem is that sometimes I buy them and then we go all week without having anything that uses them and I forget about them until I realize I have to use them up or they are going to go bad.  

I've spiralized them and froze them at this point, or spiralized them and served them along side whatever meal we had that evening as a 'noodle' side dish or I quickly use them in random recipes (many already posted on this site).  
 
***One of my favorite quick ways to use them up is to slice them into rounds about 1/2 inch thick, drizzle them with olive oil, sprinkle with salt and pepper and grill them!  YUM!*** 
 
Here is another quick 'use em' up' dish....
 
Sauteed Zucchini and Yellow Squash
 
Zucchini and/or Yellow Squash
Mushrooms
Olive Oil
Salt and Pepper
Feta Cheese 
options:  a bit of diced red/yellow or orange pepper, a little bit of onion, green onion or even diced celery

Add some olive oil to your pan and then add the vegetables.  Saute' until they are tender.  Season with salt and pepper.  Sprinkle with feta cheese before serving.


Print Friendly and PDF

7/19/20

Spiralized Zucchini to Substitute for Spaghetti (a low carb, keto, Atkins option)


There is no 'recipe' as all you need is fresh zucchini.


Spiralize as much as you wish (keeping in mind it will cook 'down' for your dish).
To 'cook' your faux pasta, you can simply put it in a microwavable dish and microwave it as-is for a minute or two (depends on how much you are cooking) or my favorite way; a brief boil.

Simply heat some water to boil, add the zucchini, cook for a minute, and strain in a colander.


That's it!  Ready to use with your favorite spaghetti or alfredo sauce, or any dish that calls for pasta that you are making low carb or keto.   

NOTES:

The only thing I'd note is remember NOT TO COOK THEM TOO LONG.  You don't want them mushy.  And if your dish is going to be baked or cooked after adding the zucchini noodles, you don't have to heat them first at all.  Just add to the dish and bake as usual (like for lasagna.  You could use your ribbon spiralizer blade, a sharp knife or a potato peeler to slice... add to the dish as you would pasta and then bake).


Print Friendly and PDF

2/13/20

Zucchini Stir-fry - chicken, feta, peppers.... low carb and sugar free


This one isn't even a real recipe, it's just something I throw together every once in awhile, and it's a huge hit every time.  

I use leftover chicken, zucchini and feta cheese as the 'must have' list and other things if we have them or I feel like it.  I use all sorts of leftover chicken, depending on what we have.  I think some leftover grilled chicken is the best, but any leftovers will do.  Seasoned or not.  If you don't have leftovers, just quickly cook a chicken breast or two, whichever way you like.  Microwave, grill, instant pot, even boil.  Adding a little seasoning will be best - even if it's just salt and pepper but anything you like is fine.

Zucchini Stir-Fry

2-3 zucchini, sliced, diced or chopped
Green onion or onion, chopped, sliced
mushrooms, sliced
yellow or orange peppers, sliced or chopped
oil of choice (olive oil, avocado oil, etc.)
Options:  fresh minced garlic, leftover cooked chicken pieces, celery, etc.
feta cheese, crumbled
salt and pepper

In a pan on the stove, heat a dash of oil and add the zucchini and green onions, peppers and mushrooms if you are using them.  Cook over medium high heat until they start to soften a bit, add a little fresh garlic to your own taste preference.  Add the cooked chicken, heat through and season with salt and pepper.  If you wish to add some dried red pepper flakes to this dish, you can - add them with the oil and vegetables at the beginning.  We've found we like simple olive oil, salt and pepper for the only flavorings. Top with crumbled feta, stir in a bit, and then serve!
 
Keep in mind your personal carb counts to determine how much garlic, onions, mushrooms and pepper you wish to use. 


Print Friendly and PDF

11/23/19

Low Carb and Sugar Free Zucchini Trifle? YES! Zucchini BREAD Trifle! With cream cheese frosting and whipped cream


I had this on my Instagram Story and planned on putting the recipe here but... life.  So this morning I'm finally putting the photos up!

When and if you say you made a 'zucchini trifle' it probably wouldn't sound all that great to a lot of a people (I'm guessing).  But what if you say "Zucchini Bread Trifle with Cream Cheese Whipped Cream" or something like that?  So, basically it's a yummy zucchini bread with cream cheese frosting but made into a dessert.

This really doesn't need a recipe... as you just throw it together with your favorite zucchini bread recipe, your favorite cream cheese frosting recipe and some vanilla whipped cream.  This can be low carb and sugar free or not.

I made this one low carb and sugar free using a typical zucchini bread recipe but just substituting almond flour and whey protein powder along with the natural sweetener instead of flour and sugar.

3 eggs
1/4 c butter
2/3 c sweetener of your choice (I used Lakanto this time, which is erythritol & monk fruit)
1 3/4 c almond flour
1/4 c unflavored or vanilla whey protein powder, or oat fiber or a tablespoon of coconut flour
1 t vanilla
1/2 t baking powder
1/2 t baking soda
1 t cinnamon
1/4 - 1/2 t ginger
1/2 t salt
Shredded zucchini - about a cup (I use a 'handful')
Optional - walnuts

I made 2 loaves - one with nuts and one without.  The 'nut' version tended to be a little more crumbly than the 'without' - probably because I used too many nuts!  Ha ha.  So keep the nuts to about 1/2 cup I think. 

Mix the butter and eggs and sweetener with the vanilla.  Add the dry ingredients, mix and then stir in the zucchini.  Pour into a parchment lined and greased loaf pan/bread pan (9X5) and bake at 325-350 degrees for about an hour.  The temperature and and length of time depends on your oven and how dark your pan is.  Anything between 45-65 minutes until it's done in the middle and no longer battery. Let it cool in the pan for about 10-12 minutes before you turn it out to cool completely. 

As it cools mix up a basic cream cheese frosting

I used about;
2 T butter
4 T cream cheese
1 c granulated sweetener (I used Swerve Confectioner's this time)
1 T heavy cream or almond milk
1 t vanilla


Whip about 2 cups heavy cream until it forms soft peaks in a large mixing bowl, add the cream cheese frosting and keep whipping until it's blended and whipped to stiff peaks.  Taste.  See if it's the level of vanilla and sweetness you want.  Add some cream cheese, vanilla, dash of salt, whatever you wish.

Layer the whipped cream mixture and the cut or crumbled up cold zucchini bread in a glass bowl (or any container really, glass bowls are just traditional for trifles to show off the layers). I crumbled the last of the zucchini bread on top. 


Print Friendly and PDF

10/30/19

From my Instagram Story Today: Low Carb & Sugar Free Zucchini Bread


If there is a recipe that I think any 6 or 7 year old child who is interested in baking could and should make, this might be it.  

Things with zucchini in them tend to be really easy, quick and no-fail recipes. As with almost any quick-bread, it's better to slightly overbake it than to underbake and have it gooey and undone in the center.   Make sure the center is 'done', fairly firm, and doesn't jiggle and sink before you take it out of the oven.

This will make 2 loaves.  Use a regular 9X4" bread pan, lined with parchment and lightly greased.


Zucchini Bread

1 c scooped almond flour, not packed down
3/4 c good quality coconut flour
1/4 c unflavored or vanilla flavored whey protein powder
(You can skip the whey protein and use a full cup coconut flour if that's what you have)
2 T baking powder
1 c - 1 1/4 c sweeteners (I like to mix at least 2 granular natural sweeteners for best flavor)
4 eggs
2/3 c melted butter
2/3 c sour cream
2 t vanilla
3 t cinnamon
1/2 t sea salt
2 c shredded zucchini

Mix all the ingredients with a wood spoon or spatula until moistened and well mixed.  Separate into two prepared loaf pans and bake in a preheated oven at 350 for approximately 1 hour until done.  Remove and let cool about 20 minutes in the pan before removing and pulling away from the parchment paper too cool completely.  I like to wrap all my quick breads (pumpkin, zucchini, banana breads)  in plastic wrap as soon as they are mostly cool, then wrap in foil, and place in the freezer for 24 hours.  After that either they stay stored there until I need them, or I remove them and thaw to serve.  I keep mine in the refrigerator because I like cool breads personally and just don't like quick breads at room temperature.


Print Friendly and PDF