Pages

9/28/21

Old School Pizza Burgers! And I made them into a Keto Pizza Burger Too!

Old School Vintage Pizza Burgers
Pictured are low carb - using a keto bun and served with keto 'faux' fries - not potato based french fries
 

When I get a food memory/craving stuck in my head, it lives there until I finally make it.  I got it into my head I just had to have something from my childhood.  Not just my childhood, but an elementary school lunch item; pizza burgers.

Now, I wasn't able to recreate it exactly to my memory.  But it's close.  So close.  I'm going to tweak it a little more at some point in the future - as I know my school used canned tomato soup in their version as well; and we don't ever have canned tomato soup in our house because we are lowcarb/sugarfree.

To make it a little more difficult, I was having to not only recreate something from a childhood memory, but we eat sugar free and low carb so I had to try to make it keto!  

If anyone from the internet stumbles upon this recipe through searching; remember - YOUR school might have made these differently.  I suggest you do your own taste tests and see if it's similar to the version your school cooks made.  Mine just needs a little bit of tweaking (needs a bit more... tang I think) but it was SO close, I was happy with the results for now.  (And, since this is the first time I've craved them in over 30+ years, I might not have another craving for years!  Ha ha).


Old School Pizza Burgers

1 1/4 lb. ground beef (approximately - I didn't weigh)
1/2 lb. (about) ground ham
1/4 c onion, finely minced
1- 6 oz. can tomato paste
1/2 c water (use the can to pour as to rinse out the can as well)
1 c (scant) ketchup  (I'm going to use part tomato soup next time as I KNOW my school did)
1 1/2 T dried parsley
1 t Italian seasoning
1/2 t salt and some fresh ground black pepper
onion powder
sage
oregano
2 t vinegar
2 - 3 T cream or whole milk

Hamburger buns
Shredded mozzarella
Shredded or sliced up American cheese


Brown the ground beef and onion, add the ground ham. 

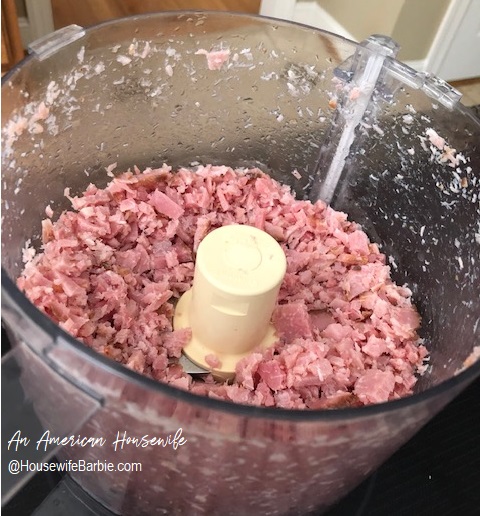
(I used an S-blade in my food processor.  I didn't want to over process it, but after I was ready to add it, realized I should have processed mine a little more - but I was lazy and didn't want to bother so the pieces in mine in the photos are little larger than I'll do next time).  Season with salt and pepper. 

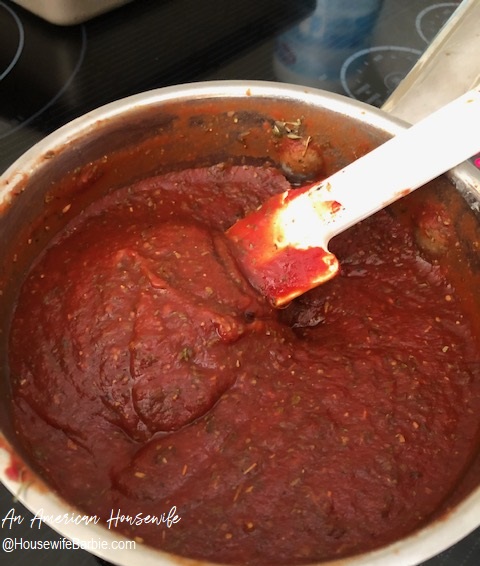
While the meat cooked I mixed up the sauce separate (although you TOTALLY could add it to the meat in the same pan.  I just made mine while the meat was still cooking as I like to multi-task and have no patience to just stand around browning meat without doing other things as well.)  Mix the tomato products and the seasonings.  For the onion powder, safe and oregano, I started with about a teaspoon of each.  You can adjust this later.

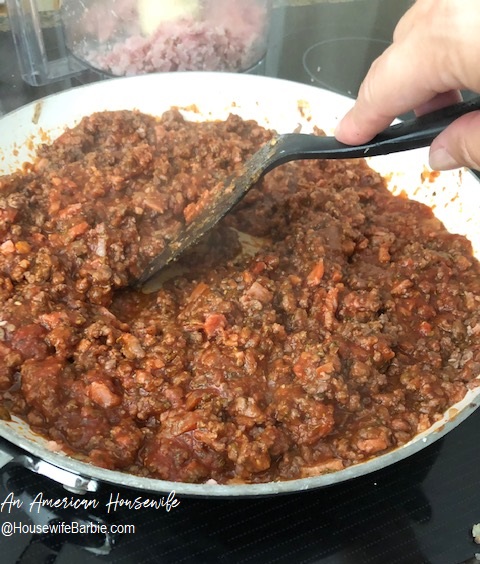
Add the tomato mixture to the meat.  Let it simmer for about 10 minutes over low.

After mixing with the cooked meats and letting it simmer for a few minutes to blend the flavors; do a taste test.  I added about 1/2 - 1 teaspoon more of each of the oregano, sage and onion powder.   When you are happy with the meat filling, stir in about 1/2 cup cheddar cheese IF you wish - or some of the American cheese into the mixture.  Use the rest of the mozzarella and/or American for the top later.

On a baking sheet (lightly greased if you wish) but not on parchment as the buns need to crisp up a bit, lay out about 8 buns to make 16 sandwiches.  Or lay out 4 buns, open to make 8 sandwiches and you can freeze the rest of the meat mixture.

NOTE:  I used KETO buns for this meal with only 4 carbs total per whole bun, so only 2 carbs total when eating just the one half, as these are served "open faced".  Regular buns usually run about 24-30 carbs, so each half would be about 12-15 carbs.

Sprinkle the tops with shredded cheeses.  Bake at 350 or 375 (I baked at 370) until golden brown buns, melted cheese and heated through.  About 12-15 minutes depending on the heat of your oven.


 ground beef with onions  

grinding up ham in a food processor

making sauce for pizza burgers

pizza burger mixture

old school pizza burger meat/ham mixture

old school pizza burgers ready for cheese


pizza burgers with american and mozzarella cheese


Print Friendly and PDF

9/25/21

From My Grandmother's Recipe Box: Vintage Recipes.... Devil's Food Chocolate Cake and Cream Puffs

If you've followed this series previously, then you already know that a number of years ago I inherited my grandmothers cookbooks and her old, metal recipe box.  These are recipes that she started to collect and hand write around 1940 when she was in junior high school and continued until the 60's and 70's. 

Vintage Recipes:


Devil's Food Cake

1 cup sugar
1 Tbsp butter
1 egg
1 cup buttermilk
1 1/3 cup flour
1 teaspoon soda
2 Tbsp cocoa
1 teasp vanilla


Cream Puffs

1 c water
1/2 c butter
Let come to boil

Stir in quickly - 1 cup flour
Beat until smooth
Beat in 3 egg - beat until smooth

Drop on buttered pan and bake in quick oven.


Print Friendly and PDF

9/22/21

From My Instagram - Keto Lowcarb Biscuits (made entirely from food storage items too!)


Yesterday was a recipe test day.  Not testing my recipe actually, but testing my favorite low carb recipe for biscuits made entirely from emergency storage foods. 

This keto recipe came about when I used my favorite all wheat flour, southern biscuit recipe and changed it up by substituting King Arthur's keto flour when it came on the market last year.  I had been using my own mixtures of vital wheat gluten, wheat resistant starch, wheat protein isolates, yada yada for years to try to find a keto flour mixture I loved; and then King Arthur finally did it for me.  It's expensive and I don't use it as often as I would if it were more affordable, but for my keto biscuits, I love it.


My original Keto Biscuit recipe post (linked there) uses keto flour but uses fresh cream and butter.  I love it - it's my 'go to' biscuit recipe for our low carb biscuits.  

But my test needed to be for ALL food storage in the event we didn't have access to or funds for fresh butter or fresh cream/milk.  That's what this recipe test yesterday accomplished.  There is absolutely a difference in the texture of the biscuits made completely from dry food storage; they didn't rise as high and they weren't as flaky as they would have been with fresh butter, but they were absolutely fine and I feel good knowing I have the option of making low carb biscuits in the event we are using dry goods only.

The only fresh or wet ingredients I used was literally, one cup of water. 

Homemade Keto Biscuits from Food Storage Ingredients

2 c Keto Wheat Flour  from King Arthur
1 T baking powder
1/2 t salt
3/4 T sweetener, granulated
1/4 c real butter powder
1/3 c heavy cream powder
1 cup water as needed

Preheat your oven to 450.  Line a baking sheet with parchment paper or spray with no-stick baking spray.  Combine the dry ingredients in a bowl.  Add about 3/4 cup of the water and stir until it comes together as a dough.  Use the last 1/4 cup water if needed.  If your dough is too sticky, add a little more keto flour.
 
Turn out onto a lightly floured surface (I turn it out directly onto the parchment lined baking sheet), sprinkle with more keto flour pat or roll out to about 3/4 - 1" thick round and cut with a floured round biscuit or sharp edged cookie cutter.  

Cut straight down, don't twist!  This ensures high rising biscuits.  Re-pat scraps to keep cutting until you run out of dough.  Bake about 10-12 minutes until the tops are golden brown.  Makes about 8-10 biscuits. 


 Dry ingredients in the bowl


Mix - adding water or flour or needed until it comes together as a dough you can lift and pat
(This is a bit sticky so I added about 2 tablespoons of more keto flour) 


Pat to a round and roll or press to about an inch thick 


Keep re-rolling (re-patting) the dough smaller and small to continue to cut biscuits out until it's gone. 


Ready for the oven 


keto biscuits


low carb keto biscuits made from all dry goods


Yesterday, fresh from the oven I had one with butter. 
Later I tested one with bacon and cheese as a breakfast sandwich item.
Finally, the real test.  Last night I served them for dinner with chicken.
I feel really good about the ability to make a low carb biscuit option in the event we have to use our pantry storage items but still want to stay lowcarb.  


_____________________________________________


Print Friendly and PDF

9/18/21

Re-posting for Fall: Sugarfree, low carb cut out cookies

 Re-posting as next month is Halloween!


I posted this last year but hey, Halloween is coming up in just a few weeks so I'm bringing it back!  It only has 1/4 cup of wheat flour in it and the rest is low-carb friendly almond flour and coconut flour.  I cut mine into ghosts - but any shape will work!  You don't have to use the wheat-based flour if you need/want to cut out wheat completely due to digestive issues.  Just increase the almond flour 1/4 cup instead.

Cut Out Cookies - sugar free and lower carb

1 1/2 c almond flour
1/4 c coconut flour
1/4 c whole wheat flour
1 egg
1/4 t almond extract
1/2 t vanilla extract
1 1/2 t baking powder
3/4 c natural sweetener
5-10 drops liquid sweetener to your level of taste
scant 1/2 c butter with 1 T shortening to make up for the 'scant'

Cream the sweetener, butter and shortening.  In a large bowl mix the dry ingredients well.  Add the egg and extracts to the sweetener/butter mixture.  Add the dry mix and blend until it comes together as a dough.  If it's really sticky, add more of your favorite gluten free flour or a little more whole wheat flour until the stickiness is lessened a bit so you can form a ball and wrap in plastic wrap to chill.  Chill about 30 minutes, remove half the dough.  Return the second half back to the refrigerator.

Preheat oven to 350.  Roll the dough out between 2 sheets of parchment.  Cut out your shapes and transfer them to a baking sheet. I use a Wilton icing spatula to transfer mine.  Use either ungreased or parchment lined pans.  (I did both and my cookies did not stick even on the unlined).

Place the cookie sheet in the freezer for 3-4 minutes and then place directly into the oven.  Bake for about 9-10 minutes or until you can see the edges just starting to brown.  I find almond meal based cookies to be a little more tender and delicate than wheat cookies and have learned to bake almond flour based cookies a little longer than I have to for all purpose flour based.  I just keep an eye on them and set the time for "one more minute" if I didn't see the edges had any color to them yet.

Remove from the pan and place on wire racks to cool completely.  If your cookies are baked long enough this isn't a problem - they are nice and sturdy but still tender with a perfect 'bite' to them like any good sugar cookie.

Frost with your favorite frosting.

I used a favorite "cake" frosting I whipped up but you can use any you like.

Sugar Free Butter Cream Vanilla Frosting

2/3+ c granular natural sweetener  
2 T water
2 large egg whites (separate and use the yolks in another recipe)
1 stick real butter
1 T vanilla extract
 *If you taste test it and find your personal tastes would like it sweeter, use 5-8 drops liquid sweetener

In a saucepan, place the water and sweetener. Heat over medium high until it comes to 240 degrees. 

As you are heating the sugar substitute and water, mix the egg whites in a large mixing bowl.  Beat the egg whites until soft peaks form.  With the mixer running, pour the hot sweetener mixture down the side of the bowl in a thin stream, mixing into the egg whites.  Beat approximately 5-7 minutes on high until the egg whites resemble a thick and glossy meringue.

Start to add the butter in chunks, about a tablespoon at a time.  Keep the mixer running and whip the mixture about 5-7 minutes more.  If the mixture breaks up when you first add the butter and it looks like cottage cheese, no worries.  Just keep whipping until it's smooth again.  Once the frosting is smooth, add your vanilla and whip again for a few minutes.  If it's a really warm or humid day it might get too warm to work with.  Just refrigerate it for about 7 minutes, whip again.  The cooler temperatures will cause it to harden up again.


Photos from the cookie making process

I added a bit of whole wheat flour as we have no allergies or food restrictions in our house


I like to use a long, thin frosting spatula to transfer the cookies to the baking sheet


Ready for our decorations!


Print Friendly and PDF

9/17/21

Salmon and Zucchini Sheet Pan Dinner


When I use my regular un-marinated salmon our go-to seasoning is indubitably lemon pepper!  A simple drizzle of olive oil brushed on, with lemon pepper and perhaps a light sprinkle of salt.  When it comes out of the oven, I dot it with real butter and let it melt, resulting in our favorite way to season salmon.  

Typically we like to grill our salmon (same seasoning) but when I want an easy-peasy, quick dinner I make it into a sheet pan dinner.  Surround the salmon with sliced zucchini and yellow squash, also drizzled with olive oil or avocado oil, and sprinkle with fresh cracked black pepper and salt, or a little of the lemon pepper as well.

Into the oven at 375 for about 20-25 minutes until the salmon is done and turning golden.  That's it! How easy is this?


Either use marinated salmon or plain that you season yourself. Place on a greased/oiled/or parchment covered pan.  I always use foil for easy clean up.


 Into the oven with you!


Print Friendly and PDF

9/15/21

Homemade low carb, sugarfree black licorice (can also be black licorice gummies)


Sugar free Black Licorice


Be sure to read the *notes* under the recipe before starting because you have a couple options for anise extract, fennel seeds and the activated charcoal.  I will also explain how this recipe can be both/either gummies or licorice, depending on whether you dry them or not!


Sugar Free Black Licorice
(or Licorice Gummies)

1/4 c unflavored gelatin
1/2 c natural sweetener of choice (I use a mixture of 2-3 for best flavor)
1/4 c heavy cream
1/2 c water* (see note about if you want to use Fennel Seeds in this recipe)
2 T real butter
1 T molasses
1/2 t sea salt
1 T activated charcoal
1 T anise extract

Prepare candy molds if you want to use them or prepare an 8" pan or 9X13" pan with a piece of parchment paper you've lightly buttered.  If you want nice thick pieces of black licorice, use the 8" size.  The 9X13 will give you a thin later of candy pieces. Personally I like them thicker and will touch on that at the end of the recipe.

In a saucepan on the stove place your unflavored gelatin, sweetener, heavy cream, (fennel or not) water, butter and molasses.  Whisk and stir over medium heat until the gelatine and sweetener are dissolved and it comes to a boil.  Boil about 2 minutes while stirring constantly.  Remove from heat and whisk in the activated charcoal and the anise extract.  

Pour into your prepared pan or molds.  Chill in the refrigerator to set for about 30 minutes.  Pop out of molds or slice with a knife into candies.

 ____________________________________

*IMPORTANT NOTES* 

I used a mixture of real fennel seeds and about 1 t anise extract.  If you want to use real fennel seeds in this recipe instead of a whole tablespoon of anise extract, then add about 2-3 tablespoons of dried fennel seeds to the 1/2 cup of warm water the night before or day before you want to make this.  Let them soak all night/day either on the counter or in the fridge.  Use the back of a spoon to gently press them before straining.  (I then saved my seeds and let them sit out on a paper towel to dry and will use them later in things like pizza sauce as they still have flavor to them.)  Your water should be heavily 'anise' smelling by now.  Use it in place of most or all of the anise extract if you wish.  I used a mixture of both.  2 T fennel in 1/2 cup water and 1 teaspoon anise extract.

The molasses of course does have sugar - it's about 15 grams in the entire tablespoon and this is going to make a whole pan of licorice so the sugar count for each piece is going to be almost nothing.  You would have to eat a quarter of the whole batch to even equal 3 or 4 grams. 

Activated charcoal... I have this on hand at all times because we love CharcoCaps and I use activated charcoal in some of my homemade soaps.  For this recipe I just reached up in the cupboard and used about 6 (?) charcocaps that I pulled apart and used the powder in the syrup.  Without the activated charcoal (which is not regular old 'charcoal' like you find out in your grill!) your licorice will be a weird brown color.  This gives it a nice black color but also has health benefits!

The sweeteners... I have blogged about this numerous times.  For the best flavor in natural sweetener baking I keep a container in my pantry in which I always keep 2-3 different kinds mixed.  Usually  Erythritol and Monk Fruit, some Allulose, Stevia, maybe some Swerve and some Xylitol if I have it on hand.  Xylitol is good in this recipe because of how well it makes any kind of syrup or caramel, but for this batch - the photos and video - I only used  Erythritol, Monk Fruit and Allulose - there may be some Stevia powder in there right now as well, but I don't have any Xylitol right now!  :)

The SIZE OF PAN is super important.  I prefer an 8" or 9" square pan for this to make the pieces nice and thick like real licorice.  When you use the larger 9X13, it makes a very thin layer.  I personally don't like the thin layers as much so right after cutting, I layer 2 or 3 equal sized pieces on top of each other or roll a 4 inch strip into a round.  They stick to each other perfectly to make candies whatever size/shape you like.

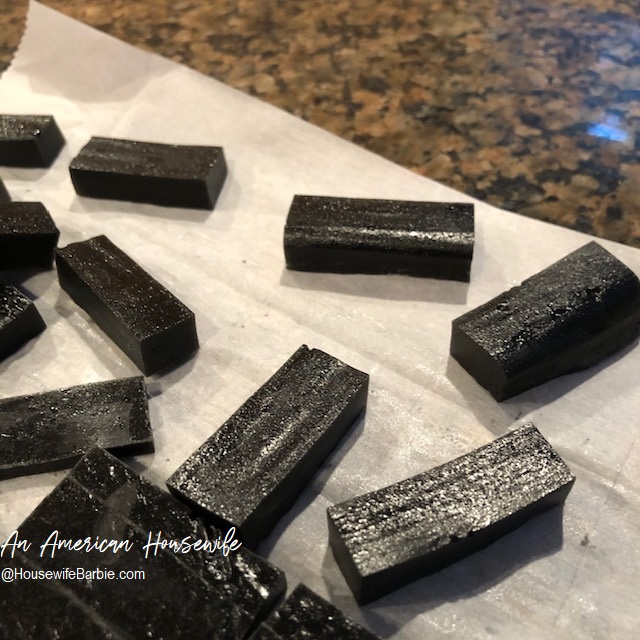
Using the 8 or 9 inch pan, cut into typical licorice sized bites.


The gummy/licorice comment from above is explained here....

When I first make these they are gummy bites.  Black licorice flavored gummies.  Very yummy if you want gummies!  I don't care for those very much though as I want  a chewy licorice. 

I let them set out at room temperature, on the parchment paper for a few days to dry out.  Bingo!  If you eat these within the first 2-3 days they are gummies.  By letting them lay in a single layer on a piece of parchment at room temperature for 3 or more days, they will dry out more and get that chewy licorice texture instead of being gummy-like.


This is the brown syrup as I am adding the activated charcoal powder....


 A video of stirring in the activated charcoal


 A quick video of pouring the black licorice syrup into the pan


What it looks like in the pan before chilling.


A 9X13 pan makes a thin piece. I preferred to stack 2 or 3 finished slices to make a nice thick
bite but if you like them thin, you can use this large of a pan. 


YUM!!!


Homemade Sugar Free Black Licorice 


Print Friendly and PDF

9/12/21

From my Instagram Photos: Try Canning Potatoes! It's really not hard, I promise! (And top 3 pressure canner picks)


We eat sugarfree and low carb so potatoes are something I pretty much never keep on hand.  But we do  love them!  We just don't regularly eat them due to the starch/sugar/carbs.  Once in a while I'll incorporate them into some of the food we serve when we have non-lowcarb guests over.  I always have to plan ahead for those meals, to allow time to run to the grocery store to get the food items that we don't usually have in the house.  (Think; morning hash browns, potato salad, potatoes with roast, mashed potatoes, cheesy potato casserole, baked potatoes. Yum!  We love potatoes, so sometimes having guests over and serving them is a treat for us too!)

Having canned potatoes on hand in various forms is awesome because I don't have to plan ahead.  I don't have to run to the store.  I simply grab a can of potatoes, open it, and use them.  They are already cooked, often are sometimes canned already seasoned, and cut to size.  So easy to simply pop open a can, and serve with with the roast beef, or quickly throw together a potato salad, etc.

But now let's go one step further.  Your pantry and longer term food storage.  Potatoes are such a comfort food!  For our 'longer' term storage pantry having canned potatoes on hand is a blessing because if the power is out or there are other natural disasters, I have foods (not just potatoes) on hand, already cooked - which means I don't need access to tons of fresh water to cook or make them.  Also, in the event of a time where money is tight, a job loss or any number of other things that happen in life (especially now under our current President) having some emergency food in your pantry is just something you should have.

If you haven't tried pressure canning or have been scared of trying it... do it!  I promise it's not hard and not intimidating at all once you have just a couple canning sessions under your belt. 


If you've never canned anything before and don't know where to start, truly the only thing you really need to can something are canning jars and lids.  

If you have a simple canning jar and a lid/ring, you can can things like jam, jelly, salsa, tomatoes, peaches, pickles, etc. because you don't need any special pressure canner.  You can your jar of tomatoes, peaches, etc. by boiling that jar in any pot large enough to cover it with water and boil it in.

Canning low-acid foods requires special care. This includes red meats, fish, poultry and all vegetables (except for tomatoes).  A pressure canner heats food to high temperatures (240-250 degrees F or higher) and destroys the spores that produce the botulism toxin. A boiling water bath canner, heats food to boiling temperature (212 F), which is not high enough to ensure safety for canning vegetables and other low-acid foods.

Potatoes are one of the many food items that must be pressure canned.  Yes, this involves a pressure canner purchase, however your pressure canner can also be used as a water-bath canner so it's a good investment that has you covered no matter what you want to home can.


Print Friendly and PDF

9/8/21

From my Instagram: I've been dehydrating again... Dehydrating Lime Peels, Whole Limes and Cabbage (UPDATED)

THERE IS A SMALL UPDATE ON MY DEHYDRATOR AT THE END OF THE POST (1/22) 

I (like most all of you) are so so so busy lately that I never find the time to pop in to post - even though I obviously cook and bake daily.  Three or more times a day.  But I often don't bother to take photos - or I start to take them but forget to take a 'finished' product picture - or I do take photos and then they live in my computer files and never see the light of day because.... too busy.

A couple weeks ago I was doing some dehydrating.  I had limes leftover from a weekend of guests, and I didn't want them to go bad before I could get around to using them.  So, I juiced the limes to get the juice for my favorite chicken marinade and then used the peel to get a nice little bottle of dried lime peel.  I like to keep dried lemon peel, lime peel and orange peel on hand for baking and cooking.

I also had extra cabbage on hand - which lasts forever - so I didn't need to hurry really, but there have been times when I wanted cabbage and we didn't have any so I decided to dehydrate a head of it so I'd have it ready in the pantry for beef stew and boiled cabbage, etc.


There really is no recipe for drying cabbage.

You don't have to blanche it or do anything to prep it. 
Just slice into thin strips or small pieces, place them on your dehydrator trays, and let them dry until the pieces are dry, small and ready to put into a mason jar or container of your choice.


For the limes I used half of them to make dried lime peels for the pantry and then used the rest to dry 'whole' and grind up into dried lime powder.  You can buy dried lime powder and dried lime slices online but they are sooo simple to make yourself!  

For the dried peel, just peel the zest off your lime (the green part) and lay them out to dry on your tray.  When they are brittle, you can pop them into your container, or chop them a bit first, or spin them in a small food processor first to chop them quick and easy.

To do the lime slices, just wash your limes well and slice thin.
Lay the slices out and dry until brittle.
They will turn quite dark.
You can use them as is to cook with (laid under chicken and fish is nice!) but I grind mine up and use the dried lime powder in marinades.


I just reuse old spice bottles and repurpose them to whatever I need at the time.
This one now holds dried lime zest.


This is a close up of whole dried limes ground into powder.


In 2022 I upgraded my dehydrator to a larger, rectangle version with shelves and adjustable temperature.  Any dehydrator will do, but I do find the upgrade is easier and better to adjust the temperature so I get the colors of my goods to stay nice and bright.


Print Friendly and PDF

9/4/21

From my Instagram today: Keto Fried Chicken


Keto Fried Chicken

4-6 boneless, skinless chicken thighs
1/2 c King Arthur Keto Flour
1/2 c Isopure Unflavored Whey Protein Powder
1 t salt
1/2 t fresh black pepper
1 t garlic powder
1 t onion powder
1 T paprika
2 eggs
1/4 c heavy cream
1/4 c water
Oil for frying

Preheat the oil in your frying vessel of choice (I use a cast iron skillet).  Rinse and pat dry the chicken.  Sprinkle with some of the dry keto flour and whey protein powder.  In a bowl, mix the egg, cream and water.  Place the chicken in the bowl of the wet mixture.  In a Ziploc baggy, place the keto flour, whey protein powder, and seasonings.  Lift the chicken, place into the Ziploc.  Do 2-3 at a time.  Zip closed and shake to cover the chicken.  When the oil is hot enough to sizzle with a drop of water (about 350 ish is good) place the chicken in the hot oil.  Fry 2-3 at a time, allowing space between them. 

Fry slowly until golden brown, flipping once half way, and then continuing to flip if needed to get a nice dark, even color. It should take around 12-15 minutes.  Drain on a rack over paper towels. 


Print Friendly and PDF