Showing posts with label Cheese. Show all posts

4/8/24

Cheeseballs


 The sauce is made with sour cream and mayo and Mrs. Dash Southwestern spice mix.


Last night I was craving something hot and comforting and honestly I wanted dumplings or homemade pasta but when I went into the kitchen to make 'something' I decided at the last second to make homemade cheese balls.   

Here is the basic recipe - same one I first posted for  Cheeseballs - back in 2009.

Food storage options include things like butter you have stored in the deep freezer or have home canned; the green onions I used were freeze dried from storage.  You can used premixed milk, freeze dried or frozen cheeses of your choice - mix and match any kind of cheese you wish.  Jalapenos can be left out, and you can also use straight from a can or bottle or even freeze dried. I used shortening to fry them in - which is hopefully in everyone's storage pantry.

 Homemade Cheese Balls

Play with the ingredients in this recipe. Use all different cheeses, leave out the jalapeno, add crumbled bacon, add extra jalapeno, some chipotle, add chopped shrimp, crab or lobster to make a seafood ball... the possibilities are endless.

1/2 stick (1/4 cup) real butter
2 green onions, chopped
1/4 c flour
1 c milk
1 c mozzarella, shredded
1/2 c cheddar, shredded
2 small jalapenos, chopped fine
1/4 c flour, extra for tossing with the cheese
oil for frying

Form balls and fry in hot oil or melted shortening.  Drain on paper towels.  Serve hot as is or mix up whatever sauce you wish to go with them.


Print Friendly and PDF

3/8/24

Quesadillas


Last night was a very simple dinner as it was just me home at dinner time.  Quesadillas.

I like onions on mine, but we obviously have no fresh onions right now so freeze dried it is!  I chose green onions, although you could use minced dried onions as well.
Lastly - the cheese. 
Not only do we keep blocks of cheese in the deep freezer, but when they are opened, I always use my vacuum food sealer to seal them tight for storage in the refrigerator.  This means our cheese lasts and doesn't get moldy or go bad!   So I had a food sealed 1/4 block of cheddar and a bit of Queso Fresco in the refrigerator which I used and then promptly resealed the rest of the cheddar again - which if we don't care to use it, will still be perfect a month or two from now (although we love cheese so it will probably be used this weekend as I cook with it all the time).


Print Friendly and PDF

1/23/24

Canned Cheese From Storage: one good, one, meh

December 2021 dated


Last night's dinner were burritos and nachos.  I had pulled a small food sealed bag of shredded cheddar out to use, but I also remembered single cans of cheese in the 2-3 year pantry and I wanted to get those tested/rotated and used up so I decided to open and 'test' them.

Both were the same brand, but one is cheddar and the other white cheese. Both bought at the same time and both have the same 'best if used by' date of Dec. 2021.  (Not an 'expiration' date - remember - if the seal is good, they are good.  The quality taste or color may change with time but they are perfectly good and safe to eat). 

First I opened the aged cheddar.  It wasn't the bright orange color, and had faded to a more white color.  That's fine, because cheddar is actually white and the orange/yellow color is an additive so it may have faded.  It looked perfectly fine and the seal was good but the initial taste test brought out a taste of... tin can.  I could certainly taste the can flavor had permeated the cheese sauce. 

That one went into the trash.

I expected the same thing with the second can so I opened it quickly, only to find it was still the same off white color it always is, had the same texture and looked and smelled the same as a brand new, fresh can off the shelf.

Taste Test:  no discernible flavor of the tin can taste the cheddar sauce had.  This one was pretty much still 100% in color, taste and texture.  I used it for the burritos and the nachos. 

Granted, processed cheese sauce isn't my 'go to' normally, because I don't like the chemical taste of processed cheese foods - but I had picked up a few random cans on one of my previous shopping trips over the past few years strictly for the 2-3 year storage pantry, so it was nice to get a chance to use them up. 

The last time I opened one of them to test for use was in July and it had also been the cheddar cheese sauce version - and I didn't use it as it was a darker burnt orange color at the time so I just threw it out.  We weren't living on food storage at that time and I was just randomly opening it to 'test' and use it up to rotate it out if I could. 

Interesting that the aged cheddar cheese sauce is now 0 for 2 but aged differently; one turned a dark burnt orange, the other faded to almost white.  Neither were used.  But the Queso Blanco white cheese sauce has been perfectly fine. It apparently stores better for longer term.


December 2021 dated


Print Friendly and PDF

4/14/23

Spinach and Feta Chicken - quick and easy - minimal ingredient list too


This is basically the chicken version of one of  my favorite Greek Pizzas.  

PLAY WITH THE AMOUNTS.   I discovered I like it better when I use tons of feta cheese.  Adjust everything as you like.  Garlic or no.  More feta or less.  More mozzarella... or less.  Amounts of seasoning on the chicken?  All good.  (Kalamata olives... or not.  Want to add sun dried tomatoes and rings of red onion?  Cool.  Yes.   Or no.  Your call.)

Spinach and Feta Chicken

4 thin Chicken Breasts* 
Garlic
Italian Seasoning
Oregano
Salt and Pepper
1-2 T Avocado Oil or Olive Oil
2 - 3 handfuls of Fresh Spinach
1- 8 oz. pkg. cream cheese
1 c Mozzarella Cheese - shredded
1/2 - 1 c Feta Cheese, crumbled

*I buy chicken breasts at Sams and Costco - which are really thick.  I slice two (2) breasts in half lengthwise to make 4 nice sized chicken breasts. 

Either pound your regular chicken breasts to make them rather flat, or do as I do and slice them lengthwise.  Lay them in a pan with oil.  Sprinkle with salt and pepper, oregano and Italian seasoning and some garlic.  Put them into a 400 degree oven to bake while you make the sauce.  Set the oven timer for about 17 minutes.

In a pan on the stove add more oil to the bottom and heat to a nice medium low.  Add spinach leaves and they start to wilt immediately.  Add a package of cream cheese (8 oz.).  Turn off the heat and stir until melted.  By now the chicken should be about ready to 'top'.  

Top the chicken breasts with the spinach and cream cheese mixture.  Cover everything with some shredded mozzarella and crumbled feta cheese.  Add other things if you wish (kalamata olives, red onion, sun dried tomato) but I think we like ours without all the extras best.

Return to the oven to bake at 375 for about 25-30 minutes more.  Serve hot.


This is a quadruple batch - so, lots of chicken breasts!  Seasoned.


Into the oven


Wilting the spinach


Adding cream cheese


 Chicken is out of the oven (partially cooked) and ready to be topped with the spinach and cheeses


Spinach and Cream Cheese


All the cheeses, plus some kalamata olives this time...


Out of the oven and ready to serve a crowd.


Print Friendly and PDF

2/24/23

Jalapeno and Cheese Stuffed Pork Loin Roast


(This is based on my pork chop version, which was posted in 2017 - which you can find here:  Jalapeno, Cheese and Bacon Smothered Grilled Pork Chops)

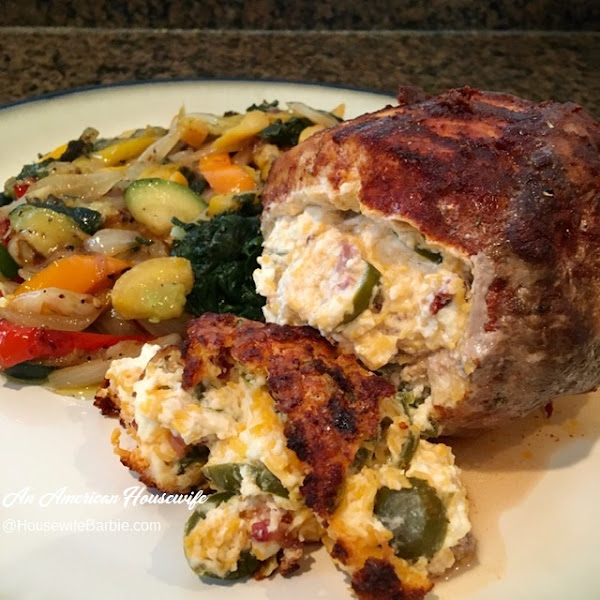
Here is the pork roast right after it came out of the oven, placed on the serving platter, before adding the vegetables for serving....

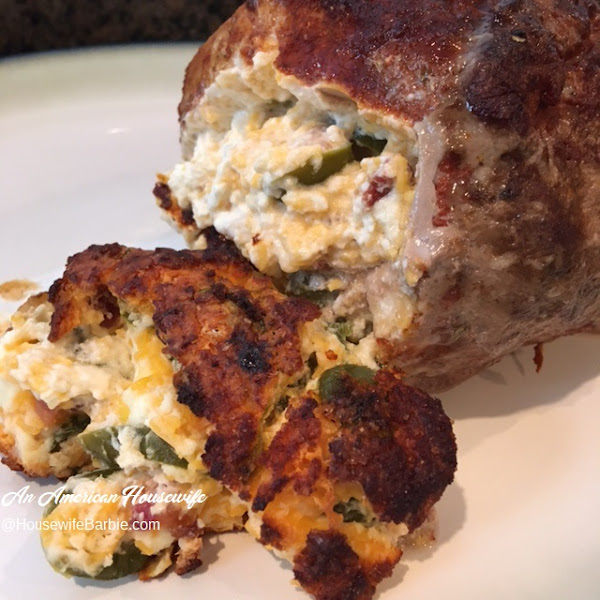
Basically you can use any amount of the cheese, jalapenos and bacon that you wish.  The same with the size pork loin or pork roast.  Depending on large of one you bought or how many people you are serving.

This pork roast looks fairly small in the photos but easily feeds 4 people.


Cheese, bacon & Jalapeno Pork Roast

Pork Loin or Roast (your choice cut and how large)
cream cheese - I used about 1/2 block or 4 oz. for this small pork roast, which was plenty
cheddar cheese (I used sharp cheddar this time but mild, medium or sharp will work fine)
diced jalapeno peppers - either fresh or bottled - your choice
cooked, crumbled bacon (fresh cooked and crumbled or bagged - your choice)
Optional:  cilantro, garlic or onion powder or even green onions

Form a pocket in the meat:

Lay the pork down on its side and use a knife to slice into the center, making a slice horizontally, but leaving about 1/2 - 3/4 inch on each side and the back/bottom.  Now turn the knife and make a vertical slice up and down, again leaving a bit on the top and bottom so you don't slice all the way through.  I added a couple more slices at angles in order to fill with more cheese filling.

Filling:

The amounts of the cheeses, bacon and jalapeno are up to you and your tastes.  If you don't like spicy foods or have children eating that are not used to spice, cut back on the jalapenos or just use a small can of diced green chili peppers (they are mild). 

We used about 4 ounces cream cheese, 1/3 cup cheddar, 1/4 cup sliced jalapenos, 1 T cooked, crumbled bacon (I just grabbed some of the Hormel real bacon bits I keep in the freezer at all times).  Mash this together and set aside.

Preheat your oven to 325.

Dry Rub: 

You could use any dry rub you like.  For this one I threw together a simple mixture using:
2 T salt
1 T ground coriander
2 T smoked paprika
3 T natural sweetener (most people would use sugar here - we are sugar free)
1/2 T espresso powder
1/2 t rosemary

Stand the pork upright and stuff the cheese mixture in.  Press it in well so it stays. 
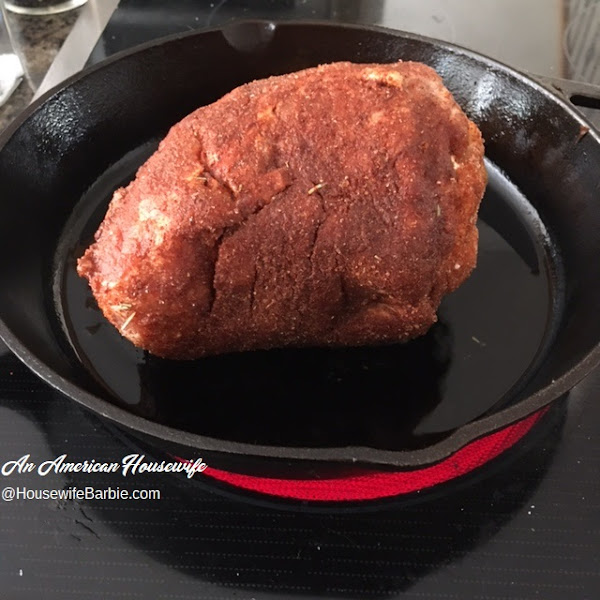
Cover the pork roast in your dry rub spice mixture.  Roll and press gently to cover.

Heat a cast iron skillet on the stove with a bit of oil in it.  Now sear the pork roast on all sides except the cheese stuffed side.  Transfer the cast iron skillet (or any oven safe pan) to the oven and proceed to roast until done.  For the roast in my photos it was about an hour. 

(Note:  I also baked it propped 'up' so the cheese filling was on top during cooking.  This isn't necessary but I wanted to keep it all in during cooking and not have it melt/run out.  It naturally falls out when you lay it on the serving platter anyway but this way I kept it all in until serving time.)

PHOTOS BELOW


A simple mixture of cheeses and a bit of real bacon crumbles

   The pocket formed in the pork by slicing with a knife, but not all the way through.
Stuffed and ready for its dry rub marinade

 
All dressed up...
 
Searing in a hot pan
Transferring to the oven to finish cooking for about an hour
Hot from the oven, placed on a serving platter


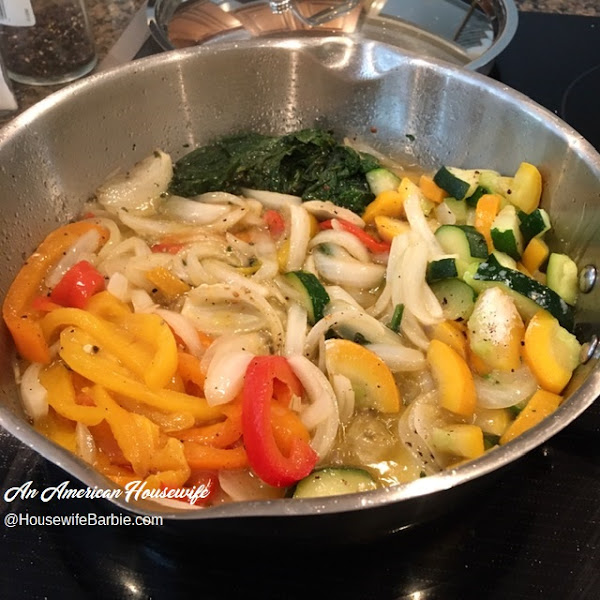
Grabbed random veggies to throw together to serve with it; spinach, peppers, onions and zucchini squash with some oil, salt and pepper 
So simple yet so good


Print Friendly and PDF

1/7/23

Spicy Shrimp Queso Dip


This week is 'Use Up All the Food" Week in our household.  This means using up all the foods we bought for our celebration(s) last weekend before we get back to our normal eating of typically low carb and sugarfree.  Last night was opening and using a bag of tortilla chips, as well as a package of 'queso' Velveeta cheese.  The dish trying to use both of those is obvious but I also wanted to start using up a bag of frozen shrimp that we've had in the deep freeze forever so.... shrimp queso it was!

This is being posted for my youngest daughter who wants me to make this for her, but I am making sure to post it so she can make it herself!  Ha.  

I didn't measure anything, so everything is estimated or just use as much or little as you like - like jalapenos; lots if you love them, little if you don't. 

And cheeses - use whatever you have on hand in your refrigerator.  Monterey Jack or Colby Jack would be yummy but I didn't have those - I ended up using White Queso, Smoked Provolone, Cream Cheese and then some mozzarella, which I only used to sprinkle on top because there was literally a cup of it sitting on the counter and I didn't want to put it back in the package in the refrigerator.  I actually liked it better without as it was on top and formed a cheese crust on top while the rest was all melted and blended.  Yours?  Play with your food - do what you like.

Spicy Shrimp Queso

A mixture of spices to blacken your shrimp:  black pepper, salt, smoked paprika, garlic powder, a little garlic salt
Onion, diced
Tomato, diced
jalapenos, diced
fresh garlic
Velveeta, Cream Cheese, Mont. Jack cheese, Colby Jack Cheese, Mozzarella, Provolone, cheddar... whatever!
Shrimp

Toss the shrimp in the spices while you heat a cast iron pan and add just a bit of oil until very hot.  Add the shrimp in a single layer and cook quickly to blacken and crisp.  Remove to a plate.  Turn down heat and add a little more oil to the pan; toss in about 1/2 cup or so of onion and fresh tomatoes.  Cook briefly and add garlic and jalapenos.  Cook for a minute or two and then add all the cheeses.  Stir off and on til melted.  While cheese is melting, chop the shrimp, leaving a few whole.  Add the chopped shrimp to the cheese in the pan.  Top with shrimp.  Bake at 400 for about 8 minutes.  Serve with tortilla chips.


Mixture of spices


Blackened in a cast iron skillet 


Some tomatoes, onion, jalapeno and garlic


Adding lots of cheeses


Melted smooth


Chopped shrimp into the cheese


Topped with a few of the whole shrimp 


Into the oven to warm through for about 5-8 minutes til bubbly.


Print Friendly and PDF

9/25/22

Chicken Bacon Ranch Slider Sandwiches - (Low-Carb Keto option too)


Last night I wasn't sure what was going to be for dinner.  It was getting late and I needed to come up with a plan so I walked to the deep freezer and chose a package of chicken breasts.  I cooked them in the microwave in water with a tablespoon of chicken bouillon soup base and from there decided to make a 'slider' sandwich but a chicken, bacon ranch version.

We used keto buns but obviously any hamburger style bun will do. 
I didn't measure anything, and honestly, that's just the kind of recipe this is - you can play with all the amounts.  I'll try to do a guesstimate on some of the items to give you an idea but honestly, it's mostly just common sense mixed with a little whatever you like best.

Chicken Bacon Ranch Sliders

Cooked, diced chicken breasts - 2 or 3 depending on the size of yours
1 fresh tomato
1/2 c mayonnaise
1/2 c ranch dressing of choice
Cooked, crumbled bacon
Cheddar Cheese, shredded
Hamburger Buns (I used Keto Culture brand since we are usually doing low-carb in our house)
Butter

To the cubed chicken breasts add the 1/2 c mayonnaise, fresh tomato diced, about 1/3 c crumbled cooked bacon pieces and about 2/3 c shredded cheddar.  Mix. If it's too dry add a little more mayo.  If you like more bacon or cheese - go ahead.  Less bacon or cheese?  Do that if you wish. 

Use some butter to heavily butter a baking pan.  Place the bottom bun in the buttered pan.  Top with scoops of the chicken mixture.  Heavily drizzle ranch dressing over the sandwiches and top with the bun.  Brush the tops with some of the butter, melted or even an egg wash if you wish.  Pop it into a 350 degree oven and bake about 15-17 minutes until heated through.

Extra chicken filling mixture is a perfect casserole, just tuck in along side the sandwiches to bake or just make more sandwiches with it.    The size of the pan you use depends on how many sliders you are making.  You can see we made 5 and heated the leftover chicken mixture separately as a casserole.


I always have crumbled real bacon on hand in the freezer, which I like to put on a paper plate and heat in the microwave to crisp up. 


Mixing up the filling; use more or less bacon and cheese and tomato based on what you prefer.


Scooping the filling onto the buns.


Top each slider with a dose of your favorite ranch dressing then put the top bun on, brush with melted butter and bake until heated through - about 15-17 minutes.


Print Friendly and PDF

8/17/22

Crunchy, Spicy Jalapeno and Cheese smothered crispy pork chops (using jalapeno potato chips to bread pork chops)


This was a post meant to be posted over a month ago but I've never had the time.  It's similar to a recipe I've posted before and make often, but this time I took it up a notch because I had foods I wanted to 'use up' - as never waste food in our household.  I always find things to make with it or use it in.

In this case, I had leftover spicy jalapeno potato chips from the family reunion weekend we held at our home.  (This brand is much spicer/hotter than Kettle brand, Miss Vickies or any of the regular run-of-the-mill jalapeno flavored potato chips, which I thought would work great as a crispy breading for chicken or pork.) I also had a jar of leftover homemade salsa to use up from the same weekend, which is what I always use to marinate the pork or chicken when I make this dish - so a win either way!


Crunchy and Spicy Jalapeno and Cheese Smothered Pork Chops or Chicken Breasts

Pork Chops or Boneless Chicken Breasts
Salsa to marinate
Jalapeno Potato Chips
Sliced Cheddar Cheese 
oil
salt and pepper
cream cheese
diced or sliced jalapeno peppers
cooked, crumbled bacon
onion powder
garlic powder

AMOUNTS will vary based on how many pieces you are making and how spicy you like your food.  The amounts don't need to be precise.

Marinate your pork/chicken in about 2-3T salsa per piece for at least 3-4 hours and up to 24 hours. Flip it a couple times during the marinating so it's evenly marinated.  *If you are making this last minute and didn't have time to marinate, just coat your chicken/pork with it and leave it on under the breading/coating.

Lay the pork chops or chicken you wish to use in a thin layer of olive oil - both sides - and sprinkle with a bit of salt and pepper if you wish, then press both sides with crushed potato chips.  Lay them on well oiled (and foil lined if you like easy clean up) pan.

Bake in a hot oven (350 or 375 is fine) for about 25-35 minutes until done and golden brown.  The thickness of your pork or chicken determines how long it will take as thick cuts will take longer than a thin cut.  While this is baking, make the cheese topping.

The amounts of the cheeses, bacon and jalapeno are up to you and your tastes.  If you don't like spicy foods or have children eating that are not used to spice, cut back on the jalapenos or just use a small can of diced chili peppers (they are mild).  

We use about 6 ounces cream cheese,  and either a slice of cheddar on the pork/chicken OR mix in 1/3 cup cheddar, 1/4 cup diced jalapenos, 1/4 c cooked, crumbled bacon (I just grabbed some of the Hormel real bacon bits I keep in the freezer at all times).  Add about 1/4 t garlic powder and 1/4 t onion powder. 

Remove the pork chops, topped with a slice of cheddar, dollop of the cream cheese/jalapeno/bacon mixture and back into the oven to bake just until it's all melted and heated through.   We served them in these photos with zucchini.


 PHOTOS OF THE PROCESS followed by LINKS to the CUISINART mini stick blender and food chopper I use, a the bottom of the post.


Leftover chips from our family reunion weekend I wanted to use up

Chopped quickly in a small processor


I used my mini Cuisinart processor to crush the chips but you can use a full sized food processor or even a bag and a rolling pin to crush them if you wish. 


Ready to use as a crispy breading


Leftover fresh, homemade salsa smothered the pork chops before breading

I left the salsa on nice and thick since they had had a short marinade time

Ready for the oven on well oiled foil


Baked until done and now ready for the cheesy topping

Mixing cream cheese, jalapenos, bacon crumbles with a bit of garlic and onion powders

I had sliced cheese to use up this way but normally just mix shredded cheddar in.

Hot and melted from the oven - ready to serve with green beans, zucchini or any vegetable


Print Friendly and PDF