Pages

12/27/22

Spinach, Feta and Kalmata Olive Keto Pizza: A review of King Arthur Low Carb Wheat Pizza Crust


I've posted various recipes for keto and low-carb pizza over the past 15 years or so, and although I really liked a couple of them, I had purchased the Keto Wheat Pizza Crust Mix by King Arthur, and had it in the pantry, so I thought I'd give it a try. 

It was very, very good. 

The recipe...  I've made this for so many years, I never actually use a recipe and just make it throwing together ingredients as I know I like.  It's been posted numerous times on An American Housewife, but here is one of them way back in September of 2011!   

NOTES:  I don't always pre-bake the crust first (although it's crispier and firmer if you do), and I top everything at once, including the spinach.  I don't like sun-dried tomatoes so I never use them; but it's delicious if you just add a couple tablespoons of pizza sauce smeared or dropped over the mayo/feta/garlic mixture.  Amounts can be changed if you want less or more garlic, feta, etc.  Play with it.  Make it your own.

Greek Pizza or Spinach, Feta and Kalamata Olive Pizza

1/2 c mayonnaise
4 garlic cloves, minced
1 c crumbled feta cheese
1 - 12 inch pre-baked pizza crust
1/2 c oil packed sun dried tomatoes
olive oil (or oil from the sun dried tomatoes)
1/4 pitted Kalamata olives,, chopped or sliced
1 t dried oregano
2 cups baby spinach leaves, washed and dry
1/2 small red onion, sliced into rings

Heat oven to 450.  Mix the mayonnaise with garlic and 1/2 cup feta.  Spread this over your pizza crust.  Top with tomatoes, olives and oregano.  Bake until heated through.  Toss the spinach and onion with about 1 tablespoon olive oil or if you have it - oil from the sun dried tomatoes.  Tops the pizza with the spinach mixture and the rest of the 1/2 cup feta.  Return to the oven for about 3 minutes.   Slice and serve!


Print Friendly and PDF

12/17/22

Cream Filled Vanilla Keto Cupcakes (from my previously posted mix in a jar)


Last week I noticed we had a little bit of sour cream left in the refrigerator container I needed to use up.  Usually my first thought for using up the last of the sour cream before a fresh grocery shopping trip is to make something like chicken enchiladas or another Mexican dish.  But then I suddenly thought about the jar of DIY cake-mixes I had in the pantry.  I knew one of them used a bit of sour cream.

That was perfect, because I also noted I had to use up some heavy whipping cream as well, which I could use for the frosting!

If you follow me on this site or my Instagram, you might recall that I like to make my own mixes for things, and I did a post in 2021 for a few keto cake and cupcake mixes to store in Mason jars in the pantry.   (Link:  here

I still had this mix in the pantry, as any time I've wanted to make cake or cupcakes, I would decide to make them completely from scratch and 'save' the jar mix for when I had 'less time' or was out of an ingredient and needed it.  But I really needed to rotate it out because it had been a year, and one of the ingredients in the mix was whey protein powder - and these are not sealed with oxygen absorbers, these are just regular Mason jars with a screw lid.


Cream Filled Vanilla Cupcakes (from my mason jar pantry mix)

2 1/2 c almond flour
1/4 c sweetener
1/2 c vanilla whey protein powder (with zero sugar/carbs)
2 t baking powder
1/4 t salt
1/2 c sour cream
4 egg whites
1/4 t cake batter flavor extract or LorAnn Princess Cake Flavoring
1/2 t vanilla
5-10 drops liquid sweetener (optional)
Sugarfree Sprinkles
Frosting of choice and/or whipping cream with 2 T sweetener per 1 c liquid and 1 t unflavored gelatin

Preheat the oven to 325 and line your 12 count muffin tin with paper liners.
To the dry ingredients, add the sour cream, egg whites, flavoring and drops of liquid sweetener if you opt to use it.  Mix until all blended and divide into your muffin tins.  Bake until golden and firm to a slight fingertip touch (about 25 minutes).  Let cool completely.

If you use your favorite frosting or filling recipe, you can use it as is, or what I prefer, to blend it with some whipped cream.  Up to you.  I used stabilized whipped cream in mine this time. 

Stabilize whipping cream by sprinkling a teaspoon of unflavored gelatin powder over a tablespoon of water in a little container and letting it soften for a few minutes, then pop it into the microwave to soften and 'melt' for about 15 seconds.  Let it cool.   To a cup of cold, heavy whipping cream, add about 1-2 tablespoons sweetener (depending on how sweet you like your whipped cream) and a dash of vanilla, and start to beat it. As it starts to thicken but isn't yet stiff peaks, slowly drizzle the gelatin mixture down the side of the bowl, into the whipping cream, continue to drizzle and whip until it forms stiff peaks. 

I used about 1 1/2 cups of whipping cream, which doubles to about 3 cups when whipped.

Put into a plastic decorator bag with the end snipped off (or use a tip if you wish) and push a bit of filling into each cooled cupcake.  Top with a swirl of whipped cream on the top and sprinkle with sugar free sprinkles if you wish.


Print Friendly and PDF

12/16/22

Emergency Storage: Opening up a 10 year old can of Red Feather Butter


Back when I first started to worry about having a bit of emergency food on hand in storage, I bought a couple cans of Red Feather canned butter.  It went into the 'long' term storage pantry. Since we don't use this butter for every day I didn't (and don't) rotate it out. 

There are a few items that are difficult to store long term because the cans they are in degrade.  This includes items such as butter, tomatoes and pineapple.  I was thinking about the butter and how it was at the 10 year limit I had heard others mention in discussing its lifespan.  I put it on my task list to go into the long term storage foods and find the cans of butter to check them.

What I found was YES the cans had started to degrade.  You can see the edges were discolored although I couldn't see, nor feel anything actually leaking.  They were completely dry, not greasy and had no discernible smell or scent. 

The outside of a can of 10 year old Red Feather Butter

When you buy this brand canned butter, note there is never a 'best buy' date on the can.  Typically they are simply marked with something like DW02 which I've not been able to find out what it means and it's stamped on cans from all different years, so it's most likely where it was canned (?) but it's not a date. 

10 year old Red Feather Butter

In this picture (above) you can see the only spot I was really concerned about would be the larger, more bubbled (?) rusty spot on the right hand side. The other rusty spots didn't concern me. 

(NOTE the cans have been stored in a temperature controlled, dark environment away from excessive temperature changes, high heat, nor any sunlight this entire time.)


Looking at the outside of the can, I was pretty sure it was going to be bad inside... but I was going to open it up and have a look anyway.


Surprise!  It wasn't bad!  Here is a photo under the lid when I first opened it.
The inside lid of a 10 year old can of Red Feather Butter
 

Here is a picture I snapped upon first opening the can
An opened can of 10 year old Red Feather canned butter - a taste test
I scooped out the butter onto a plate.  Where the butter (and my rubber scraper) rubbed against the can it smeared with a bit of the dark rusty spots but the butter itself was still pure.  (See below).  I used a paper towel and wiped off the discoloration and decided to do the taste test.


Having home-canned my own butter I already knew that when you heat the jars or cans of butter to render them safe for canning and get a good seal, the butter is 'cooked' and in turn, the flavor changes a little, and gets stronger.  Sometimes home canned butter will turn a darker yellow depending on the heat and length of cooking time. 

This butter was a golden yellow, and stronger smelling than grocery store butter, but not like it had started to go rancid. The outside of the can was questionable, the butter inside was still clean, creamy and smooth.

My Final Thoughts:   The state of the can made me leery of course, and in 'good times' and 'times of plenty' I'd probably have been tempted to toss the degraded cans out without opening.  Butter is very expensive right now though, and I opened them to taste test, so I did.  It is stronger smelling and tasting than brand new, refrigerated butter from the store; while noticeable on things like toast, bread and rolls, when used in cooked foods or to season vegetables, it was fine. 

I'm not sure how long it would take before the oils took on a truly rancid flavor; perhaps within this year or next they would to the point of being 'yuck'?  There is no mistaking the smell and taste of oils and fats that have gone rancid so you would know immediately if your butter had turned.

I feel as the 10 year mark was probably longer than I would suggest storing them before rotating out though.  Personally I think I'm putting a self-imposed limit of 5 years on our Red Feather Butter from here on out. 


Print Friendly and PDF

12/15/22

Mozzarella Dough (FatHead Dough) Cheesy Garlic Bread (keto garlic bread)

One night (last week?) I made a pizza for dinner and opted to use the second part of the dough to make cheesy garlic bread sticks.  Hardly needs a recipe, but more of a 'reminder' to myself to make these again soon as I browse through my site when I'm pondering "what do I make for dinner tonight?"

These are keto, low carb and sugarfree.  ANY of your favorite 'mozzarella dough' or sometimes known as 'fathead dough' recipes will work.  So many little variations of the recipe but if you have a favorite, just use that one.


Cheesy Keto Garlic Bread

1 recipe mozzarella dough (use half for a pizza and half for garlic bread sticks!)
a handful of shredded cheddar
a handful of shredded mozzarella
2 T fresh minced garlic (or as much or little as you like)
1 t garlic salt
1/2 t dried oregano or Italian seasoning
2-3 T real butter (or as much/little as you like)

Preheat your oven to 400.  Roll or spread your dough out on parchment to a rectangle or square shape.
Prebake it (on the parchment) on a pizza baking sheet or a pizza stone (I use a stone) for about 6-8 minutes until it's firming up and turning golden on the edges.  Remove and flip it over, still keeping it on parchment. 

Spread butter over it, top with fresh garlic and sprinkle with garlic salt and Italian seasoning or oregano.  Sprinkle cheddar and mozzarella over the top and pop it back into the oven, still on parchment, to finish baking about 5 more minutes or until the cheese melted, the edges are golden and it's done to your desired crispness and coloring.

Use a pizza cutter to slice into bread sticks or squares to serve. 

__________________________________________

If you don't know what a mozzarella dough or fathead dough is - or you don't have a recipe for one, here is one of my mozzarella/fathead doughs from almost 4 years ago, in the spring of 2019.  You can find it at the post I did on keto hot dog buns:  https://www.housewifebarbie.com/2019/02/low-carb-hot-dog-buns-and-hamburger.html


Low Carb Hot Dog Buns and Hamburger Buns 
(A Fathead Dough Style Recipe)


1 1/2 c mozzarella cheese
2 oz. cream cheese
1 egg
1 1/4 c almond flour
*optional - 2 T oat fiber 500 or unflavored, no carb whey protein powder
1 T baking powder
*optional - 1/2 t xanthan gum


Microwave the mozzarella and cream cheese until melted.  Place in the bowl of a food processor with 1 egg and the dry ingredients.  I like to add the oat fiber and xanthan gum but if you don't have it, that's fine.  Many people don't use it theirs although I feel like the texture and height is better when I use them.

Process just until the dough comes together, then stop.  Wrap the dough in plastic and pop it into the freezer while you preheat your oven to 400.

Line your baking pan/sheet with parchment.  Spray or oil your hands and divide your dough into about 5-6 pieces.  Form into balls for buns or 'logs' for hotdog buns.  Bake at 400 for approximately 12 minutes until raised and golden brown.  Cool before splitting and using.


Print Friendly and PDF

12/13/22

Pinecone Cookies (Wooden Mold Pinecone Cookies)


Not a great photo - but I was taking it quickly on my phone while also playing 'superheroes' with a busy 2 year old toddler!  Ha ha.  I don't think it shows how detailed and realistic they really are!


It took some trial and error, some thinking, some patience.  In the end, I figured out what worked for me, and although these photos are from my 'first' trial run, this is a cookie that will now be made in triple batch so it can be an addition to our cookie trays and boxes this year.

NOTES:  Use your favorite gingerbread or chocolate cookie recipe.  I opted for a chocolate sugar cookie dough because no one in our family likes gingerbread.  (I make our 'gingerbread men' out of chocolate sugar cookie dough as well!)  A dry, non-sticky dough works best and using one with little or no baking powder or baking soda will help keep the details and edges on these cookies sharp.  You can also keep them nice and detailed by placing the baking sheet and cut-out cookies into the freezer for 10+ minutes before baking.  I did not do that for the cookies in these photos as this was my trial and error afternoon - first run.

Pinecone Cookies

1 c butter
1 1/2 c sugar
2 eggs, room temp
1 1/2 t vanilla
3 1/2 c flour
2/3 c cocoa
1/4 t baking powder
1/4 t salt
powdered sugar optional

Cream the butter and sugar until light and fluffy.  Add the vanilla and eggs and mix well.  Add the flour, cocoa, baking powder and salt.  Mix a nice dough similar to playdoh, not too sticky.  If it's too sticky, add another tablespoon or two of flour.  If it's too dry and crumbles, add a teaspoon or two of milk or water until it comes together.  Form 2 disks, place in refrigerator until ready to use.

Prepare your pinecone mold with cooking spray oil like Pam.  Dusting the mold with cocoa, flour, etc. does not help it come out easier and the best thing I found was to re-spray the mold every 2 or 3 cookies.  Press a piece of dough into your mold.  You can keep it thick or use a knife to cut/scrape the excess dough off the back.  Thunk it on a counter top a few times to get it to start to come loose from the mold, help it a bit with your finger or tip of a butter knife, but the best way to get it out is to thunk it a few more times on the counter as it makes its way out on its own.

Place on an ungreased baking sheet.  Repeat to fill the sheet.  Place in the freezer 10 minutes while you preheat the oven to 350.  Bake about 12 minutes until done.  Remove to wire to cool completely.

To decorate with 'snow' hold the cookie up, vertically and use a sieve with powdered sugar in it to lightly shake back and forth over the cookie so it falls on it as if it were snow.  The edges of the pinecone sticking out is where the powdered sugar will gather - giving it a snow dusted look.

Serve or freeze until needed.  You can freeze them without the powdered sugar, and add that just before serving at a future date.


This is the pinecone mold


Print Friendly and PDF

12/11/22

Buffalo Hot Wing Style Chicken Bites (Buffalo Boneless Chicken? Buffalo Chicken Meatballs?)


About a week ago I decided to make chicken 'meatballs' for dinner.  I wanted to use up some of the Whisp cracker crumbs I had, as well as having a huge craving for 'hot wings'.  This is what I came up with.  A HUGE hit - even with family members who are not low-carb, keto or sugarfree.  It was even requested I make a triple batch and 'gift' it to them so they could store it in their freezer for future meals.

Lots of options with this one... ground chicken or sausage.  Amount of cheddar.  Optional seasonings to add.  Optional coatings to toss prior to baking... or not.  Sauce... or not. 
 

Buffalo Hot Wing Style Chicken Bites

1 pound ground chicken or chicken sausage
1 heaping c shredded cheddar cheese
1 c almond flour
1 T baking powder
1 t Italian seasoning - optional
Parmesan cheese or Whisp cheese cracker coating - totally optional
Buffalo Wing Hot Sauce - store bought or homemade


Buffalo Wing Sauce

1 c Franks hot sauce
1/3 c oil
1 1/2 t cayenne pepper
1 1/2 t minced garlic
1 t sugar
1/2 t worchestershire sauce
1/4 t black pepper
1 egg yolk
2 t water
2 t cornstarch

In a saucepan, blend the hot sauce, oil, cayenne, garlic, sugar, sauce and pepper.  Heat over medium high until it comes to a boil. Turn off the heat.  Beat the egg yolk with the water and cornstarch.  Whisk in the egg mixture.  Set aside to use later.

Preheat oven to 375 degrees.  Line a baking sheet with foil.  Mix the chicken with the cheese, almond flour, baking powder and the Italian seasoning if you want to use it.  Season with a bit of salt and pepper.  Mix until blended and form small balls, place on the foil.

If you want to, you can toss or roll the balls in either parmesan cheese or in crushed Whisp cracker crumbs.  (Photos on this post show both - half of each).  Bake 15-20 minutes, remove from oven, pour and/or brush the buffalo hot sauce over all and return to the oven for 5 more minutes.  Goes great with blue cheese dressing.


Mixing the chicken with the almond flour and cheese


Formed balls


I rolled half in crushed Whisp crumbs I wanted to use up and try; the other half tossed in plain parmesan cheese.


Baked in the oven, taken out to add the buffalo wing style hot sauce


Cover the balls in sauce and return to the oven for about 5-8 minutes


Hot from the oven and ready to serve


My husbands dinner plate with some of the sauce scraped from the pan and topped over the balls as well.


Print Friendly and PDF

Sugarfree, low-carb, keto Peanut Butter Cups


These are the sugar free versions - substituting erythritol and monkfruit sweetener for the sugar and sugarfree chocolate chips for the regular.  The coconut oil takes the place of melted shortening usually called for - and yes, you can use melted shortening if you don't have coconut oil.


Sugar Free Peanut Butter Cups

1/2 c creamy peanut butter
1/4 - 1/3 c sweetener of choice
1/4 c almond flour
1 t vanilla
1 cup (ish) sugar free chocolate chips
1 T MCT or coconut oil, or melted shortening or real butter

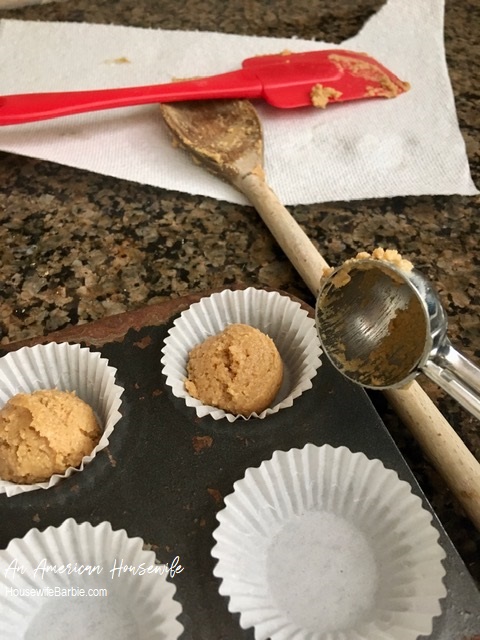
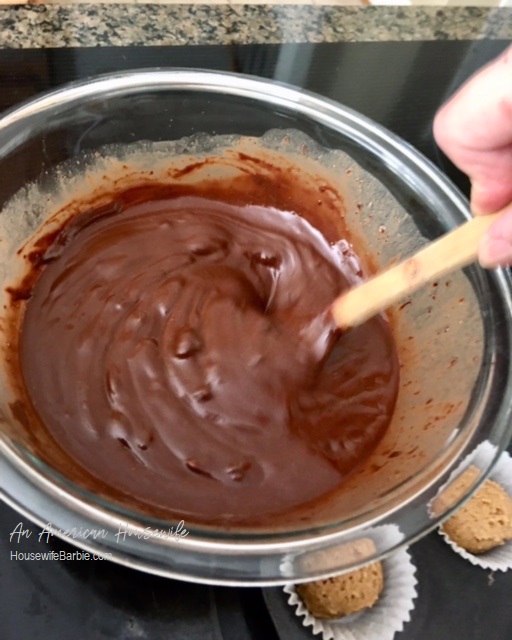
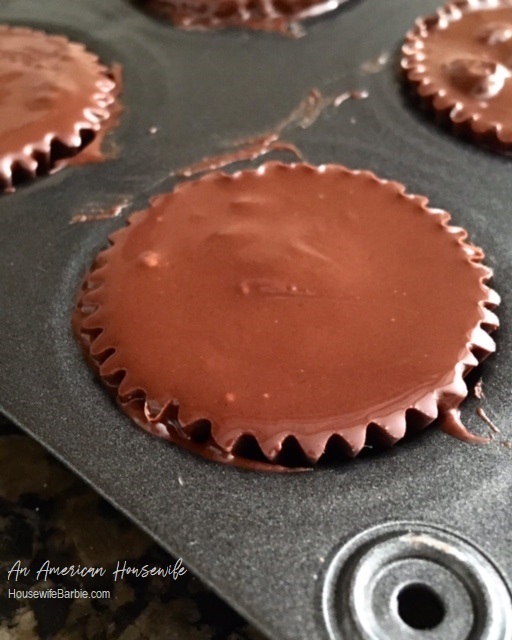
Beat the peanut butter, sweetener, almond flour and vanilla.  Roll in balls approximately 3/4" each.  Place in a mini muffin tin, lined with small candy/cupcake liners.  Melt the chocolate chips in the microwave on 45 seconds, stir a bit, melt another 30 seconds, stir.  As soon as they are melted, add the coconut oil (or butter, shortening) and mix well.  Spoon melted chocolate over the peanut butter filling.  Place the mini muffin tin in the freezer for about 15 minutes to harden.

NOTE:  When and if I make these for people other than my own family and myself, I make the melted chocolate first, and dab a little in the bottom of the cup, then add the peanut butter filling, then top with the chocolate.  This ensures a fully encompassed bite of filling with the chocolate cover.  But for the ease of quick, easy and who cares what they look like for everyday?  I skip the bottom dollop.  Mostly they are covered anyway.


The peanut butter filling (use peanut butter with no sugar added if you need keto)
 
 
Roll with your hands or use a tiny little scoop


I wanted to use up the last of my MCT oil in this container, and added a bit but real butter to make up the rest needed.


The tops dolloped with melted chocolate and ready for the freezer


When you take them out of the freezer, hardened, you can peel the paper liner off.  If you've used coconut oil or MCT oil, the chocolate melts pretty quickly with the warmth of your fingers if you are hot handed.  :)


Print Friendly and PDF

11/7/22

Instant Pot Sugarfree and Low Carb Cinnamon Pumpkin Cake with Streusel Topping

A re-post from almost exactly one year ago!  


Instant Pot Cinnamon Pumpkin Cake with Streusel Topping

Crumb Topping:

1/2  c almond flour 
1 T good quality coconut flour
1/4 c Swerve Brown
1/4 c butter, soft
1/4 t cinnamon

Pumpkin Cake: 
 
1 c almond flour 
1/2 c natural sweetener(s) - I use Erythritol, monk fruit and some allulose mixed
1/4 c vanilla or unflavored whey protein powder (I use Isopure)
2 T coconut flour
2 t baking powder 
1/2 t cinnamon, ginger
dash of cloves and nutmeg
1/4 t salt 
2/3 cup pumpkin puree 
2 eggs
3 T butter, melted
1 t vanilla extract 
 
Glaze
1/4 - 1/3 cup powdered sweetener(s) - I use a mixture of 2-3 I keep in a container in the pantry
1 T cream cheese (optional)
2 tablespoon cream 
1/4 teaspoon vanilla extract 

Place the dry ingredients in a large bowl and whisk to combine. Put the eggs, pumpkin, butter and vanilla in another large bowl and mix until smooth. Stir the wet ingredients into the dry ingredients.

Grease a small cake, bundt or springform pan that fits inside your instant pot.  
 
Pour the batter into the pan.  To make it easier to pull your pan out of the instant pot, use a long piece of aluminum foil, folded over a few times and set the pan in the middle of it, pulling the sides up and over the pan so you can 'lift' it out easily when it's done. (Or if you are lucky enough to use a 'sling' now made for lifting pans out of your instant pot, use that! I don't have one though...)
 
Sprinkle the crumb topping over the batter.  Set a trivet in a 6-quart Instant Pot and pour in 1 cup of water. Place the pan on the trivet, seal the lid, press manual cook, and set the timer for 35 minutes. Let the pressure release naturally. 
 
Open lid and let cool in the instant pot for 10 minutes before removing.

Mix the glaze ingredients together in a small bowl or processor. Drizzle the glaze over the cooled cake.


 Making the crumb topping up


I might add about 1/4 c chopped pecans to this next time.... 


In the pan...


Sprinkled the crumb topping on - but also you can see the foil I use as a 'handle' to lower and raise the pan into the instant cooker.  I think some people cover the whole top with foil as well - I assume to keep the excess condensation from running back onto the cake?  If you are using a springform pan, you'll want to wrap the outside of the pan with foil for sure so no water seeps in through the seams of it.

In the instant pot (or in my case, the Cosori)

  Here is a photo of it 'done' and out of the instant pot, cooling on the stove.


 Ready for the glaze


You wouldn't have to put a glaze on it if you didn't want to.


It's just a basic glaze - sweeteners, a little cream cheese, a bit of cream and a dash of vanilla. 

Was great with coffee - and it freezes well.


Print Friendly and PDF