December 31, 2021

Vintage Candy Recipes from the 1941 Candy Booklet: "The Candy Book"


When December started, I thought it might be fun to feature some vintage candy recipes from my collection.  I got as far as scanning a couple of the pages and then life took a different turn.  We had some unplanned things pop up and priorities changed; holiday baking and goodies took a backseat to life and of course, posting vintage recipes from an old 1941 candy booklet was so far down the priority list that it literally was off my radar.

I now have zero interest in posting this fun vintage recipe run that I had planned.  I happened to see these unused files on my laptop today and realized I should probably just post all of them here along with the images - in one post.  This way, if anyone in the universe is looking for any of these old vintage candy recipes that their grandmothers or great-grandmothers (or even great-great-grandmothers) made, they can be found.  

If you right click on the image and open it in its own browser window it will be very large and easily readable if you are having trouble reading the print in the current fit-to-page size.

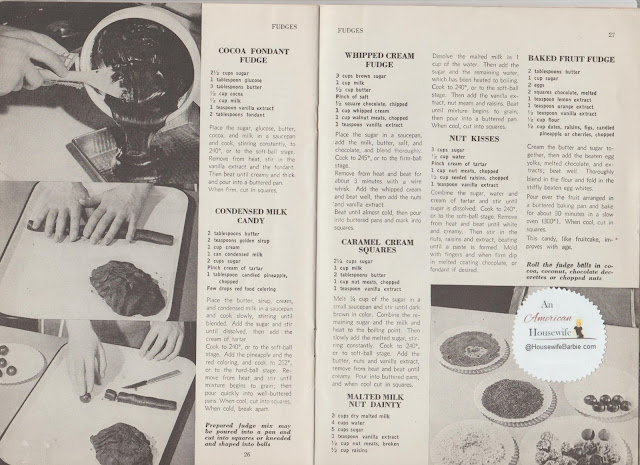
Cocoa Fondant Fudge
Condensed Milk Candy
Whipped Cream Fudge
Caramel Cream Squares
Malted Milk Nut Dainty
Nut Kisses
Baked Fruit Fudge


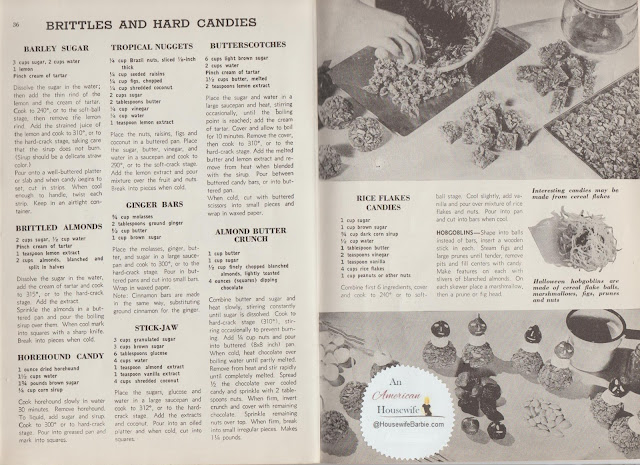
Barley Sugar
Brittled Almonds
Horehound Candy
Tropical Nuggets
Ginger Bars
Stick-Jaw
Butterscotches
Almond Butter Crunch
Rice Flakes Candies


Fruit Creams
Gingerees
Peppermint Creams
Baltimore Layer Candy
Maple Creams
Maple Brittle
14-Minute Maple Candy
Maple Molasses Gems


Coconut Caramels
Coconut Drops
Coconut Dainties
Coconut Cones
Coconut Straws
Coconut Squares
Simple Cooked Marzipan
Uncooked Marzipan


Make Up And Use Later Marzipan
Marzipan Goodies
Golden Marzipan
Honey Glazed Cherries


Chocolate Fudge
White Fudge
Almond Fudge
Chocolate Maple Fudge
Sour Cream Candy
Molasses Fudge
Panocha
Maple Panocha
Coffee Panocha


Gumdrops
Pralines
Turkish Paste
Rainbow Candy


Print Friendly and PDF

December 25, 2021

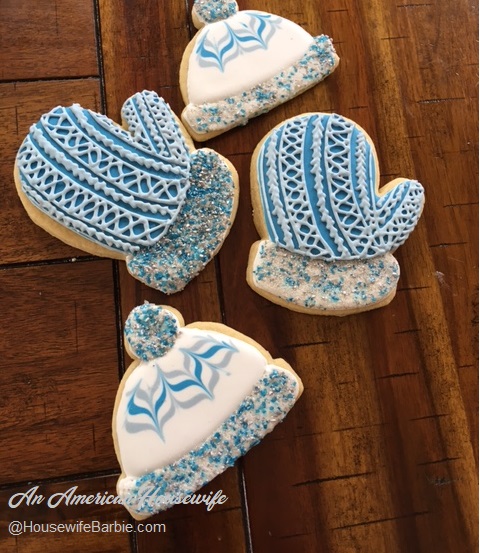
'Knitted' Look Mitten and Hat Cut-out Sugar Cookies - with a cable knit frosting decor look

A quick photo snapped while decorating. The blue cookies were decorated like knitted cookies too.


Hats and Mittens - that was my 'theme' for cut out sugar cookies this year.  I still did some Christmas trees and a couple others but I was really excited about the hats and mittens this year.

You would think I would have taken a lot of great photos then, right?  Wrong.  This year, December 13th I got thrown for a 'loop' and the world got crazy busy and time got away from me.  I managed to get these cookies made and enough goodies to make up 5 huge trays this year but that's it.  

Life.  It's what happens when you are busy making other plans.

So this poor excuse for a photo is what makes it to the blog and I only am able to quickly post links to some of the items I used to make them because I literally ordered a lot of my ingredients from Amazon so I was able to simply look up my own order to see what I used.

UPDATE: 

Yesterday I remembered I had a tray of cookies in the freezer waiting to go with a family member to her co-workers!  I grabbed the tray out and quickly snapped a few pictures so at least I can say I got a few pictures of one random cookie tray in 2021!


Thoughts:  I don't love the blue knit cookies as much as I do the white knit cookies.  I debated leaving the blue mitten cookies solid, but I had plenty of icing left so I went ahead and did a gray cable knit design on them.  They are 'fine' but I think next year I might leave some solid and some knit.


Print Friendly and PDF

December 13, 2021

From my Instagram... Christmas cookies are well underway and continuoously being baked, made, decorated........ #HousewifeBarbie #AnAmericanHousewife


An American Housewife Chit Chat:  Like most everyone, December is a busy month.  I've not bothered to update my page for many reasons; mostly because I've left many Christmas Cookie lists and links in place - which is what I and my family and friends that use my site are mostly looking for right now and using.  

I also tend to make many of the same cookies and goodies every year because everyone has their 'favorites' that I can't delete from the list!

Busy or not... baking is happening.  I post some of them on my stories on Instagram - but I don't always make an actual permanent post of them so if you don't follow me you'll miss my stories.  Not a big loss.... LOL.  But if you want to know what I'm up to, that's the best place to look!

I have made a number of items over the past 1 1/2 weeks... I've not had much time. I've got an 18 month old 'helper' as well who is a high maintenance kind of Little One - busy busy busy and has a short attention span, so that factors in to me trying to get all these cookies and goodies made!

 List so far:

Sugar Cookies - cut out and frozen, waiting on decorating day
Snickerdoodles
Chocolate Cut Out Cookies - waiting on icing and decorating
Marshmallow No Bake Fruitcake
Salted Nut Bars
No Bake Cookies
Molasses Cookies
Peanut Blossoms

Umm... I may have made one or two more, I honestly can't remember at this moment.  But, baking is happening!

The BIG TASKS are the 2 days of icing and decorating... those will be done next weekend, just before our out of town guests arrive for the holidays.

So... just a quick HELLO to my readers, letting you know I'm still around, still cooking and baking as usual. And if you need any specific recipe, be sure to enter the terms into the SEARCH bars I have on the side or at the top of the page... or by label listed to the right.  I have about 2600 recipes (?) or so, so I probably have a good one for you to use!


Print Friendly and PDF

November 19, 2021

Fall: Pumpkin Time... this one is another pumpkin cake with streusel topping


Crumb Topping:

1/2  c almond flour 
1 T good quality coconut flour
1/4 c Swerve Brown
1/4 c butter, soft
1/4 t cinnamon

Pumpkin Cake: 
 
1 c almond flour 
1/2 c natural sweetener(s) - I use Erythritol, monk fruit and some allulose mixed
1/4 c vanilla or unflavored whey protein powder (I use Isopure)
2 T coconut flour
2 t baking powder 
1/2 t cinnamon, ginger
dash of cloves and nutmeg
1/4 t salt 
2/3 cup pumpkin puree 
2 eggs
3 T butter, melted
1 t vanilla extract 
 
Glaze
1/4 - 1/3 cup powdered sweetener(s) - I use a mixture of 2-3 I keep in a container in the pantry
1 T cream cheese (optional)
2 tablespoon cream 
1/4 teaspoon vanilla extract 

Place the dry ingredients in a large bowl and whisk to combine. Put the eggs, pumpkin, butter and vanilla in another large bowl and mix until smooth. Stir the wet ingredients into the dry ingredients.

Grease a small cake, bundt or springform pan that fits inside your instant pot.  
 
Pour the batter into the pan.  To make it easier to pull your pan out of the instant pot, use a long piece of aluminum foil, folded over a few times and set the pan in the middle of it, pulling the sides up and over the pan so you can 'lift' it out easily when it's done. (Or if you are lucky enough to use a 'sling' now made for lifting pans out of your instant pot, use that! I don't have one though...)
 
Sprinkle the crumb topping over the batter.  Set a trivet in a 6-quart Instant Pot and pour in 1 cup of water. Place the pan on the trivet, seal the lid, press manual cook, and set the timer for 35 minutes. Let the pressure release naturally. 
 
Open lid and let cool in the instant pot for 10 minutes before removing.

Mix the glaze ingredients together in a small bowl or processor. Drizzle the glaze over the cooled cake.


 Making the crumb topping up


I might add about 1/4 c chopped pecans to this next time.... 


In the pan...


Sprinkled the crumb topping on - but also you can see the foil I use as a 'handle' to lower and raise the pan into the instant cooker.  I think some people cover the whole top with foil as well - I assume to keep the excess condensation from running back onto the cake?  If you are using a springform pan, you'll want to wrap the outside of the pan with foil for sure so no water seeps in through the seams of it.

In the instant pot (or in my case, the Cosori)

  Here is a photo of it 'done' and out of the instant pot, cooling on the stove.


 Ready for the glaze


You wouldn't have to put a glaze on it if you didn't want to.


It's just a basic glaze - sweeteners, a little cream cheese, a bit of cream and a dash of vanilla. 

Was great with coffee - and it freezes well.


Print Friendly and PDF

November 14, 2021

Homemade Sugarfree Strawberry or Raspberry Breakfast Rolls - could also be made low carb/keto if you choose

Homemade Sugarfree Strawberry Breakfast Rolls

 __________________________________________

I had no intention of doing a post on this recipe or dish so I wasn't taking any photos at first.  It was only after I had rolled it out and spread the filling that I realized I should add this one to my site to make it an easy 'reminder' to myself when I'm brainstorming breakfast roll ideas or one of my (young adult) kids want to make it.  So that is why the photos start after it's been rolled up - and incidentally, frozen and sliced.

I also thought it would be quick and easy to hurry and post the photos and type out the recipe but now that I'm doing it (a couple weeks later) I realize there are a bunch of variables to this recipe and post - and some might want links to some of the related products so I've just brewed a fresh cup of hot coffee and I'll try to get this post finished this morning before I get preoccupied and another month goes by!

NOTES/VARIABLES:  

I didn't bother making this one keto or lowcarb as we got off the keto track when entertaining and cooking for house guests for a week and hadn't gotten back to cooking keto when I made these.  So they are sugarfree as always, but I used flour.

FRESH GROUND WHEAT FLOUR:  Instead of keto flour, this version was made with freshly milled wheat.  I only buy and use store-bought flour when I'm doing my massive Christmas baking.  During the rest of the year, on the rare occasion I use flour, I use fresh ground (milled) non-GMO, non-irradiated wheat berries - I use my WonderMill to grind them- which I'll link to below.

YOU CAN USE KING ARTHUR KETO FLOUR and use this recipe.  For the dough, make a keto version with my Homemade Keto Buns recipe.  After the 15 minute rest period, just roll out the dough into a large flat rectangle, add the strawberry filling and proceed with letting it rise and bake as in the regular recipe.   

Most people reading this would simply use regular all purpose flour for this.  Which is of course, is what I would do too (and used to do)  if I didn't have a WonderMill and grind my own wheat berries.  

LASTLY:  This makes a soft dough and it's best to slice the rolls from the long log by using un-flavored dental floss (slip under, criss cross, pull back and slice).  However, I made these at night for the next morning and realized it would be just as easy to freeze the log of rolled up, filled dough, and slice and bake when I wanted them.  

Because we didn't need a whole 9X13" pan full at one time, I sliced some and froze them in a round 9" prepared pan, ready to thaw, rise and bake when I needed them.  Then I froze the rolled 'log' and sliced them with a knife the next morning.  Some I sliced and placed in small individual prepared pans for a 'one or two' at a time breakfast.  So you do you.  Freeze or don't, slice right away or don't, and bake in the size pan you want.

When they are done baking, let them cool down and frost with a glaze; a super quick sugar free glaze is to spread a sugarfree frosting over the top of all.  I keep two (2) backup cans of sugarfree frosting in the pantry at all times for last second impromptu use.  I don't love the flavor of store bought frosting on cakes or cookies (I prefer homemade) but on these rolls it was really good.

I've made these with both sugar free raspberry and sugar free strawberry jams.  You could use any flavor filling you wish but when I make my orange breakfast rolls, I don't use a prepared jam.  I think these would be good with any berry, peach, apple, cherry, even lemon.  OR just make them into cinnamon rolls by using a mixture of sugarfree 'brown' sweetener, butter and cinnamon as the filling.


Homemade Sugarfree Strawberry (or raspberry) Breakfast Rolls

You can use your own favorite bread dough recipe for this.  I happened to use one of two that are my 'go to' recipes. 

1/4 c butter
1 c scalded milk (I scald quickly in the microwave)
1/4 c natural sweetener(s) of choice
1-2 t sugar (which will be eaten and used up by the yeast)
1/2 t salt
1 pkg. active yeast (2 1/4 t) sprinkled in 1/2 c warm water and let foam
1 egg
3 1/2 - 4 c flour
Sugar Free Seedless Strawberry Jam
Sugarfree glaze or frosting of choice

Place the butter, salt and sweeteners and small amount of sugar in a bowl.  Pour the scalded milk over and let it cool to just warmer than room temperature.  Add the beaten egg, mix briefly then add the yeast mixture.  Add the flour and knead with the dough hook on your mixer (or by hand if that's your thing but I'm lazy and use my KitchenAid mixer).  When the dough is soft, the gluten is formed and you can gently spread a piece of it without it snapping apart or breaking, place it into a greased bowl, cover with greased plastic wrap and let it rise to double.  Punch down, rise again.  

Punch down and roll out into a large rectangle on a piece of lightly floured parchment paper or surface.  You can also divide the dough and do separate smaller rectangles if a large one is too much for you to handle or you want to freeze half the dough for later or you want to make a loaf of bread or buns out of it!  

Warm your fruit filling a bit in the microwave so it's easy to spread and spread over the dough, leaving about 1" on the top border.  Now roll up the dough tightly into a long log shape.  If you've used parchment paper under the dough, you can use it to help start and lift the dough, rolling tightly to start and then rolling up gently until you get the whole log rolled.  Now, use your fingers to pinch and seal the roll with a seam.

It's easier to slice if you place the log into the refrigerator or freezer for a little while, but if you want to slice right away, use the un-flavored dental floss to slice as I described above in the notes.  Using floss or a sharp knife, slice as thin or thick as you wish; and carefully lay into your prepared (greased) pans.  

Let them rise if you are baking them right away and not freezing them.  Bake at 350 for about 15-35 minutes depending on the size pan you are using and how many rolls you are baking.  When they are puffy, golden brown and the center rolls are done and not doughy, remove and let cool.  When cool, spread with your homemade or store bought glaze or sugar free vanilla frosting.

You can make a quick version by using  powdered confectioner style sweetener mixed with a dash of vanilla and a tiny bit of cream. The amount needed again is determined by the pan size, number of rolls and how thick you like and prefer your glaze or frostings on your rolls.  Some like them completely plain and they are excellent that way too.

A frozen 'log' of strawberry breakfast rolls - being sliced


I baked a small pan right away, another pan went into the freezer for another day.


Some I placed in individual greased pans to freeze and bake just one or two at a time at a later date. 

 
Breakfast rolls are one of the few items I like store bought sugar free frosting on.  They taste like the raspberry and strawberry breakfast sweet rolls from my childhood that my Grandma used to serve at their business (and I would always ask for when we visited!)


Still a little warm but I couldn't wait any longer!  YUM.


Print Friendly and PDF

November 10, 2021

Homemade Cherry Coffee Cake - Plus - A low carb low sugar option!


This vintage recipe is one from my childhood, and one of the very few cakes my mother ever made - but she made it all the time so it is a huge part of my childhood 'food' memories.  It originally came from my Aunt Carol and I know my Mother made it all through the 1970's and 1980's.

Back then it was popular to serve "coffee cake" at any and every get together at your home.  Anytime you had your neighbor over for morning coffee, hosted any gathering, had relatives come to visit, had a Tupperware party or other sales party at your home, had after-church socials, etc.... there was coffee cake.

It's quick and easy - and you can use whatever filling you like in it.  You can even make your own filling-of-choice if you don't want to use store bought canned fillings.  My mom usually used an apple filling, second only to cherry but we also often had either blueberry or peach.  Pumpkin and chocolate also work but I don't recall her ever making a lemon version.  If I were to try lemon I'd leave out the cinnamon topping.

THE LOW CARB, LOW SUGAR VERSION

I hadn't thought of this cake in a few years since we usually eat keto low carb and sugar free.  But the cool Fall weather set in and I found myself reminiscing about this cake.  I have King Arthur Keto Flour in my freezer so I remade this recipe using the keto flour, avocado oil and a low sugar cherry pie filling I already had on hand. 

The can of pie filling says it has 4 g sugar per 1/3 cups of filling; which is FAR more filling that you have with a piece of this cake.  The can says 7 servings, so at 28 grams for the whole can, divided into a 9X13 pan of coffee cake, cut into approximately 18 pieces, that gives you 1.55 grams of sugar per serving.

ORIGINAL VINTAGE COFFEE CAKE from the 70's

1 c sugar
1 c oil
4 eggs
2 c flour
1t baking powder
1/4 t salt
1 t vanilla
1 t cinnamon
1 1/2 t sugar
1 can pie filling

Mix the sugar, oil and eggs.  Add the flour, baking powder, salt and vanilla.  Beat just until smooth.  Spread half into a prepared 9X13" pan.  Top with a can of pie filling.  Finish topping with the rest of the batter.  Mix the 1 1/2 t sugar and cinnamon, sprinkle over all.  Bake at 350 for 30 minutes.  Serve with Cool Whip or Dream Whip or whipped cream after its cooled.


LOWER CARB AND LOW SUGAR VERSION  

1 c natural granular sweetener(s) - like Lakanto, etc. (erythritol, allulose, xylitol, Monk Fruit, Swerve)
1 c oil of choice
4 eggs
2 c King Arthur Keto Flour
1 t baking powder
1/4 t salt
1 t vanilla
1 t cinnamon
1 T natural sweetener of choice
Up to 1/3 c water if needed
1 large can low sugar/no sugar added pie filling (or make your own version)

Mix the sweetener(s) with the oil and eggs.  Add the keto flour, baking powder, salt and vanilla.  If the batter is really, really thick (too thick to stir/beat very well) add about 2 tablespoons water at a time until it's still a fairly stiff dough, but you can beat it.  You don't want it too runny or it won't bake up nicely, but the King Arthur Keto Flour does require a bit more moisture/liquid than wheat flour would.

Spread half the batter into a greased 9X13" pan.  Top with the no sugar pie filling, and spoon the last half of the batter over all.  Spread it a bit if you can.  Mix granular sweetener with a teaspoon of cinnamon and sprinkle over all.  Bake at 350 until just done in the center by testing.  This could be 35 minutes or may be up to 55 minutes depending on the oil you used, and the pan you used as well as your own personal oven.  Let it cool completely or almost completely before serving with real, whipped cream sweetened with a no-sugar option or plain, if you prefer.


Here it is going into the oven - not baked yet.


Print Friendly and PDF

November 07, 2021

Everything 'sticking' to your stainless steel cookware? Well, yes, you'll want to 'season' your new stainless steel cookware set... and yes, it will be 'non-stick' naturally if you do!


I uploaded these photos a week or two ago but then life got in the way and I never got back to actually write the post.  I have to get ready to go somewhere in a few minutes so this will be quick, but I wanted to mention something about new Stainless Steel Cookware.

I realized a couple weeks ago, many people don't realize you have to 'season' them a bit, much like cast iron. A couple weeks ago, I got this set from Target.

I followed the directions for seasoning them, proceeded to use them a couple times and I'm happy to say that they are non-stick now; with very little effort on my part.

I liked them so much that I was thinking of buying a set for someone else for Christmas.  When I went to the listing, I realized there were a lot of people complaining that they were 'awful' and 'everything sticks' to them.  Now, these were people who admitted in the reviews they opened the box, and tried to use a pan immediately to cook things like eggs!!!

I just want to let others know that if you get a set of good stainless steel cookware, please take the time to read the instructions that come with them.   Your instructions will say something similar to what mine did about washing and drying them, then covering the bottom with oil and heating your new cookware on the stove until it just gets to 'smoking'.

The second you see little tendrils of smoke starting, then you remove them from the heat source and let them cool.  Completely.  Go find something else to do or do this at night before bed and then just let them sit there all night.

When they are cold, you wipe out the pans with a paper towel to absorb the oil.  Rub it good - polish it with the oil; the bottom and sides.

Now, pour in a little fresh oil or use a bit of shortening, and rub it around to coat it lightly and store your pan that way.

The first few times you use the pan, be sure you have enough oil for the foods.
When you place the pan on the stove, don't crank it up to the highest heat setting.  A medium high is good and will bring the pan up to temperature gradually.  You can always put it on high after it's completely hot.
Another helpful hint is to be sure your pan is preheated and hot before adding your food.

If you have food that stuck to the pan, remove most of your item and then add water to deglaze the pan (add water and put it immediately back on the hot burner, then use your spatula or utensil to gently scrape the bits and bobs from the pan as the water has loosened them.)

Now you can wipe out the pan with hot water and a dish rag.  Don't use soap until you feel you absolutely have to.  Washing it with hot water is usually sufficient and then add some fresh oil, wipe it with a paper towel and store it again.Scrubbing it hard and using a lot of soap right away is 'undoing' the seasoning.  After a couple weeks of cooking in it though, you'll be able to wash it and use it however you wish - including soap.

After you cook and clean it and store it with a bit of oil a couple times, you'll start to notice it's becoming non-stick naturally.

By the 3rd use of the fry pan, I could cook eggs and they did not stick at all.
I've since made French Toast and pancakes and the pan is basically non-stick already.

In another pan, I've browned ground chicken and ground beef, as well as made bacon.  I had to deglaze the pan a bit at first but now that pan is also 'non-stick' as long as I use a bit of oil to start.  And that was in less than 3-4 uses. 

Don't use your brand new stainless steel cookware straight out of the box
without first seasoning it.  If you read the instructions that come with your set,
you will find out how to season your particular cookware set.

Once seasoned, after a couple uses you'll find they are basically non-stick naturally
and you will have a long lasting cookware set that doesn't have the gross, peeling
'black' non-stick finish to add chemicals to your foods like coated cookware does!


 You can see the oil is getting really hot in the photo below as it's showing 'ripples' right before the whispy smoke tendrils start.


After they were hot and removed from the stove, I simply put them into my oven to completely cool so I could use my stove and my kitchen without hot pans in the way.


The set I replaced with this one is still perfectly wonderful but I am saving that set (a Wolfgang Puck stainless steel set) to hand down to a family member.  I have had it for about 16 years and it's still in perfect condition - including all pans and lids have been washed in the dishwasher and not seasoned with oil in 15+ years.  The more you use stainless steel, the better they age.


Print Friendly and PDF

November 01, 2021

Vintage Recipe: Broccoli Casserole (the 'church cookbook' kind your grandmother or great-grandma might have made)


"Anything special you want for dinner?" I asked.
Surprisingly the answer was, "Yeah... uh, for a side dish, make that broccoli casserole thing.  I'm really craving that!"

Blink. Blink. Blink.  (That's me)

Yes, my husband requested not only a vegetable... but a casserole.  He loves this casserole (one of perhaps only two or three since he is not a casserole kind of guy)  and it's the easiest, quickest thing to throw together.   It's an 'oldie' and probably has fifty different versions depending on the person making it, but this is the one he loves, I love, the kids loved... and it's something we've made for too many years to count.  

The amounts are approximate - a little more, a little less, meh.  Also, I have made this a number of times with fresh broccoli - just make sure you cook it tender as this casserole is not as good if the broccoli is still too crisp.  Plus, I don't like 'wasting' fresh broccoli on a casserole when it's so good in various ways eaten fresh and crisp; or in dishes where it's the star of the dish and stands out.  This is a good old fashioned casserole and frozen works perfectly.

I know I've posted it on An American Housewife previously, but to make it quick and easy to find I'm posting again. 

Broccoli Casserole

20 oz. frozen broccoli, cooked and drained
Optional:  replace some of the broccoli or add to it a bit of frozen, cooked carrots/yellow squash
2 eggs
1 c mayonnaise
1 can cream of mushroom soup (regular or fat free)
1 c shredded cheddar cheese (option: I've used some Velveeta in it and the family loved it)
3/4 c crushed Ritz Crackers
1/4 c butter
Salt and Pepper

Combine the mayonnaise, soup, cheese and eggs.  Add the broccoli.  Pour into a greased casserole dish or 9X13 ish pan.  Top with the crushed crackers and either dot the top with butter or melt and pour over.  Salt and Pepper to taste.  Bake at 350 for about 35 minutes.


We never used to have Ritz Crackers on hand and had to buy them for this dish but with a baby/toddler around we now have Ritz on hand most all the time so this is really easy to whip up for dinner!


This time I used 20 oz. broccoli but also some frozen carrot/yellow squash, cooked and drained.


Print Friendly and PDF

October 27, 2021

Spaghetti Inside a Garlic Pastry Crust - (my Low Carb, Keto option too!)


When I decided to try making this 'idea' I had in my head, I didn't know how it would turn out but since I had one of my old cell phones sitting on the kitchen counter, I grabbed it every once in a while and snapped some photos.  I'm glad I did... because this was pretty yummy!

I was busy yesterday and had left the house early so I had nothing out thawing for dinner, nor had any ideas of what to make.  When I had to brainstorm something fairly fast for dinner, a keto spaghetti came to mind.  I normally like to use Great Low Carb Bread Company Low Carb Pasta, but I'm currently out of all but their elbow macaroni.  However, I had Palmini Hearts of Palm Pasta - which I always keep some on hand in the pantry, as I can find that locally and don't have to order it online.

There is no recipe for this, it's more of an idea I had when getting ready to make a regular keto style spaghetti and garlic bread dinner.

Use your favorite keto/low carb spaghetti sauce, faux pasta and favorite keto Bread Product.


Keto Spaghetti Inside a Garlic Bread Pastry

Your favorite keto/low carb spaghetti sauce
Your favorite keto/low carb bread - thin sliced
Your favorite keto/low carb pasta
Mozzarella Cheese
Parmesan Cheese
Butter
Garlic, minced
Garlic salt
Parsley

Prepare your keto pasta of choice, add a bit of butter or oil so it doesn't stick while you prepare the pan.
Cut the crusts off enough slices of keto or low carb bread, enough to cover whatever size pan you are using.  SAVE the crusts for another dish!  I save all my keto bread ends and bits in a baggy in the freezer and use them to make 'keto bread crumbs' and stuffing for a keto Thanksgiving.
Use a rolling pin to flatten the bread slices.
Melt some butter (amount depends on the number of bread slices) - start with about 1 stick or 1/2 cup.
Add about 2 teaspoons minced garlic, a 1/2 t garlic salt and about a tablespoon of parsley.
Brush each slice of flattened bread on both sides and start to lay them in your pan of choice, overlapping the seams just a little to cover your pan.
Use your fingers to seal the seems a little bit.
Place a layer of mozzarella cheese and parmesan cheese over the bread pastry crust bottom.
At this point you can pre-bake your bread for about 8 minutes or so. If you don't have time, skip it.  The bread just won't be quite as crunchy on the bottom.
Layer your spaghetti sauce and keto pasta into your pan in as many layers as you wish.  Fill your pan.
(If you use a sauce that is really runny or has a lot of liquid, you can simmer it ahead of time to reduce it to a nicer, thicker sauce.)
Top your pan with more garlic/parsley/butter brushed breads.

Bake at 350 approximately 40 minutes or until it's heated through, bubbly and golden brown.


I didn't have my favorite keto pasta on hand but I always have Palmini.  I rinsed it twice and then boiled it in water for about 10 minutes to soften it a bit. 


Cut the crusts off your bread and save them for another recipe like stuffing or use for bread crumbs.

 Now roll them out with a rolling pin to flatten them. 


And brush both sides with melted butter with garlic and parsley in it.


 Start to line whatever pan you wish to use - based on the number of servings you need to make.


The pan is covered with garlic bread, seams gently pressed together. 


Heating my sauce to reduce it a bit and make it thicker so it doesn't saturate the bread.


 A thin layer of mozzarella and parmesan.


This time I started with a bit of sauce over the cheeses.  I thought my cheese layer would seal the bread but next time I make this I'll pre-bake the bread with the cheese layer first for about 8 minutes and then I'll top with the keto pasta, followed by the sauce.  I think this will seal the bottom bread layer better from getting soft.


Layering 


 Finish the top of your pan of spaghetti with the same melted butter/garlic brushed slices of keto bread.


Into the oven!


I baked mine about 40 minutes at 350 degrees.


When I served it, I flipped my pan over onto a serving tray as I had used a rounded, pretty, half-circle loaf pan.  I popped it back into the oven with the curved side up, to toast the underside (now topside) of the bread.   If I had used a regular flat bottomed pan to bake it in, we could simply cut and serve much like lasagna.


___________________________________________________


You might be interested in some of the products related this post:  I can find some keto products locally, but I buy many of them online.

I make my own spaghetti sauce and freeze it in food-sealed bags but of course there are many low carb, sugarfree and keto sauces available. 

My favorite keto pasta is the Low Carb Bread Company version but it's not something you can find locally and I have to order it.  It's also pretty expensive (as is all keto and low carb foods!) but I do try to keep some in the pantry at all times.  I use their shells, rotini, fettucini, spaghetti, penne and elbow macaroni.

Because I know I'll probably run out of my favorite keto pasta before I can budget a new keto/low carb foods order, I always keep Palmini brand on hand in the pantry for back up!  I CAN get this locally, so it's easy to pick up during our normal grocery trips.

Recently a LOT of companies have been coming out with keto bread... which I love because I've never found a perfect keto bread recipe I loved so much I'd rather make it than buy!  I used to order the Low Carb Bread Company bread because they were one of the few making it and I had no local options.  In the past 6 months or so, Lewis Bakery and now Arnold's have both been popping up randomly at my local grocery stores.  So I use both as I can find them and order keto bread online when I can't.

Low Carb or Keto Bread of your choice.  I know a lot of people love this one - although I typically use Lewis Bakery or Arnold's.


Print Friendly and PDF