Pages

2/23/22

What 6 large green peppers look like after dehydrating them! Crazy isn't it? - Prep and Pantry work going on right now in the American Housewife Household

Busy!  Not much being posted lately by way of recipes, but a busy toddler, a few unexpected things in 'life' we're dealing with and of course the state of things being what they are right now, I'm also trying to do some canning, dehydrating and 'stocking up' just in case.

If you follow me on Instagram you might have already seen this, but I just love seeing the results of dehydrating foods!  

This is the dried green pepper bits from... SIX (6) large green bell peppers!  

It's so awesome!  After drying, each 1/4 cup of diced pepper basically equals about 1 fresh. 

I store bell peppers in various ways, but for our family, I do a few bags of green peppers frozen, and the rest I dry as I tend to use them in soups and stews, which are perfect for dehydrated (or freeze dried). 

Red and yellow peppers are mostly cut into strips and food sealed and frozen as I use them in stir-fry, and fajita's, etc.  It's super easy to cut them into diced if needed as well from frozen state.

(Just because we are on topic - as a side note, I buy containers of sliced mushrooms and immediately put them into the freezer as they are unless I am using them that night or the next day.   I throw them into soups, stews, the pan to saute', etc. straight from frozen state as well).


Print Friendly and PDF

2/20/22

Great Low Carb Bread Company Pastas.... Rotini, Shells, Fettucini and more... ready for pasta salads, speghetti, alfredo and so much more


This is a 're-post' of sorts - originally blogged about in March of 2021.  However, it's here today because for the past 3-4 weeks I've been trying to talk myself into spending the money to place another order of low-carb, or keto foods and ugh... I just don't want to spend the money!   But I really need to, as it's much easier, more fun and quicker to cook healthy low carb when you have ingredients on hand.
 

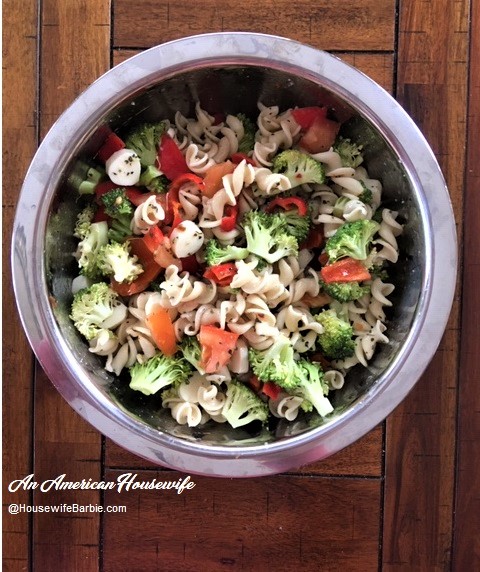
When it comes to pasta salads, I make them using whatever we have on hand at the time, or whatever I feel like that day.  I also sometimes take into account if I've already had a high number of carbs that day and want to leave out higher carb veggies or use fewer of them, and take into account what the salad is being served with.

Lastly is the dressing used.  I always keep a couple low carb no sugar added dressings on hand, but also often throw together my own versions - either Italian or Ranch.  Both bode well in pasta salads depending on what taste you're going for.  The final note to that is sometimes I use mayonnaise with the Italian dressings sometimes not. 

Basically you use your favorite pasta salad recipe or toss together random ingredients - but do so using low carb options.

  • pasta - low carb/sugar free only
  • fresh broccoli
  • fresh cauliflower
  • red pepper
  • fresh lettuce
  • cabbage shreds
  • green onion
  • cucumbers
  • mushrooms
  • cheese - mozzarella or feta with Italian or ranch
  • cheese - cheddar if using ranch or plain mayonnaise
  • basil
  • dressing - Italian style or ranch style within your personal carb counts for the day
  • black or green olives, red onion, yellow or orange peppers, fresh spinach, etc. (watch your carb counts and likes/dislikes)


Do not use high carb veggies like yellow onion, peas, corn, potato or carrots.  Use just a bit of tomato if you wish - it's higher carb or some artichoke hearts (not many - higher carb).

Mix and chill.  Serve cold.


Here is the nutrition listing for the Great Low Carb Breads Company Rotini Pasta.  Just 7 carbs.


Print Friendly and PDF

2/14/22

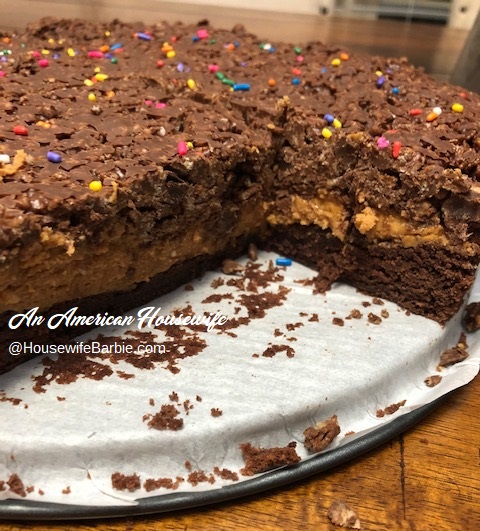
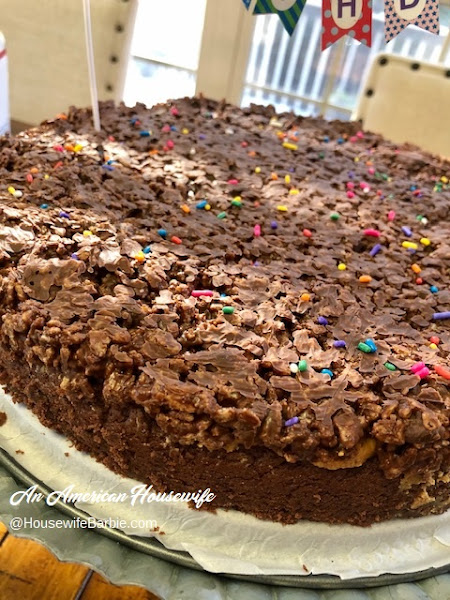
Triple Layer Krispy Peanut Butter Chocolate Bars - also can be made sugar free and lower carb if you wish


Did not plan to post this, but it ended up to be really, really good and I want to keep it here as a reminder!   
 
My version is a lower-carb and sugarfree option but it can be made full sugar and full carb making it the exact same way, using 'regular' ingredients.  


Triple Layer Krispy Peanut Butter Chocolate Bars

Brownies:  either homemade or a mix (sugarfree or regular)
Peanut Butter - approximately 3 cups
2 t vanilla
1/3 c confectioner style sweetener or sugar
1 T butter
3 c plain rice krispies
2 c chocolate chips - regular or sugar free

Make the brownies according to directions and spread in the bottom of a parchment lined pan of choice.  I used a spring form pan here.  You could also use a 9X13" pan, be sure to leave the parchment on the sides long enough to be able to grasp and pull the bars out of the pan with it when they are done. 
 
(My quick and easy brownies are to use 1 dry chocolate cake mix of choice, mixed with 1 stick melted butter and 2/3 c evaporated milk.)

When the brownies are done, let them cool completely.  Prepare the peanut butter filling by mixing 2 cups of peanut butter with the vanilla and sugar or sweetener.  Spread this over the cooled brownies.
 
In a microwaveable bowl, mix the remaining 1 cup peanut butter with the chocolate chips and 1 T butter.  Microwave about 1 minute, stir smooth, microwave another 15-20 seconds if you need to until melted and smooth.  Mix with the 3 cups rice krispies.  Spread this over top of the peanut butter layer.  I use plastic wrap to press and smooth (it won't stick to the plastic like it does your fingers).
 
Now chill for about 30 minutes.  Sprinkle sprinkles, drizzle with melted white chocolate or add frosting if you wish.  Serve.
 
____________________________________________


Print Friendly and PDF

2/10/22

Five (5) Low Carb and Sugarfree Cake Recipes: White, Chocolate, Cinnamon Coffee Cake and Red Velvet (Plus 2 frosting recipes)

This post isn't actually here for anyone but me... but I keep the blog site open to the public so others can find recipes and hints too.  

The reason for this post is to take some of my keto or low carb cake recipes from the past 10 years and put them 'front and center' here because I need to make a birthday cake this weekend and I'm not sure yet which kind I want to make.  It just saves me a few extra minutes to put them here and decide at the time I start the cake.

All of these are from posts over the past 10 years.


sugar free low carb white cake with layers of white sugarfree frosting and fresh flowers


This photo is a cake I made in September of 2012 for my parents anniversary as they were visiting us during that time, and I wanted to celebrate, but our family was in the middle of a no sugar, low carb way of eating.   I first made it in April 2012 for my own birthday (was also doing no sugar at the time) and again in September for them. 


FIRST RECIPE:   Sugar Free, Low Carb White Birthday Cake

3 c good quality, blanched, fine grained almond flour
1/3 c whey protein powder - vanilla or unflavored (I only use IsoPure - not any other brand)
2 t baking powder
1/2 t baking soda
1/2 t salt
1 1/3 sticks real butter
3/4 c mixture of granulated natural sweeteners of your choice (Lakanto, Xylitol, SoNourished, etc)
1/2 t liquid sweetener drops like Sucrarose, etc. (optional but it helps to use 2-3 sweeteners)
3 eggs
1 T cake batter flavoring
1 1/2 t vanilla
1/2 c unsweetened almond milk

Grease or line a 9" pan with parchment.  Preheat the oven to 350.  Put the dry ingredients into a large bowl; almond flour, whey protein powder, baking powder, baking soda, salt.


Mix butter and sweeteners until fluffy, add eggs.  Beat in cake batter flavoring and vanilla.  Add the dry ingredients alternating with the almond milk.

Bake in the oven for about 35 minutes.  At this point your cake might be done, but I find almond flour baked goods need a little longer and the cake may start to be too brown on top.  If your cake is still a bit too wet in the center or jiggles, yet the top is getting browned, cover with foil and bake about 5 minutes more; turn off the oven and let it for about 5-10 minutes more, checking to see if the center of your cake is set and done.  My oven bakes this cake in a good quality 9" pan for 35 minutes at 350, cover with foil, turn off the oven and leave for another 10-12 minutes and it's perfectly done.  Cool completely or freeze before frosting.


SECOND RECIPE:  White Cake - Low Carb and Sugar Free

1/2 c butter, soft
8 eggs
1 c  white sugar-like sweetener of your choice
2 T Xylitol
14 drops liquid sweetener (I used Superose Liquid Sweetener which is no longer available, but you can use Stevia, EZ-sweet, etc.)
1/2 t salt
4 t vanilla extract
2 T Torani Sugar Free Vanilla flavor
1/2 c sour cream
1/3 c (not quite heaping) Carbquick
1/3 coconut flour
2/3 c Isopure Vanilla Whey Protein Powder (0 carb, 0 sugar)
1 t baking powder
Whisk or mix eggs and vanilla flavorings in a bowl until yellow and frothy.  In another bowl place the Carbquick, coconut flour, protein powder and baking powder.  In a large mixing bowl beat the butter and the sweeteners; Splenda, Xylitol and liquid sweetener.  Beat until fluffy.  Add the eggs by pouring them in as the mixer is running.  Add half the dry ingredients, half the sour cream, then the rest of the dry and the rest of the sour cream.  
Place in 2 round 8" or 9" pan sprayed or oiled and dusted with either a light dusting of Carbquick or almond meal, etc.  Bake at 350F for approximately 25-35 minutes until the center is set.  Let cool about 10 minutes so you can remove it easily from the pan.  Invert it onto a platter and let cool completely before frosting and serving.


Cinnamon Coffee Cake  It's one that always turns out and everyone loves it - even those who have no idea it's sugar free, gluten free and low carb. 


Frosting:  Do a taste test on this one.... add more or less sweetener or vanilla if you wish

Approximately:   1 stick butter
2 c Swerve Confectioner's Style sweetener (Swerve Confection Style)
about 1 teaspoon liquid sweetener drops
1/4 - 1/2 c Lakanto or other sweetener to bring out the best 'sugar like' flavor.  (If you use something like SoNourished Sweetener, I find I only need about 1 cup!  So TASTE TEST because the sweeteners you use make a huge difference in the amount needed to flavor your frosting). 
1/4 t xanthan gum (optional, but it makes a nice thickener/texture)
1/2 - 3/4 c heavy whipping cream
1 T vanilla extract
1/2 - 1 t LorAnn liquid emulsion "princess" cake flavoring.

In an electric mixing bowl, beat the butter, then add the rest.  Add more cream to make it a bit thinner, or more sweetener to make it thicker.  Taste test to get the right amount of sweetness and flavorings that you like.


 Low Carb, Sugar Free, Chocolate Cake

2 1/4 c good quality almond flour
3/4 c cocoa powder
1/2 c sweetener (erythritol, etc.) + little more if you like it sweeter
1/3 c whey protein powder (I use Isopure - zero carb & zero sugar)
1 t instant coffee
2 t baking powder
1 t baking soda
1 t xanthan gum
1/2 t salt
3/4 c sour cream
1/2 c soft butter (1 stick)
5 eggs
15 drops liquid or other sweetener (mixing sweeteners gives it better flavor than a single sweetener)
2 t vanilla
2/3 c almond milk or half and half, etc.

Place all the dry ingredients from the almond flour to the salt, in a large bowl and mix well with a wood spoon, whisk, etc.  Set aside.  In your mixing bowl, beat the butter and sour cream.  Beat in the eggs, liquid sweetener and vanilla.  Add half the dry almond flour mixture, beat well.  Add the almond milk, beat.  Add the last of the almond flour mixture.  Bake in your preferred pan;  a greased and parchment lined 9X13, a greased bundt pan, 2 greased and parchment lined round 8 or 9 inch pans or make into cupcakes.   Bake at 325 degrees.   I baked in two- 9 inch round pans about 32 minutes.  Test and bake until the center is done.  Let cool about 10 minutes and remove from pans to cool completely.


Low Carb Sugar Free Red Velvet Cake

1 c butter
1 1/2 c sweetener
2 eggs
2 1/2 c almond flour
1/3 c whey protein powder
1/4 c coconut flour
1 t xanthan gum
1 t baking soda
1 t baking powder
2 t cocoa
1 t salt
1 bottle - 1 oz. red food color
1 T vinegar
2 t vanilla
1 c almond milk with part cream and 1 1/2 t vinegar (or lemon juice) to sour

Mix the almond milk with the vanilla and 1 1/2 t vinegar in a small cup and let set.  You could buttermilk in place of the vinegar and almond milk.

Cream the butter and sweeteners in a mixing bowl til fluffy.  Add the eggs.  If your eggs are small use 3.  In a separate bowl mix all the dry ingredients.  Add the dry ingredients alternately with the milk mixture.  Begin and end with the dry.  When mixed well, pour into your pans of choice.  I use 2 round cake pans sprayed and lined with a piece of parchment.  Bake at 350 approximately 25-35 minutes depending on your oven.  When the center is set and the cake is done, remove and cool 10-15 minutes in the pan before removing from pan to cool completely.  Decorate as you wish - the traditional Red Velvet Cake Frosting DOES NOT USE CREAM CHEESE.  It's a flour and milk based frosting you then cool and add the butter, sweetener and vanilla.

Sugar Free Butter Cream Vanilla Frosting

3/4 c granular Xylitol 
1/4 c water
3 large egg whites (separate and use the yolks in another recipe)
2 1/2 sticks real butter
2 T vanilla extract or use half vanilla sf syrup and half extract
*If you taste test it and find your personal tastes would like it sweeter, use 5-10 drops liquid sweetener

In a saucepan, place the water and Xylitol. Heat over medium high until it comes to 240 degrees.  With normal sugar this would be soft ball stage but because Xylitol and Splenda do not thicken, you cannot test this by traditional soft ball stage.

As you are heating the sugar substitute and water, mix the egg whites in a large mixing bowl.  Beat the egg whites until soft peaks form.  With the mixer running, pour the hot Xylitol mixture down the side of the bowl in a thin stream, mixing into the egg whites.  Beat approximately 7-10 minutes on high until the egg whites resemble a thick and glossy meringue.

Start to add the butter in chunks, about a tablespoon at a time.  Keep the mixer running and whip the mixture about 7- 10 minutes more.  If the mixture breaks up when you first add the butter and it looks like cottage cheese, no worries.  Just keep whipping until it's smooth again.  Once the frosting is smooth, add your vanilla and whip again for a few minutes.  If it's a really warm or humid day it might get too warm to work with.  Just refrigerate it for about 7 minutes, whip again.  The cooler temperatures will cause it to harden up again.


 Drizzle the hot syrup down the side of the mixing bowl into the egg whites


 I had to make 2 batches to fill and cover a 3 layer cake


Print Friendly and PDF

2/9/22

Home Canned Butter - a taste test after almost 18 months (2020 canned - testing 2022)


In May of 2021, I posted a "6 month taste test" of my home canned butter.  At the time, I was thrilled it was so wonderful yet at six months but now, in 2022, how is it?

Last night I grabbed one of the 2020 jars of home canned butter and opened it for a taste test and... it was perfect!  A beautiful 'butter yellow' color and the taste?  As perfect as the day I canned it.

I'm extremely happy with it!  

Here is a copy of part of my original "six month" taste test of my home canned butter - but I can attest that after almost 18 or so months out, it's still as perfectly delicious as the day it was canned.


It had good, even color.  It had a light, fresh, 'buttery' smell.  


Basically, I want to have the option of having and storing butter without depending on electricity.

  _______________________


(Tiny update the next day...  I made another 18 jars yesterday.  Finished the 'shaking' during solidifying process last night around 9:15 pm.  What a great feeling to see the fruits of your labor!)


2022 PHOTOS

Thrilled!  That's how I felt about this can of 2020 canned butter last night.  It was just as perfect as the day it was canned in the Fall of 2020.  


________________________________________-


Print Friendly and PDF

Home Canned Pickled Beets - an old Amish recipe

Originally posted in August, 2008 - yes, over 13 years ago!  

I was looking over some old canning recipes and when I read this one, I noted I had said (in 2008) a can of beets at the grocery store was about $.50.  Just for the heck of it, I checked Walmart to see how much a can of beets is today and surprise!  Their Great Value brand was... $.50!  That was funny... and I decided what the heck - it's been over 13 years, let's post this old recipe again for 2022!


My recipe is out of an old Amish recipe book that my FIL gave me and it used to be my MIL's years ago (she passed away in 1982). I love the recipes in this book because the Amish women assume that you know just what they mean and use as little words as necessary.

(typos are as typed in the Amish recipe book and are not mine);

How to Can Beets

To every quart vinegar add 1 tablespoon salt, 1 heaping cup sugar. If your beets are dark red use part white sugar. Spice whatever you like. Heat to boiling point and pour over beets. Can while hot.


That's it. The whole recipe.

So... here is my version - with just a few more details as I made them.


Home Canned Beets - Pickled

1 quart vinegar - cider/white (I used a mixture because I didn't have enough cider vinegar)
1 c water
1 heaping cup sugar 
1 1/2 T salt (I checked 3 recipes and there was a disagreement on how much so I did 1 1/2 T.)
1/4 t cinnamon more or less to taste
1/8 - 1/4 t cloves more or less to taste
10 lb. beets

Combine the vinegar, water, sugar, salt and optional cinnamon and cloves. Bring to a boil and simmer until ready.

Scrub fresh beets and cut off the roots and tops. Roast in a roasting pan in the oven, covered for an hour and then immediately fill the roasting pan with ice water or dump the beets into ice water so the skins will slip right off.

Dice or cut beets to size, or if they are very small, under 2 inches, leave whole if you prefer.

You can also boil them if you prefer although this will leak more of the red color out and they won't be quite as vibrant. Continue with the cutting and packing as above.

Pack into hot, sterilized jars. Cover the beets with the hot brine leaving 1/2 - 3/4 inch head space. Tighten lids and caps and water bath process for 35 minutes for quarts and 30 minutes for pints.

Let cool on the counter, making sure they 'pop' and store to use. I got about 3 quarts out of this.

Cutting off the roots and stems In the roasting pan (I removed the cover for the photo) Plunged into cold water Sliced or diced and packed into hot, sterilized jars After a 35 minute water bath let them set to cool and 'pop' and then store in a cool dry place like a cupboard.


Print Friendly and PDF

2/2/22

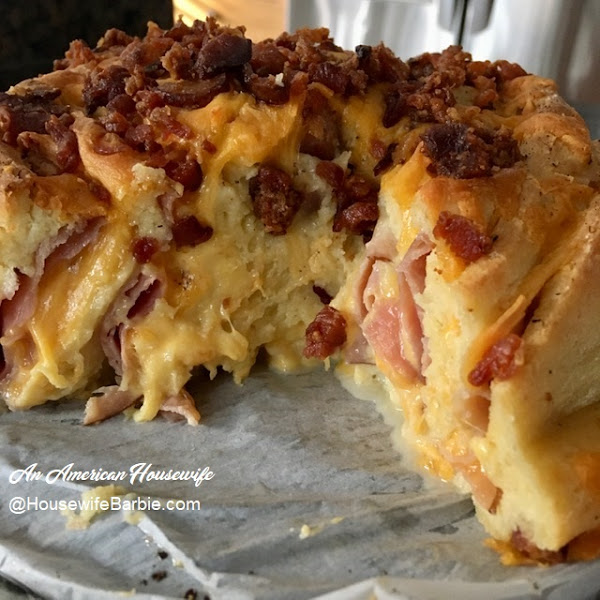
Large Spiral Ham, Cheese and Bacon Sandwich - Keto, Low Carb

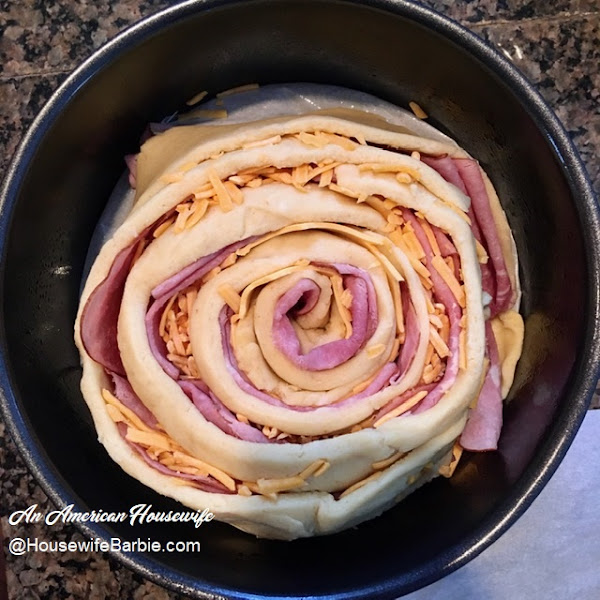
  I didn't plan to post this on the website so I almost didn't take any photos - but figured at the last second before I start to roll it up, I would.  So here it is!
 
This time it's a ham and cheese version but it makes a great Italian Sub version, or jalapeno popper version, pepperoni version... etc.  And that's just the savory version.  The same thing rolled with cinnamon, butter and brown sugar sweetener turns it into a cinnamon roll... or sugarfree raspberry jam and cream cheese makes a raspberry breakfast roll... and again I say "etc."  Basically the idea works for a ton of ideas.
 
This one is the ham and cheese version.  It's also keto as I use a fathead dough.  If you prefer Swiss, use it and spread with mustard if you wish.  I don't like mustard, so I use Italian dressing with mine but because my husband loves mustard, we serve it with the condiment choices on the side and everyone gets what they want;  mustard, Italian dressing, ranch dressing or nothing if you prefer that.   
 
Extra Large Spiral Ham and Cheese Sandwich with Bacon
 
Dough:  
2 1/2 c shredded, packaged mozzarella cheese
2 oz. cream cheese
1 1/2 c almond flour
1 T baking powder
1/2 t xanthan gum powder
2 eggs, beaten
extra almond flour, King Arthur Keto Flour, Longivity Flour, etc. if needed
 
Topping:
A package of deli ham slices of choice
Slices of Cheese:  Swiss, American or whatever kind you like
Cheddar Cheese: shredded or slices
Crumbled cooked bacon
Optional:  Spread mustard, Italian Dress or favorite condiment OR sprinkle with oregano or other spice you like on your regular ham and cheese sandwiches
 
Microwave the mozzarella cheese and cream cheese for a minute or two until melted.  Mix the dry ingredients in a standing mixer (KitchenAid style) bowl while waiting, pour the beaten eggs over; add the melted cheeses over all and mix with the dough hook, scraping down the sides.  Stop as soon as it forms a dough.  If it's too sticky, add a tablespoon or two of extra almond flour or one of the other options until it forms a dough.  It will be a little sticky - that's fine!  
 
Have a springform baking pan ready, a 7", 8" (or 9" but it might be a bit big) works well. Grease it well, and if yours is not a non-stick version, consider using a piece of parchment in the bottom.  Preheat the oven to 350.

Dump the dough out on a large piece of parchment paper.  Top with a second sheet of parchment and roll out to a very large rectangle shape.  Use a pizza cutter to slice strips as wide as you would like your sandwich to be.  I did mine about 3 inches (?) wide. You'll want at least 4 or 5 strips of dough to work with to fit into a 7, or 8 inch springform pan.  

Here you have an option: You can spread the dough strips with mustard, spices, dressing or nothing.  Top with pieces of ham, overlapping each other a bit, the full length of the dough strips.  Now another option:  the cheese you use.  I like cheddar and American with my ham, but you can use Swiss or Pepper Jack, etc.  Use strips or sprinkle the length of the dough on top of the ham.
 
Start to roll one of the strips up, supporting it on the sides as it starts to get larger.  When you get to the end, carefully pick it up between your palms and lay it on the bottom end of the next strip and continue to roll.  Again, when you get to the end, carefully pick it up supported between your palms to the beginning of the next strip and continue until you are done.  

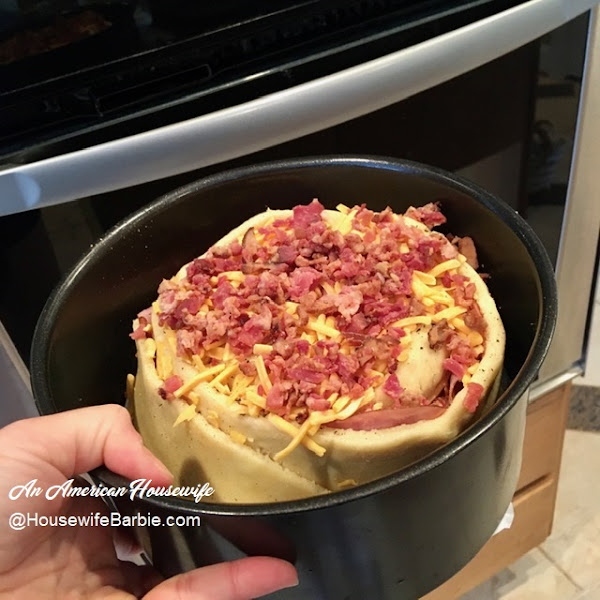
Carefully place it into the prepared springform pan.  Sprinkle the top with the bacon crumbles and extra cheddar cheese.  Bake approximately 45-60 minutes - more or less depending on your pan, the thickness of your dough and the diameter of your finished spiral.  Almond flour is a wetter dough than wheat so make sure the center is done.  I also carefully flipped mine over when it was done, and put it back in the springform pan and returned it to the oven for 10 minutes to firm up the almond flour dough on the bottom as well. 
 
Take it out, remove the outside edge and serve with extra condiments for dipping if you wish.  


Rolling up the spirals into one large spiral
Rolling each strip onto the one before it to make a non-stop spiral
The spiral placed into a prepared pan
Sprinkled with cooked bacon crumbles and extra cheese
I sprinkled a tiny bit of fresh black pepper on as well
Hot from the oven, I let it sit for 1 minute and then flipped it over and baked another few minutes to firm up the bottom (since almond flour dough is a bit heavy and moist compared to wheat flour)
Ready to slice and serve - hot, gooey and amazing
A quick photo snapped as we were cutting our slices out - almost didn't stop snitching bites to take a picture!


Print Friendly and PDF