Pages

1/30/22

Dehydrating Zucchini for the pantry! Spiralized Zucchini and Half Rounds.


Dehydrating zucchini takes almost zero prep because you do not blanch it or do anything special to it unless you want to take one extra little step - which I do.  Because zucchini has a lot of moisture in it, I sprinkle a tiny bit of sea salt on the slices or spirals and let them set out on paper towels or the dehydrating racks for about a half hour before I pat them dry and put them into the dehydrator.  This leeches out some of the liquid before the process starts.


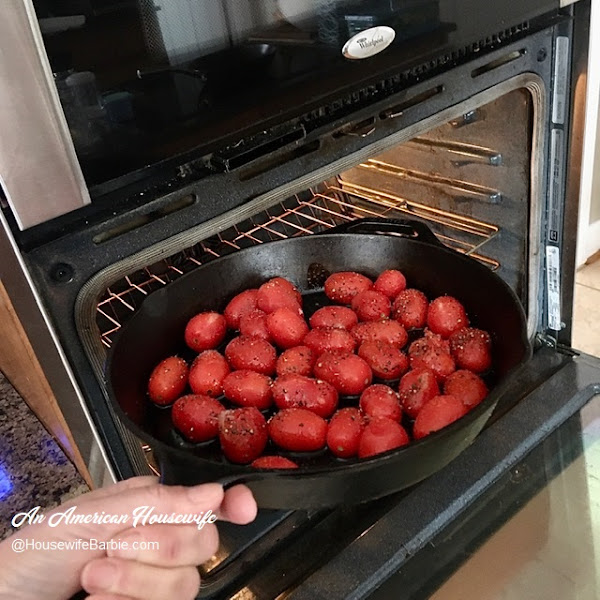
Zucchini that needs to be used up!

DEHYDRATING ZUCCHINI

  • Wash and pat dry your zucchini
  • Slice, dice, spiral in whatever cuts your family uses most
  • Lay the slices/spirals/dices out on paper towels or the dehydrating racks and sprinkle a tiny bit of salt over to start leeching some of the excess moisture out
  • After about 30 minutes, pat the zucchini dry with a paper towel and place into your dehydrator
  • Dehydrate at 125 degrees for approximately 6-10 hours or so, depending on your appliance and the size and thickness and style of your slices/spirals.  They are done when they are completely dried
  • Place them loosely in a glass jar with a lid and let them sit for at least 4-5 days this will even out the moisture content in all the slices
  • Store in an air tight jar - you can use an oxygen absorber or vacuum seal with your food vac attachment if you wish

Do not reconstitute them before using.  Zucchini should be added at the last second to your soup or meal as it will soak up the liquid right away and be perfect for serving.  

The spirals are great to leave as is for soups or crumble them up to add to your batter for zucchini bread or muffins!  Crumbled, they are just like you shredded them fresh.  You only have to use about 1/3 of a cup of dried to equal a whole cup of fresh! 

_____________________________________________

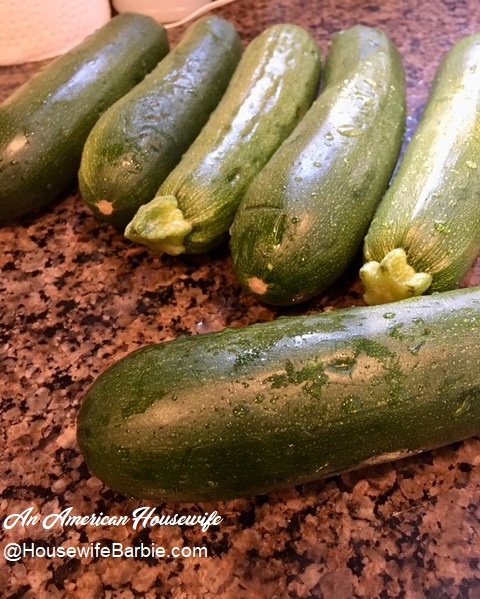
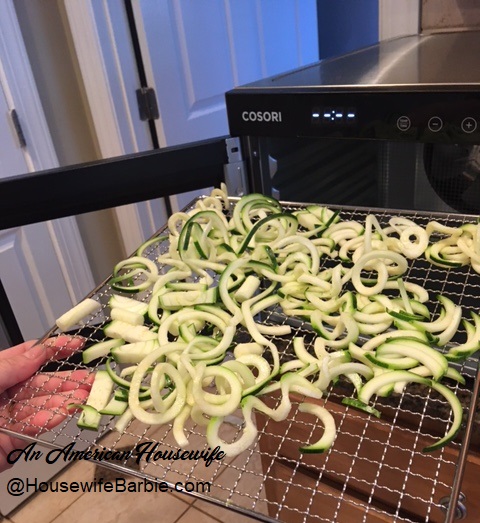
Here are some of the spirals I cut going into the dehydrator... I also did half slices, which is my 'go to' cut for most of our zucchini dishes. 

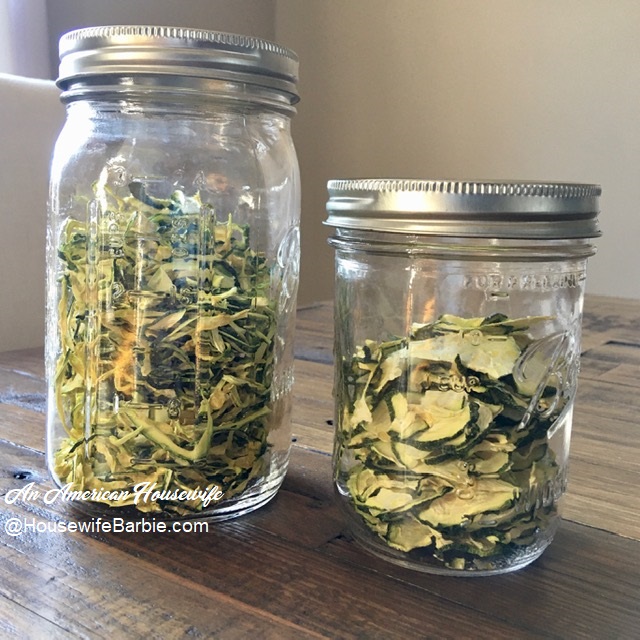
All the zucchini you see in the top photo dehydrated down to these two small jars. 

Dehydrated Zucchini - spirals and half rounds
Dehydrated Zucchini

 Print Friendly and PDF

Reposting from 2019: A perfect, chewy, homemade oatmeal cookie


I made these for house guests that were staying with us and have regular white and brown sugar in them (not sugar free).

Although many of our regular low carb, sugar free or keto recipes work perfectly for everyone, there are those that don't.  I found that when I made these with the natural sweeteners instead of brown sugar and white sugar, they puffed up too much and they got hard, while made with brown sugar and white sugar, they stayed flat and chewy, which was more preferable. 

As a matter of fact, these are still chewy and perfect 3 days later... although they are almost gone now.  But don't over bake them!  The oatmeal and brown sugar keep them pretty chewy and perfect but if you over bake them to death, they'll be hard no matter how hard the oatmeal and brown sugar try to save you.  There is no coming back from an over baked cookie.  If your oven is preheated completely, then about 11 minutes is right.  But 10-12 is what to aim for and watch for.  All ovens and the cookie sheet you bake them on make a difference!


Homemade Chewy Oatmeal Cookies

1 c butter
1 c sugar
1 c brown sugar
2 eggs
1 1/2 t vanilla
1 1/2 c flour
1 t baking soda
1/2 t baking powder
1/2 t salt
1 t cinnamon
3 cups oatmeal - the quick cook style

Cream the butter and sugars.  Add the eggs and vanilla.  Add the dry ingredients and mix well.  Shape into balls or use a scoop about 1 1/2 inch size and bake at 350 for 10-12 minutes.  Use an ungreased cookie sheet or bake on parchment.  Let cool on the baking sheet for a minute or two before removing to a wire rack to cool completely (so they don't fall apart on you). 


Print Friendly and PDF

1/27/22

Reposting: One of my favorite Cheesecakes! A lower-carb, sugarfree Birthday Cake Cheesecake......

 
Originally posted  similar in 2016/2019


Of course no one else has to make it sugar free if they don't want to.
Use regular sugar, a regular cake mix and put a regular graham cracker or sugar cookie crust on this baby and you've got it made.

Amounts don't specifically matter!  I'm putting down the approximate amounts but if you use a little more, a little less; it won't matter.  Taste test if you want.


Sugar Free Lower Carb Birthday Cake Cheesecake

2 pkg. (8 oz. each) cream cheese, soft
2/3 c natural sweetener of choice (I mix 2 kinds for best flavor)
1/4 t Lorann Princess Cake flavoring 
1/2 t vanilla extract
1 1/2 c heavy cream
3/4 c dry cake mix from the package (I use sugar free)
1/2 c half and half or milk
*sprinkles (most of these have sugar in them but you don't have to use many if you don't want to or you could make sugar free out of food color and unsweetened coconut flakes)  I have sugar free sprinkles - two different brands and I love them but they are expensive.  Like, $10 for a little bag.  But you can use them sparingly to go farther.
*Crust if you wish to use one or make one - you can always make cheesecakes without them.


Simple Basic Low Carb Crust:

1 1/2 c almond flour
1/3 c natural sweetener, confectioner's style
1/4 t salt
4 T butter, melted

Mix or blend the almond flour, sweetener and salt in a small bowl.  Add the melted butter, stir until it starts to come together, place in your pie pan or a small 8 or 9 inch pan (for pie or bars).  Press evenly all across the bottom of a springform pan. Set aside.

In a mixing bowl beat the cream cheese with the sweetener and the princess flavoring and vanilla until smooth.  Scrape down the bowl.  Add a bit of the whipping cream and start the mixer on low (trying to cut down on splatters).  Keep pouring in the rest of the cream and half and half.  Then increase the speed to a medium/high like you usually use to whip.  Within about 1 minute it should be whipped to stiff peaks.  Add the cake mix and mix on low just until blended. I just dumped some in - going to guess it was about 3/4 cup-ish.  One cake mix can make about 3 of these cheesecakes. Save the rest of the dry mix for another time.  

At this point mine got really thick so I used about 1/3 c half and half to thin it out just a little bit.  Use your half and half or milk for this purpose if it's super thick, to get it to a nice thick batter more like stiff peak whipped cream.  Mix in some sprinkles if you wish at this point to make it rainbow sprinkled all the way through or you can leave it white and put the sprinkles only on top.  Up to you!

Scoop into the springform pan over your crust if using.  Smooth the top.  Top with sprinkles of your choice - as heavy or light as you like.  Now chill for at least 6 hours or freeze for about 2 hours and then move to the refrigerator until serving time.  If you can make this 1 day a ahead that is best!  It will set up beautifully and the taste really has a chance to mix through the entire cheesecake. 


Whipped cream and cream cheese before adding the cake mix.


Scoopable... not a real thick batter but not thin or pourable either.  "Scoopable" and "spreadable" is about right.


Here comes the pretties!


Scoop into the springform pan (I didn't spray mine and it came out perfectly after freezing/chilling).


Ready to add the rest of the pretties on top and then chill.


I wanted it to be set up in time for dinner in a few hours so I put it in the freezer for about 2 hours.  It went into the refrigerator after that.  Set up beautifully.


This is actually the snapchat I sent my family - that's why you see text on the photo.


Print Friendly and PDF

1/26/22

Origin of Common Vegetables and Fruits

I don't know if anyone else will find this particularly interesting, but I did and I thought I'd share. 

It's the Origin of Common Vegetables and Fruits listing published by "Arm & Hammer" in their "Arm & Hammer baking soda is pure bicarbonate of soda book of valuable recipes" - published in 1921.


Spinach is a Persian plant.
Horseradish is a native of England.
Filberts originally came from Greece.
The turnip originally came from Rome.
The peach originally came from Persia.
Sage is a native of the South of Europe.
Sweet Marjoram is a native of Portugal.
The bean is said to be a native of Egypt.
The pea is a native of the South of Europe.
Ginger is a native of the East and West Indies
Coriander seed came originally from the East.
Apricots are indigenous to the plains of America.
The cucumber was originally a tropical vegetable.
Capers originally grew wild in Greece and Northern Africa.
Pears were originally brought from the East by the Romans.
The clove is a native of the Malacca Islands.
Cherries were known in Asia as far back as the 17th century.
Asparagus was originally a wild sea coast plant and is native of Great Britain.
The tomato is a native of South America and it takes its name from a Portuguese word.
Parsley is said to have come from Egypt, and mythology tells us it was used to adorn the head of Hercules.
Apples were originally brought from the East by the Romans.
The crab-apple is indigenous to Great Britain.
The onion was almost an object of worship with the Egyptians 2,000 years before the Christian era.  It first came from India.
The cantaloupe is a native of America and is so called from the name of a place near Rome where it was first cultivated in Europe.
Lemons were used by the Romans to keep moths from their garments and in the time of Pliny they were considered an excellent poison.  They are native to Asia.


Print Friendly and PDF

Tilapia Florentine (a Spinach, cheese white sauce): LOTS of options for fish, shrimp, chicken or even pasta


I was trying to think of what I wanted to make for dinner tonight, and clicked into my photo files on the laptop.  I saw this one (Tilapia Florentine) and thought it sounded good for tonight but I then realized I don't think I ever posted this one to the recipe collection site.  It's time I did!

Although I usually use tilapia for this one, I've made it with chicken and I've made it meat and poultry free and served it with pasta (you can use low carb pasta or even spiral cut zucchini).  The way I make it most of the time is to serve the florentine sauce over quickly added shrimp to the pan (and I use the optional lemon pepper for sure when I make the shrimp version).

Basically it's just your basic alfredo or white sauce, with cream cheese added and then served with almost any chicken, seafood, fish or pasta.  With pasta I also sometimes sprinkle the top with crumbled bacon or once in a while, some grated smoked Gouda cheese.

The amounts are approximate as you can add more or less of almost any ingredient to this one.  If making for pasta or shrimp you obviously don't bake it.   Just pour the sauce over your cooked shrimp or pasta; or you can throw the shrimp into the pan with the sauce and simmer for about 6 minutes or so until the shrimp is cooked through.  Chicken can also be cooked ahead if you wish and just warmed through with the sauce.  So many options.

Tilapia Florentine (a Spinach, cheese white sauce)

5-6 tilapia fillets (or as many as you wish)
3 T butter
2 green onions, sliced
1 c heavy cream
2-3 ounces cream cheese
1/2 c Parmesan cheese
salt
fresh cracked black pepper
handful of fresh spinach (about a cup)
Options:  use a bit of lemon pepper or a tiny bit of thyme if you wish

Rinse and pat dry your tilapia.  Sprinkle with a bit of salt and fresh black pepper.  Melt the butter in a pan and add the green onions.  Cook for about 2 minutes until soft.  Add the cream and cream cheese, stirring until it melts and is smooth and thick.  Add the Parmesan, salt and pepper.  You can add a pinch of thyme if you wish, or a tiny dash of lemon pepper.

Turn off the heat, throw in the spinach and stir briefly.  Lay the tilapia in a greased or oiled baking pan (I like to use pans lined with foil for easy clean up).   Pour the sauce over all.  Bake about 25 minutes at 400 or until the fish is done all the way through.


Print Friendly and PDF

1/25/22

Vintage Cookie and Candy Recipes: by Karo Syrup and Mazola Corn Oil "Fancy Cookies - Festive Candies - Delicious Goodies For Giving" circa 1956

 
This morning I was going through some of my cookbook 'booklets' to find a certain one I wanted, but I spied this one and had to pull it out and glance through it.  Oh, these old vintage booklets and recipe books from my Grandmother and Mother-in-law make me smile.   

This is one printed and distributed by Karo Syrup and Mazola Corn Oil in 1956. 


Quick Popcorn Balls
Sherry Christmas Cakes
Quick Party Punch
Holiday Punch


Crunchy Ginger Cookies
Fruit-Nut Bars
Sugar Cookies
Rich Fudge Brownies


Candy Apples
Butterscotch
Vanilla Fudge
Refrigerator Fudge

 
Lebkuchen
Chocolate Squares
Swedish Date-Nut Bars
Pecan Bars
 
Holiday Pie
Glazed Sweet Potato Pie
Mazola "No Roll" Pastry Shell
 
Fruit Cake
Glazed Hungarian Coffee Cake (yeast dough version)

   No-Cook Fondant
Peanut Butter Kisses   

I love how it says on the last page:


For other delicious recipes featuring Karo Syrup and Mazola Oil write:
Jane Ashley, Home Service Department
Corn Products Refining Company
17 Battery Place
New York, New York 4 

(Note the zip code... "4")


Print Friendly and PDF

1/23/22

From my Grandmother's Recipe Box - Homemade Grape Nuts

 
____________________________________________


Homemade Grape Nuts

3 1/2 cup whole wheat flour
1 cup dark syrup
2 cup buttermilk
1 teaspoon soda
1 teaspoon salt

Mix well and bake in a slow oven.  Cool.  Cut in squares and dry in oven.  When it is good and dry, grind it.


Print Friendly and PDF

1/19/22

From my Grandmother's Recipe Box - Vintage Recipes: Salted Peanut Cookies

It's been a long time since I've pulled a recipe out of my (late) Grandmother's recipe box and posted.   I chose this one today for a couple reasons.  The first, I have salted peanuts in the freezer leftover from Christmas baking and I need to do something with them.

Second reason, I have oatmeal on hand (also leftover from Christmas baking) so I could kill two birds with one stone so-to-speak here.  These do call for sugar and brown sugar - which I would switch out for natural sweeteners like Lakanto and Swerve of course.  So, it's tempting.

The other reason I'm posting this one is the chance to smile and nod knowingly that so many, many old vintage recipes are simple like this when it comes to the directions because back then everyone had a bit of common sense about them and everyone basically knew how you would bake a cookie... so need to write that part out.  The important thing in this recipe was obviously just to make sure the baking sheet was greased (as compared to cookies that are baked on ungreased sheets).  So it would somewhat assumed you would bake these at 350 until done, which was probably around 8-10 minutes as most cookies are.


Salted Peanut Cookies

1 c white sugar
1 c brown sugar
1 c shortening
3 eggs, beaten
1 3/4 c flour
1 tsp soda
3 c oatmeal
1 c salted peanuts
1 tsp vanilla

Mix well and drop on greased cookie sheets


The name on the recipe card (and the handwriting) is of a friend of hers at the time.


Print Friendly and PDF

1/14/22

Homemade Chili - the best one I've ever found to give my regular 'go to' chili recipe a run for its money!


As I scoop the last spoonful into my mouth, I'm now immediately coming to the laptop to write down how I made tonight's chili, because it's the first time I've ever really liked a chili more than my regular "go to" chili I've made for years.  I still love 'my' chili but I love this one just as much - and that is something I've never said before about any chili I've had in almost 20 years.

Even though we are typically low carb and keto - when it's winter time, I crave chili once in a while and I absolutely love chili with beans.  L.O.V.E. my chili with beans.  Beanless chili is... fine I suppose but I'll pass it up for whatever other food item is available.  I love the texture and feel of a chili made with beans.  That is why even though we almost never have beans at other times; when it's December and January and I'm craving chili... I will make it with carby-chili beans and that's all there is about that!

Now, tonight I made a different version than my regular 'go to'.  I started with my general go-to, I used a couple ingredients from another chili recipe (Worcestershire I'm talkin' to you), and then improvised what I thought would be good in it.  Oh it is good.  So good that I want to make sure my young adult kids have the recipe at their fingertips if they want to make it.


Homemade Chili

4-5 slices bacon
1/2 lb. mild Italian sausage (crumbled)
1/2 lb. ground beef
2 medium onions
3 t minced garlic (fresh)
1/2 green pepper, diced
1 can medium green chilies, diced
2 t Worcestershire sauce
1 T chili powder
2 cans (15 oz.) diced tomatoes
1 can (15.5 oz.)  Bush's Black Chili Beans
1 can (16 oz.) refried beans
salt and fresh cracked black pepper to taste

Cook the bacon in a pan until crispy and break up with your spatula.  Add the sausage and ground beef and brown it - adding the onion towards the end.  During the last 2 minutes of cook time, add the garlic. Turn off the heat and add the rest of the ingredients to a crock-pot or slow cooker of choice; or you can slow cook the chili on the stove all afternoon too.  Up to you.  But in the crockpot or a large pot, put the green peppers, green chilies, Worcestershire sauce, chili powder, tomatoes and beans.  Add the meat and onion mixture.  Stir.  Add salt and pepper to taste.

Slow cook all day or at least 3-4 hours if you can wait that long. 


(You can serve with bread and butter or cornbread.  Tonight I served with sugar free keto coffee cake muffins; the muffins with a bit of cinnamon in the topping paired perfectly with the chili.)


Print Friendly and PDF

1/11/22

From my Instagram: Sugar Free (keto) Meringue Sprinkle Cookies


As with many sugarfree recipes there are some important notes.... 

The first note is the sprinkles.  If you want your meringue cookies to be sugarfree, you have to use sugarfree sprinkles.  Granted, there are so few sprinkles on each cookie, if you aren't cutting sugar because you have to, but simply because you want to cut down a little in your everyday foods, then you could certainly use regular sprinkles.  But if you can't do sugar at all; then you must use sugarfree.

Another note:  if it's a humid or wet day where you live and are making these, the egg whites are a bit cranky and might not want to whip up quite as well as they do on dry, hot, sunny days.  You can add cream of tartar to help, and use room-temperature eggs to help overcome this.  If all else fails and you have some meringue powder in the cupboard, add a tablespoon of that to your egg whites.  They will whip right up after that.

There are a couple more important little notes but I'll talk about those below in the recipe.


Admittedly... I don't actually use a recipe when I make these.  You don't really need one, because the basic idea is about 2 egg whites to each 1/3-1/2 ish cup of sugar or sweetener.  That's it. 

You can add vanilla or almond flavor (the two most used) if you wish.  But because egg whites can be a little temperamental, you can help them whip up to a nice stiff batter by adding a little cream of tartar, and it helps to whip them at room temperature - not straight from the refrigerator.   You can leave them out on the kitchen counter overnight if you want to make these in the morning.
 
 
Keto Sugar free Meringue Cookies
 
4 large egg whites 
1/4 t cream of tartar* 
little dash of salt - optional
3/4 c sugar free powdered sweetener*
1-2 t flavor extract of choice* 
 
Bake these on parchment paper.  In a bowl, with an electric hand mixer, beat the egg whites until they are frothy.  Add a bit of the cream of tartar and/or salt if you are using it to help the meringue whip.  Add your flavor extracts of choice (more on that below) and add the powdered sweetener by sprinkling as you continue to whip or mix, until stiff peaks form.

Spoon the mixture into a piping bag with any large star tip or if you don't have one, you can just put into a bag or baggy and cut the end off to pipe little circle mounds.  Pipe little stars or mounds until the batter is used up. Sprinkle the tops if you wish.  (You can also add a bit of food color to the batter if you want them colored or striped or even tie-dye.) 

Bake at a very low temperature (from 170 - 220 degrees but no higher)  for about 40-50 minutes depending on how large your little mounds/stars are. You can 'test' them by gently lifting a couple off the parchment.  They might be a tad bit moist in the center yet but basically will lift off the parchment easily.  If they are sticky or don't lift at all, give them another 5-6 minutes and check again.

When they basically lift off for you, just turn the oven off and prop open the oven door to vent, and just let the meringue cookies cool in the oven.   After about an hour you can remove them from the parchment and place them on a rack to cool completely.  They can be stored in an airtight container on the counter after that.


 _________________________________________
 
 
*if you want to use a meringue powder instead of cream of tartar that works great too.   Just add a tablespoon of the meringue powder (without sugar added) to your egg whites and beat stiff.  

*Amount of sweetener is up to you.  You can taste test and add more if you wish.  A cup of sweetener to 4 egg whites is great, but use less if you don't like your meringues very sweet.  Also - the kind of sweetener makes a difference in not only taste but how they whip up.  Using allulose doesn't work as well as powdered erythritol.

*The two favorite extract flavors for these are usually vanilla and/or almond extract.  I used a bit of vanilla, a bit of almond and a tiny smidgen of 'cake batter' flavor.  I didn't care if my meringues turned out a little yellowish so I used regular vanilla and not the 'clear' that I would have if I cared.  Also, the 'cake batter' flavor is yellow so that made the finished baked meringues a little yellow tinged too.


If you skipped the notes above - my finished meringues turned a bit 'yellow' because I didn't care if they were white after baking (they were just for us to munch on) so I didn't bother using up my good "clear" vanilla extract on them... Ha ha. 

I also added a touch of 'cake batter' flavoring which is yellow and makes the finished product a bit yellowish because of it.  


Print Friendly and PDF

1/6/22

Roasted Cherry Tomatoes with Feta Cheese - Pasta Sauce

 Feta Tomato Pasta with roasted tomatoes, feta cheese served over pasta 
We are low carb so the 'pasta' I used in this dish was low carb macaroni and Palmini spaghetti mixed together because it's the only two low carb pastas we had in the pantry at the time.  I finished the meal by using some keto buns to turn into cheesy garlic bread.

Oh my.  It was good.  Very good.
 

Feta and Roasted Tomato Pasta Sauce

2 pints cherry tomatoes
1 small block feta cheese (about 6-8 ounces)
Olive oil (I used avocado oil)
Salt and fresh cracked black pepper
Fresh minced garlic
Dried red pepper flakes
Dried basil or fresh basil
Pasta of choice (we use low carb and keto pastas)

In a cast iron skillet I used about 1/3 cup oil, added the cherry tomatoes and roasted them in a 400 degree oven until they were starting to crinkle but weren't yet brown.  At that point add the block of feta cheese to center and return to the oven to roast until the tomatoes start to turn golden brown on the edges.

Add a dollop of fresh, minced or chopped garlic and salt and pepper to the feta, return to the oven for a few minutes to roast the garlic a bit.  Then sprinkle the rest of the spices on top and mash the tomatoes with the back of a spoon as well as smashing the cheese, all together to form a sauce.  I debated using a stick blender to blend it a little more but I liked the rustic sauce as it was.   

Boil and drain your pasta, top with the sauce and serve with your favorite garlic bread and a side salad.


feta pasta sauce, roasted tomates, feta cheese
Adding the feta cheese and returning it to the oven

 Feta Tomato Pasta with roasted tomatoes, feta cheese served over pasta


Print Friendly and PDF

1/2/22

Birthday Cake Pinata Cookies - mini birthday cake looking sugar cookies with a surprise sprinkle and tiny marshmallow pinata filling

Birthday Cake Pinata Cookies

Remember about 8 years ago when donkey Pinata cookies became a thing?  Cookies filled with mini M&Ms' or other little candies or sprinkles?  And soon everyone was making them and in all different shapes?  

I hate M&M's so THAT wasn't happening, but I liked the idea of a birthday cake cookie and decided I would use whatever I happened to have on hand in the cupboard.  

I used a regular sugar cookie dough recipe (here is one of my favorites), some leftover royal meringue icing I had in the freezer from decorating Christmas cookies, some sprinkles and mini marshmallows from the pantry and topped them off with some wax birthday candles from the cupboard.

I loved them... but also loved how incredibly quick and easy they came together.

Roll and re-roll scraps to cut out round cookies.  You need 3 cookies per 'cake'.

My round cookie cutter in the photo is one I made years and years ago by cutting a tin can in half and using a pair of pliers to smooth down the top edge.  I have a lot of other round cookie cutters but this one gets the most use.


After baking, while your cookies are still hot, use a smaller sized round cookie cutter to cut a circle out of the center of one of the 3 cookies that will form each birthday cake cookie.


I saved the little cut-outs and made them into tiny cookies as well. 
You can save them, use them or eat them.


I used a plastic straw to cut a small circle out of the top and final layer of each of the birthday cake cookie tops.


I usually see mini M&M's used in pinata cookies but I don't like chocolate and hate M&M's.  I've seen Skittles used - which is TOTALLY my kind of filling but it's a good thing I don't have Skittles in the house because I'd eat the entire bag.  Even if it were a 1 lb. size bag.  I'd eat it.  So no... we have no Skittles in the house.

Besides, I knew I wanted to use sprinkles or multi-colored jimmies anyway to go with my birthday cake sprinkle theme.  However, I did spy my itty bitty mini marshmallows in the cupboard (bought for Christmas cookies I never got around to making) so I used those too!


Any meringue or royal icing would do but I had 2 bags leftover from Christmas cookies in the freezer.  A light blue and a white.  So those became my color theme. 

Lay the bottom layer of your cookie down and pipe the icing around the edge, topping with the second layer; which is the one with the hole cut out.  Let this dry for about an hour so the sprinkles in the filling don't stick to the icing.


When the icing is dry to the touch, I filled them with some jimmies, sprinkles and marshmallows.


Then I carefully piped another round of icing and topped the 'cake' with the final cookie. 


I didn't have to worry about hiding the icing like I did on the donkey pinata cookies, as you want the icing to show on these; it looks like a layer of filling between your cake slices.


I let the cake cookies sit while I got out the little wax birthday candles and cut the ends off of them to make them a little bit shorter and more to the size of the tiny 'cakes'.


I just snipped them off with scissors.


I piped a bit of icing around the base of the candle, and inserted it into the cookie top.
Then I used a decorators bag with the end snipped off to top the cookie with royal icing, letting it run down the sides a bit.


After about 2-3 minutes of letting it set up a bit, I sprinkled some little rainbow sprinkles and multi-colored jimmies on top.


When you are done, let them dry overnight so the icing hardens.  This makes them fabulously portable.


Today I simple stacked them on a metal cake stand and we were ready to with the birthday girl a happy birthday!


Print Friendly and PDF