Pages

3/27/22

Crispy Baked Egg Rolls - (yes, baked, not fried) and freezing the leftovers for future meals!


I love egg rolls but I don't give into that craving very often because of the useless carbs.  However, I've been craving them off and on for about a year, and last weekend I had a couple cabbages in the fridge to use up.  I grabbed a packet of egg roll wrappers at the store and decided to give into the craving.  

Note - yes you can 'make' various versions of low carb or keto egg rolls.  But I don't actually like them and no, they are not like the real thing when you are absolutely craving the real-crispy-yummy-deal.  

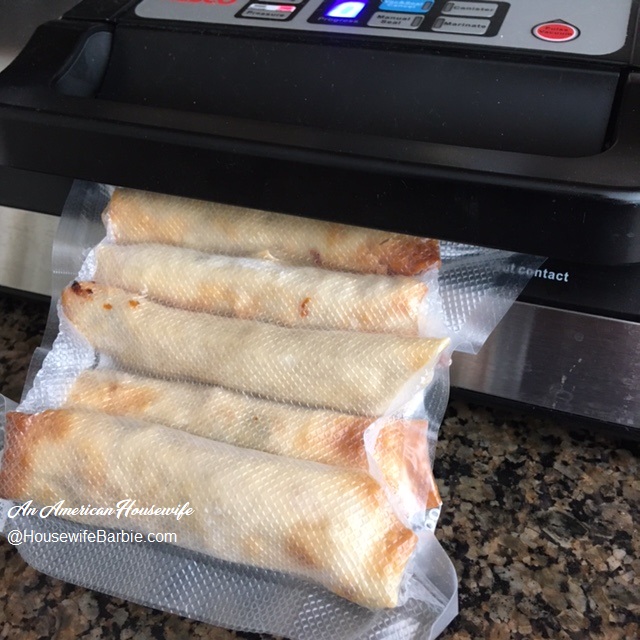
I made a batch, ate the leftover filling separate for 'lunch' (low carb!  No egg roll!) and then had 3 egg rolls later that night for dinner.  After we all had our fill, the leftovers were placed in a container and put into the deep freezer to freeze over night so I could food seal them and freeze them the next day!

YES YOU CAN FREEZE EGG ROLLS.  That seems a silly question to me, but apparently a lot of people don't know, or think you can't.  Basically, just ask yourself if you can buy a food frozen at the store?  Yes?  Then you can freeze it. 


I like shrimp egg rolls and pork egg rolls.  Not so much chicken.  And beef?  Well, that's basically like making any number of Midwestern beef and cabbage meals (like Runza with an egg roll wrapper instead of a pastry crust, or a bajillion of the Iowa/Nebraska/Minnesota casseroles that are basically the egg roll cabbage filling but with ground beef).  If you are from Minnesota you might want to substitute 'casserole' for 'hot dish' when you mentally read that last sentence.

I wanted pork, and I have ground pork in the freezer (remember, I grind our meat myself so I have whatever kind of ground meat or poultry I want).  So pork it was!

Since I was going to have carbs in this meal anyway from the egg roll wrappers, I also decided to use up a can of bean sprouts I had in the pantry.  Egg roll fillings are great that way.  You can play with your food a little bit and add/delete what you want outside of the typical cabbage, green onions, soy sauce and ginger. I didn't have any green onions left (I go through them quickly!) so I used dried chives in its place. 

When you get the mixture made, taste it.  See if you prefer it to be seasoned a little more - or a little less (by adding more cabbage or pork).  Do you want to add more onion? Garlic? Ginger?  Soy Sauce?  Do it.  It's your recipe, your food, your meal.  Play with it to make it taste how you want it to.

BASIC EGG ROLLS - Crispy and Oven Baked

1 1/2 lb. ground pork
4+ c shredded cabbage
1 can bean sprouts, drained and pressed well to get moisture out
a few carrots, shredded
a stalk or two of celery if you wish (I don't but some do)
a small can of water chestnuts, diced up
4 green onions, or scallions, sliced
4 cloves garlic, minced
1 T ginger
salt and pepper
1/2 c soy sauce or liquid aminos
4 T rice vinegar (if you only have white vinegar, only use about 3 T)
2 T brown sugar or brown sugar substitute like Swerve
Oil - about a cup total for everything (you'll probably use canola)
2 pkgs large egg roll wrappers (the ones about 6-7 inch
You can use oil, water or a beaten egg to seal them.  I just use the liquid from the filling and oil that are on my hands/fingers when I'm rolling them.

In a bowl, mix the soy sauce, rice vinegar and brown sugar.  Set aside.  Cook the ground pork in a pan with oil on the stove until it's done and no longer pink.  Add about 1/2 the liquid soy sauce/vinegar mixture.  Cook another minute or two until the liquid starts to evaporate a bit.  Remove to a plate and use the same pan to pour in about 1-2 tablespoons oil to cover, then add the vegetables, ginger and garlic.  

When the cabbage is softening a bit, add the green onions or scallions and the rest of the liquid soy sauce mixture.  Cook and stir until the liquid is evaporating (about 5 minutes on a medium high heat).  Put the mixture into a large bowl with the browned pork and mix.

Lay out a well oiled baking pan (I use avocado oil for everything but most people use canola). 
Lay your egg roll wrapper in front of you in a diamond, with the point at your stomach; place about 1/3 cup filling on the wrapper just below the half way line and an inch above the bottom point.
Use your finger to get the top point and about an inch down each side wet with either liquid that is already on your hands from grabbing the filling, or water, oil or some beaten egg. 
Start with the point nearest your stomach and roll up the filling, stop at the half way to fold each side point inward to contain the filling, then finish rolling upwards.
The moistened top point now seals the roll.
Place on your well oiled baking pan.  Do the rest of them.

If you have filling leftover, you can eat it as it is and call it lunch.  :)

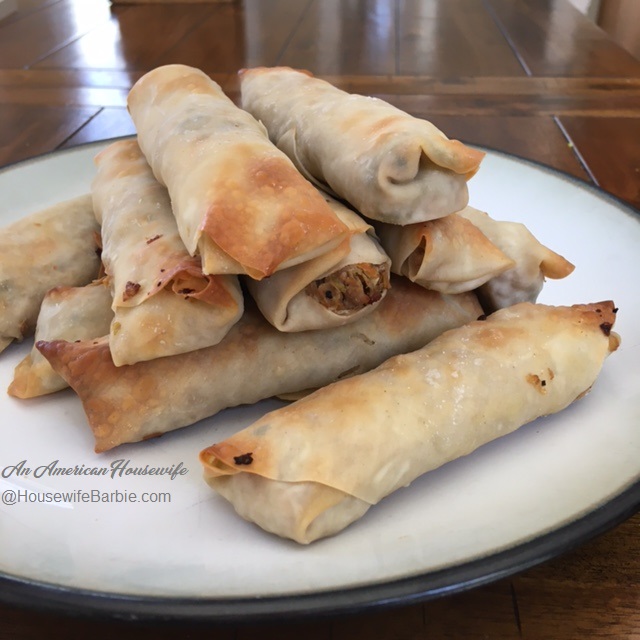
Brush the egg rolls very well, covering them with the oil.   Bake in a preheated 400 degree oven for about 12-15 minutes or until golden brown on the ends and crisp. 

Remove, and although you don't have to, if you aren't going to serve them for at least 10 minutes or more, I like to remove them to a wire cookie rack so the bottoms crisp up and don't get soggy sitting on the oiled pan.  I also do this to let them cool if I'm freezing them.

TO FREEZE:  Let them cool down and place them into the freezer overnight or at least for 4-6 hours to freeze solid.  Then remove them and package them in freezer ziplocks or food seal them - as many to a package as you would need or want for future meals.  To prepare them later, you just bake them again until they are heated through (about 15 minutes). 


The filling... 


Rolling... and placing on a well oiled pan


That first little guy was opening up a bit but the oil I brushed on before baking got him back down


Using lots of avocado oil (purely my choice oil - you can use canola) to get them crispy


Ready to be dipped in a little Braggs liquid aminos...(or any soy sauce. I use both Braggs liquid aminos and LaChoy soy sauce - whatever I have on hand).  Many prefer a sweet and sour sauce.


Print Friendly and PDF

3/23/22

Scones - low carb, keto and sugar free versions (A cranberry orange and a cinnamon version here)

I was craving scones all week but never had time to make them.  The craving got strong enough that finally, the night before last, at 8:15 pm, I started to make them.  I wasn't sure what kind I would make when I started, but I saw a bag of dried cranberries (the low 50% sugar ones) in the pantry, so I decided cranberry orange would be good.  However, once you have all those ingredients out, you might as well make a second.  For simplicity sake, I decided on a simple cinnamon scone version.  I really really want a blueberry scone and I have frozen blueberries on hand so more than likely, those will get made this week.

Because the dried cranberries do have a little bit of natural sugar, those are not completely sugar free so not officially keto (which is why I just say low carb for those).  

Almond flour scones are not as good as wheat flour (obviously) but they are good.  Almond flour tends to be 'softer' and doesn't hold a crisp edge or bottom like wheat versions - which I love - but the carbs and sugar in regular scones aren't worth eating the flour version.  :)


Scones - keto/lowcarb and sugarfree versions

1 1/2 c almond flour
1/2 c coconut flour
1/3 natural sweetener
1 T gelatin powder
1/2 t salt
1 T baking powder
1/2 c whipping cream
1 egg
3 T butter
2 t good quality vanilla
1/2 c dried low sugar cranberries or for cinnamon version, 2 t cinnamon and 1/4 c natural sweetener

In a food processor bowl, place the dry ingredients (or use a regular mixing bowl and mix everything either by hand or with a mixer - up to you).  After pulsing to mix the dry ingredients a few times, add the whipping cream, egg, butter and vanilla.  Pulse until it's all mixed and starts to ball up a little bit (a very thick batter).

Add the dried low sugar cranberries if you are making that kind and then scrape the batter/dough out onto a piece of parchment paper.  If you are making the cinnamon scone, add about half the cinnamon sugar-substitute mixture over the dough and gently fold over just once or twice to cover.   Then pat out the dough into a circle shape with your hands - gently forming a round.  It was about 8-9 inches in diameter. 

If making the cinnamon version, sprinkle the rest of the cinnamon sugar substitute over all.

Use a long knife to cut the round into wedges.  About 8 or 10 depending on how large you want them.

Carefully spread them apart a bit with a spatula or knife so air can reach all the sides.

Slide a baking sheet under the parchment paper and place in a preheated 350 degree oven.

Bake until they are firm and golden - but if they start to brown too much, just place a layer of aluminum foil over them.  Mine took about 35 minutes.  Let cool at least 5-10 minutes before removing them to a wire rack to cool completely.

For the glazes, I used an orange glaze on the cranberry, and a basic cream cheese glaze on the cinnamon.

For the cream cheese version, mix about a tablespoon of cream cheese with a bit of vanilla and about a tablespoon of whipping cream and a tablespoon of sweetener.  Put in a frosting bag or a baggy and sip the corner off, squeeze over the scone. 

For the orange cranberry scones, I used a couple tablespoons sweetener and mixed in a dash of vanilla, a dash of dried orange zest, a tablespoon of whipping cream and a dash of orange extract emulsion.  Drizzled with a spoon over the scones.


Print Friendly and PDF

3/9/22

Reposting: Keto Sheetpan Pizza


I think this was posted back in the summer of 2021 but reposting again today because I plan to make it tonight and thought maybe it was time to re-share it again.  It's THAT good and THAT easy.  The part I hate is just the time it takes to mix up the almond flour and mozzarella dough.  Pure laziness on my part since it takes 5 minutes to mix.  Ha.  You make the dough, add in some sausage and Italian spice then press it into a large sheet pan and pre-bake a bit before topping with whatever the heck you want.


Keto Supreme Pizza

Use your favorite mozzarella keto dough
(typically 1 c mozzarella, 2 oz. cream cheese, 1 c almond flour, and 2 eggs but also add 1/4 c coconut flour and 1/4 c parmesan to it). 
Mix in about 1 cup Italian sausage, uncooked
1 1/2 t oregano or Italian seasoning

Toppings:  Use what you like - mix and match to your preference
                    1 T avocado or olive oil    
                    1 onion, sliced
                    1/2 green bell pepper, diced
                    Fresh garlic
                    Pepperoni
                    Mushrooms
                    Black olives/green olives
                    3/4 c low sugar/low carb/keto pizza sauce
                    Mozzarella Cheese and Cheddar Cheese

Mix your mozzarella dough and the sausage, and press into a greased sheet pan about 10X12 or 9X13.  Bake 15 minutes at 375.  Saute' the onions and green peppers in the olive until they are beginning to soften.  Take off the heat and add the garlic.  Stir.

Remove crust from oven and top with the pizza sauce, then the toppings - ending with the cheeses.  Bake again until the cheese is melted and it's starting to turn golden (about 25 minutes or so).


Pressing it into the sheet pan....


Softening the onions and peppers a bit


Topping with onions, peppers, garlic, pepperoni....


Out of the oven.... piping hot


Literally took this photo quickly right before eating it!


 Print Friendly and PDF

3/8/22

Sugarfree Lemon Cheesecake with a Keto Lemon Cake Bottom Crust (Reminder to myself: THIS IS THE ONE)


Reminder to myself:  THIS IS THE ONE

I just polished off a second piece of this amazing cheesecake (for breakfast... with coffee... and I don't even like to eat breakfast).  The texture of this cheesecake is so incredibly creamy it's hard to only eat one slice at a time; which is why all three times I've had this since it was made, I've had 2 helpings each time.

I don't waste food so the idea behind this cheesecake was using up the remnants of the keto lemon cake I made about 2 months ago and popped into the deep freezer.  We aren't big 'dessert' people.  We rarely (never) finish off desserts so typically after the first day or so,  I wrap them and freeze them for a month or two and then pull them out when we are in the mood for that item again.

I knew this lemon cake wasn't going to be finished as a 'cake' (we hardly ever actually eat 'cake') so I decided to make a cheesecake base to use it up.  And that is how this recipe was born.


Keto Lemon Cheesecake
with a keto cake crust

(6 inch - 3" tall Fat Daddio spring form size)

1 crust from either typical almond flour/sweetener/butter or leftover keto cake of choice
2 1/2 pkg. cream cheese (8 oz size) - softened a bit
3/4 c natural sweeteners - confectioner's style
2 eggs
1/4 c sour cream
1/4 c whipping cream
2 t lemon juice
1 t Watkins vanilla
1/4 t dried lemon

Grease the pan and line the bottom with either a regular nut crust (and pre-bake for 12 minutes at 375  and let cool completely) OR line the bottom of the pan with leftover keto cake of choice, pressing lightly to fill.

With hand mixer, beat the soft cream cheese and sweeteners smooth.  Add the eggs, sour cream and whipping cream along with the extracts.  Either add the dried lemon peel to it or sprinkle across the top after the pan is filled.   Pour into the pan and smooth  the top a bit.  In the 6 inch, FatDaddio pan, this filled to 1/2" from the top with a little left over in the mixing bowl.

Bake at 325 until the center is 'set' and not jiggly.  Turn off the oven, open it for a bit to release some of the heat, and then close the oven and let it set and cool slowly for about 45 minutes or until you remember it again.

Remove and let cool more, then cover with plastic wrap and refrigerate overnight at least for the texture to turn creamy.  Serve as is, with whipped cream, strawberries, blueberries, etc.  Almost anything.  Perfection.

*For a regular size 9" or 10" spring form pan - double the  recipe.
For a regular cheesecake NOT sugar free or keto - use regular powdered sugar of choice.


Print Friendly and PDF

3/7/22

How To Clean Pampered Chef Baking Stones: (Photos of my 17+ year old stones.... bought in 2005 and used continuously - today is March/2022)

Before and After... these are also 17 years old by now (MANY cleanings)


If you've been a reader of An American Housewife for a few years, then you'll know that every once in a while I do an update on my stoneware - or how I 'clean' it I should say.  I've also added another brand of stoneware a few years ago so I have 3 baking stones now and they all three (3) live in my oven at all times, full time.  

Yes - even when I'm not baking on them, they are still in the oven full time - mostly just hanging out on the lower racks while 'whatever' else bakes.  They also sometimes do double duty as a 'drip pan' when cheese, grease or apple pie filling, etc. drips down from whatever it is I'm baking.

A well seasoned baking stone is dark brown.  This is a good thing because when they are 'loved' and dark brown, they are non-stick.  And even though they are cleaned by scraping them with the little plastic scrappers, and a quick hot water scrub if needed; once in a while you actually want to 'clean' them.  

I got my stones in 2005(Yes, the  PC baking stones in these photos are from 2005)

By 2007 they were beautiful dark brown and seasoned well.  One day in 2007 I decided spur-of-the-moment to clean the ovens and flipped the self-cleaning feature on while I was crazy-busy doing other things.   

I wrote about it in an old post here: 2007 Post (https://www.housewifebarbie.com/2007/10/how-to-clean-pampered-chef-stoneware.html)

The end result was beautifully clean stoneware.

That's how they've been cleaned ever since.  Literally... since 2007 (and today is March of 2022).

Since 2007, whenever I clean my oven I leave 2 or 3 of the pans in and let them get clean as well.  Note it does take the 'shiny' off the metal racks when you leave them in, but if you actually use your oven and cook with it, you won't have sparkly, shiny 'new' looking racks after a little while anyway.  I sometimes just put a tiny amount of WD-40 on a paper towels and lightly run it over the side of the racks to make them slide nice again.

Here is a well seasoned, well used, loved stone.  This is pretty much what they all look like after awhile.


And here is what they come out of the oven looking like... ready to be brushed lightly with a towel to get remnants of ash off and then immediately ready for use again.  

The 'clean' one (with a light bit of gray ash to be gently blown or brushed away) is on top and I placed a regular 'before' stone below it to show the difference of "before and after" simply letting them in the oven during a regular self-cleaning cycle.


Print Friendly and PDF

3/5/22

Lower Carb Crispy Chicken with Lemon Garlic Sauce - adapted from a Chicken Piccata without Capers recipe

Double breaded chicken breasts (keto flour) - with a tangy lemon sauce

Not a great photo but I almost didn't take a picture with my phone at all because I was so busy cutting off and breaking off bits and pieces to eat... but I MADE myself take a picture so I would remember to add this recipe to my blog so I could make it again.  Many times.

Last night I heavily adapted a 'chicken piccata with lemon sauce' recipe that strangely, doesn't have capers in it.  Which is actually why it originally caught my eye because when I had seen it posted on social media, I expected to see capers.  Nope. No capers - which is good because 1)  I don't usually keep them on hand and when I do buy them, I use them once or twice and then they sit in my refrigerator forgotten for the rest of the year.  And 2) I like the taste of capers - but mentally I have a hard time eating them.  Maybe it's the texture or how they look?  If I chop them up and use them in a tartar sauce, it's all good.  If they are in a dish as a round little wrinkly ball, not-so-much.  

But it didn't matter because this recipe didn't call for them.

I wouldn't be making it as it was anyway - as it needed to be adapted since I planned to do a lower carb version.  This was just the basis for the dish I did make last night - and the inspiration for it was 'chicken piccata' without the capers. 

Lower Carb Crispy Chicken with Lemon Garlic Sauce

2-4 large skinless chicken breasts, sliced lengthwise into 2 or 3 thinner slices each
2 eggs
2 T dry white wine
2 T chicken broth or stock
2 T lemon juice
3 t fresh minced garlic
1/4 t mild hot sauce like Frank's
1/2 c King Arthur Keto Flour
1/2 c grated Parmesan
1 1/2 T dried parsley
1/2 t salt
3 T lemon juice
3 T chicken broth/stock
2 T butter
Olive Oil

Mix the eggs, wine, lemon juice, garlic and hot sauce in a shall bowl.  In a second bowl, combine the keto flour, Parmesan, parsley and salt.  

Dredge the chicken breasts in the egg mixture, then the flour mixture.  If you like breading (I do) then do it again a second time.

In a non-stick skillet, cook the chicken breasts in olive oil until they are done.  Don't crowd them, this may take 2 or 3 batches.  Remove to a plate.

In the same pan, add the butter, then the 3 T more of lemon juice and the additional 3 T chicken broth.  Bring this to a boil while stirring.  Simmer/slow boil, until it reduces to a thick sauce.  The flour from the chicken breasts help thicken it.  When it's reduced to the consistency of a nice sauce, pour over the chicken breasts.

I served with seasoned riced cauliflower (remember - low carb here - no rice).  I simply riced the fresh cauliflower in the food processor by pulsing.  When the sauce for the chicken was done, I poured it over the chicken on the plate, then (without washing the pan) brought it back to the stove and tossed the riced cauliflower in it - adding a couple pats of butter, some salt and pepper and Mrs. Dash seasoning.


Print Friendly and PDF

3/4/22

Ideas to Use Up Potato Peels After Cleaning Potatoes for Other Dishes or Using Up Peelings From Canning Potatoes

Bowl of crispty baked potato peels - using up potato peelings
Potato peel crisps
Campfire Potatoes using potato peels
Camping Potatoes - using the peelings


Although we don't get to eat potatoes regularly anymore because of the high carb content, we love them.  Anything you can make with them - any way, shape or form - I probably love it.  Potatoes and onions are two of my all-time favorite foods.  

Over the years of cooking them and using them in dishes, I've come up with a few ways to not only use leftovers from meals of mashed potatoes, baked potatoes, etc;  but use up the peelings as well. 

When I can potatoes I use a knife - not a potato peeler, as I personally like the feel of a paring knife better and can clean them faster.  I knew I planned to use the peels to make two side-dishes so I was also happy to slice freely with a bit more potato on each slice as I planned to use them in other dishes.

I soaked the peels in water to keep them from browning, and then drained them just before using.

Potato Peels


I've been cooking for more years than I'd like to admit (count the years in decades).  One of the first ways I ever used up potato peelings - and did so for the first 20 years of our marriage - was to make pancake syrup from them.  

I actually make pancake syrup from potatoes in two different ways;  you can either boil the potatoes whole with the skins on and use the potatoes after, however you wish; and the second is to peel and clean the potatoes first and use the peeling's starchy water after.  Either way works.  This recipe is very, very old.   


Pancake Syrup Made from Potatoes or Peelings

Approximately 6 potatoes - the starchier the better (like russet) or the peelings from 6-8 potatoes
1 c sugar
1 c brown sugar

Scrub the potatoes well and place in a pan with 2 cups of water.  I've also used just the peelings from a bunch of potatoes (anywhere from 6-8).  Boil them, reducing the liquid until about 1 cup of the water remains.  Remove the potatoes and use them for another dish.  To the water remaining in the pan add the sugar.  Bring to a boil, stirring to dissolve.  When dissolved, continue boiling about 1-2 more minutes.  Remove from heat and let cool.  Pour into a mason jar or other container, like recycling a syrup bottle.  You can use it right away, but the flavor is best if you can keep it in the cupboard or pantry for a few days before using.  Tastes like maple syrup!


The second way to use up potato peels - Baking them into a crispy treat to snack on. (The top photo)


Potato Peel Crisps

Potato Peelings
Onion powder if you wish
Oil
Salt (and if you wish, pepper)

Toss your peelings with oil (I use avocado oil or olive oil).   Spread them in a foil lined baking pan or baking sheet. Sprinkle with a little onion powder if you choose, then sprinkle with salt and pepper if you like it as well.  I like them with just oil, a little onion powder and salt.   Bake at 400 degrees approximately 20 minutes or more depending on the level of crisp you like.  Flip them and stir them a bit every 8 minutes or so to cook them evenly.  Around 15-20 minutes they are 'done' but if you want them really crispy, keep baking them longer, checking every 4 minutes or so.  Serve as is or with a sour cream dip. 


The last idea on this post for using up the potato peelings is to make the old, well known 'campfire potatoes' but make them using peels from other potato dishes or home canning.  (The second photo above).   

Normally you make individual campfire potato packs wrapped in aluminum foil and cook them over the fire when you are camping or at home in the oven just because they taste so good.  You use the whole potato, sliced up, topped with a bunch of other ingredients that everyone pick and chooses based on their personal tastes - topped with a bunch of butter, wrapped up tightly in the foil and eaten out of the foil as everyone sits around the campfire.  

This is like that - but the photos you'll see I opted to use a disposable aluminum pan for these batches.  I have leftover aluminum pans on hand from holiday cookie baking AND this allows me to cover the pans with foil and pop them into the deep freezer to grab out for future meals or when/if we have guests over.


Campfire Potatoes 

Peelings from your other potato dishes or home canned potatoes
Onions
Butter
Salt and Pepper
Onion Powder
Garlic, green peppers, other bell peppers, zucchini, green onions, chives, cheese, bacon bits, etc.

*if baking in an aluminum pan in the oven, add about 1/4 c cream.  If baking in little packets, do not add liquid.  

If you are using disposable aluminum pans, grease or spray the pans, otherwise use a double layer of aluminum foil or use heavy duty aluminum foil pieces large enough to wrap a pile of potato and other additions in and wrapping up to seal tightly with space for a little expansion.

Layer leftover potato peels and bits and pieces along with onions and a bit of onion powder;  if you like and want to add things like bell peppers or other ingredients - yes, please!   In a pan in the oven, add about 1/4 cup cream poured over all.  Do not add cream to little foil packets though.  Top with a bunch of butter pieces or pats.  Cover the pan with foil or seal up your little foil packets - but not too tightly, the potatoes and veggies will expand a bit during cooking.

Cook either over your coals or in the oven at 400 degrees for about 30-35 minutes until thick and dark golden brown.  Uncover the foil pan half way through cooking.   If you use potato slices you'd have to cook about 10-15 minutes longer but peelings are thin and cook faster.


 _____________________________________

Photo:  layering leftover potato peelings from canning potatoes in a disposable pan with onions and seasonings.  I baked them, then served one and froze the rest for future meals - as they just have to be reheated in the oven. 


Layered to the top and then lots of yummy salt and fresh cracked black pepper

 
I went a little heavy on the butter this time - oops!  I was busy and just quickly cut up butter and threw it on.  I wasn't really thinking about it.


These were some of the peelings tossed with oil and sprinkled with salt and a bit of onion powder


Crispy potato peelings... yum!


Print Friendly and PDF

3/1/22

Homemade Apple Scrap Vinegar (also called Homemade Apple Cider Vinegar - although there is a difference, including in the acidity level)


In our family, we don't waste food.  Before anything is discarded, thought is given to what else I can do with it.  When it comes to apples, I love getting the peels and scraps to make into homemade apple scrap vinegar.

Apple cider vinegar at the store is pretty expensive! You can make a similar homemade apple scrap vinegar for free.

You can't use it for home canning as it's not acidic enough but I don't use my apple cider vinegar for canning anyway.  We use it for daily health, or in a healthy tea or usually - salad dressings and side dishes like cucumber salads, etc.  

I love it because it's a little more 'drinkable' than the more acidic cider version, meaning it's not as strong.  It's not as 'harsh' on the palate but still has all the healthy, yummy goodness.)

It's SO EASY and all you need are apple scraps, a container and something to cover it with.

And time.  About 2-3 weeks.


My little 'ghost'...  


Take a peek under the cheesecloth... 


No longer fizzing, it's done fermenting.  It tastes and smells like a fresh apple vinegar smell.


Time to strain it into the container I'll be keeping it in.


In my case, I use an old apple cider vinegar bottle. 


Apple Scrap Vinegar

Apple peels and cores leftover from pie, applesauce, snacking, etc. (washed before you peeled them of course)
A clean glass jar or crock (nothing metal)
Sugar
Cheesecloth and a rubber band
Water

Place your scraps and peels into a very clean jar or crock - the size, according to how much you have.  It can be a tiny jar with one or two apples' scraps or a whole lot of cores and peels from a major home canning project and maybe use a large gallon jar.  

Add water to fill, making sure it is enough to cover the peels and cores. (I've never had a problem using water from the tap.  Our water is 'city' water but it works just fine in my apple vinegar and my homemade wines.)

Add sugar of your choice - and the amount doesn't have to be precise.  For my 2 cups of water I used 2 'scoops' of sugar which was probably close to about 2 tablespoons. 

Mix a bit, and make sure the liquid covers the apples.  They may float up and peek over the water a bit, that's fine - because you'll be pushing them down at least once day.  If you have a crock made for fermenting, you can use the weights to keep it down as well.

Cover with the cheesecloth to keep little fruit flies, dust, etc. out but also to let the gases escape as it ferments so it doesn't fizz all over the place and do a little blowing up so to speak. Secure with a rubber band.  Now, set it in a nice, calm, warmish out of the way place.   

For the next week or two, check it at least once a day, and using a clean utensil every time, push the apple scraps down into the water a few times to swish it.  Cover it back up.   Do it again tomorrow.  And the next day.

Within a few days you should start to smell a little apple cider vinegar smell.  It should be a good, fresh smell.  You can also taste it and it will be a light taste, but over the next few days should get stronger.  

Keep checking and pushing down the scraps until it no longer ferments - or shows 'fizzing' around the edges.  When it's 'still' it's done working.  At this point, strain it into your container through the cheesecloth.  Cap it loosely and let it sit another 2 weeks to develop an even deeper flavor.

Now you can use it.  Dressings, salads, teas, drinking, cooking... cleaning.  Whatever you use your regular apple cider vinegar for, except (again) canning as this isn't strong enough. 


 Don't have enough 'scraps' yet?  No problem.  Keep popping them into a container
in your freezer until you get an amount you want to turn into apple scrap vinegar.
Here is my new 'batch' of scraps started in the freezer.


Print Friendly and PDF