Showing posts with label low carb. Show all posts

8/30/25

Coffeecake Muffins (low carb, keto, yada yada)

It's been a long, long time since I've posted.  Life is still... life-ing.
It's been a tough past couple years.  Most of the time I don't even think of my old cooking and recipe blog!

This afternoon I was taking a break from convincing myself NOT to do all the things my brain is telling me should get done.  I had Coffee Cake Muffins on the counter so I stood there eating one when I suddenly thought about the cooking blog, "An American Housewife" Cooks. No idea why but it popped in my head.  I was SURE I had posted this recipe... probably at least 2 or 3 times, as I've made it at least 50 times in the past 10 years.  I snapped a picture with my cellphone as I was eating, and then later, came online to see if it was here.

Well, I have no idea... because I didn't find it within the first 8 seconds of searching so I just opted to post again.

Carb count depends on the products and brands you use.  Also, when I first started to make this recipe, there were VERY FEW products available... so my original hand written recipe card calls for things like Splenda and I think (?) Brown Sugar Twin or something like that.  Because back then the market had almost no sugar-free, low carb, keto products.  So things change over the years.  Use what you use.  Count your carbs and sugar using your products. 


Coffeecake Muffins

Topping:

1/2 c almond flour
3 T brown sugar style natural sweetener
2 T coconut flour
3/4 t cinnamon
1/4 c melted butter

Mix the topping ingredients together to blend well and set aside.

 
Muffins:

2 c almond flour
1/3 c sweetener of choice
1/4 c whey protein powder (unflavored or vanilla - zero carb, zero sugar)
3 T coconut flour
1 T baking powder
1/2 t cinnamon
1 t vanilla
1/4 t salt
1/2 c melted butter
4 eggs
1/2 unsweetened almond milk

Preheat your oven to 325.
Whisk together the dry ingredients for your muffins.
Stir in the butter, eggs, almond milk and vanilla.  Mix well by hand or briefly with mixer.

Fill lined muffin tins (makes 1 pan of 12-ish or about 6 jumbo with some leftover).  Place some of the crumble topping on each muffin tin of batter.  Bake for 25-30 minutes until done.  Cool complete in pans.  

If you wish at this point you can add a simple sugar free drizzle on top:
1/4 c powdered natural sweetener
2 T water or almond milk
1/2 t vanilla

Or top with a sugar free frosting.  I used a cinnamon flavored frosting on the ones in the photo above. 


Print Friendly and PDF

6/7/25

Keto Brownies (Note to self: THIS ONE!!!!!!)

Last night, spur of the moment, decided to make brownies before bed.

I don't like chocolate and rarely crave sweets but I've been starting back on keto after a long, long time off  due to... things; and after a couple days, I was mentally craving foods I knew I didn't even really like. However, I know when I am re-starting keto or sugar free, low carb, I always start to crave crazy things around days 3 and 7 just because I want something sweet.  (25 years of eating mostly low carb/sugar free you start to know yourself!)

Chose a cast iron skillet this time for no particular reason.  When I was going to add the sweeteners, I grabbed my current mixture of allulose, monk fruit and stevia but saw a bag of Splenda Magic Blend I forgot I even had.  Used half that and half the allulose blend (that I'm trying to use up as it's used in so few recipes as it's a 'softer' finish so it's best in things like homemade ice cream... not baked goods that you like with a crisp edge).

I ended up eating it warm, straight from the oven, with a spoon.
Then I went to bed.
  
Brownies

3/4 c almond flour
1/2 c natural sweeteners (used Splenda Magic Blend, and Allulose, Monk Fruit and Stevia)
1/4 c cocoa powder
1 t baking powder
1/4 t salt
3 oz cream cheese
1/4 stick melted butter
2 eggs
1 t vanilla
1/2 c sugar free chocolate chips (used Lily's this time)

Oven to 325.  Buttered pan.  Combine the dry, add the wet.  Mix.  Pour into pan and smooth the top.  Bake 30-35 minutes.  Let cool completely.


A really ugly photo of the brownies literally right out of the oven.  It was night time, and my kitchen lights always make things look ugly even in the day (with a yellow cast) but at night, even uglier.  They are actually a deep, deep dark chocolate color and were oh-so good!!!! A quick photo of one I ate at lunch today.
   And to make it easy to 'grab one' I sometimes do this with brownies or cheesecake... make them into little "brownie bites" or "cheesecake bites" so I can grab just one and not have to rely on myself for portion control.
Print Friendly and PDF

5/19/25

Low Carb Keto No Bake Cookies (and a few other versions of vintage No Bake Cookies including those cooked in a saucepan)


I rarely post anymore and I've removed almost everything from my site except the bare minimum but once in a great while I still pop in to add a recipe as it makes it easy for me to find them myself.  And, at least for now I'm still keeping my site open to the public, so you get to enjoy all the collected recipes as well.  (I may start up again in the future and build the site back but life kicked me in the teeth (again) in 2024 and this site fell down on the priority list.)

The no-bake cookies my family (my Mother) has been making since the late 1970's and our family continues to make to this day are not the kind most people know as no-bake cookies as typically they make the ones you boil in a saucepan for 3 minutes.  I have that recipe, yes I make it sometimes, but the family favorite of our family is truly NO BAKE.

We make these without fail every single Christmas and various times through the year.  They have oatmeal, butter, cocoa powder, sugar, vanilla and powdered sugar, etc....  which a couple of which, are things we do not eat when we are eating low-carb and sugar free.  

Replacing the oats with flaked unsweetened coconut works well and I found a recipe that used a mixture of coconut, pecans and peanut butter; I found it to be pretty good - a 'keeper' anyway although it's not the keto low carb version I make when I do a copycat of my mother's version.  For now I'm keeping that one tucked away.


This version of a low carb, sugar free
No Bake Cookie

1 1/2 c crunchy peanut butter
1 1/2 c unsweetened coconut flakes
4 T butter
1/2 c powdered sweetener such as allulose/monk fruit
2 heaping T cocoa powder
1 heaping t good quality vanilla paste or extract
1/2 c chopped pecans

Mix all together in a large mixing bowl with a paddle attachment or by hand.  Scoop mounds with a 1 1/2" cookie scoop or use a large spoon and form into mounds on parchment or wax paper.  Smash each mound with the palm of your hand just a little bit to form a nice flat circle, but still quite thick.

Let stand until they harden a bit and form a bit of a crust (depending on the humidity and temperature of your house this can be in an hour or could be 4-5 hours.  You can also just leave them out overnight.)


 ___________________________________________


In May of 2012 I posted this version, which uses oats and are not low carb, but are sugar free. 

No Bake Cookies

1/2 c butter
1/2 c unsweetened almond milk (or regular milk, but milk does have sugar in it)
2 c sweetener substitute
4 T cocoa powder
3 c oatmeal
1 c natural, no sugar added peanut butter
1 t vanilla
*optional:  you can add unsweetened, shredded coconut or chopped nuts if you wish

In a saucepan, bring the sugar substitutes, cocoa, butter and milk to a boil.  Whisk quickly until smooth.  Remove from heat.  Add the oatmeal, peanut butter and vanilla.  Stir to blend.  Drop by tablespoons on parchment or foil and let set until hardened a bit so they don't fall apart!  After about 2 minutes or so you can shape them a little if you wish (I flattened mine a bit) or leave them in haystacks.  Let harden and cool completely.  


In February, 2016 I posted this version - which I think almost every housewife in America was making back in the 1970's and is still popular today.  This is the kind that is cooked in a sauce pan and then spooned out into mounds.  (In 2016 I started to make this version using natural sweeteners like erythritol, monkfruit, etc.  and used almond milk in place of dairy milk).

No Bake Cookies

1 c granulated sugar
4 T butter
1/2 c milk
1/3 c cocoa
1-2 t vanilla
3 c oats - quick or regular

Combine sugar, butter, milk and cocoa in a saucepan and bring to boil over medium heat. Boil 3 minutes, stirring frequently. Remove from heat. Stir in oatmeal and vanilla.  Drop portions onto foil or parchment paper. Let stand until firm.


Low-carb and sugar free - no oats in this one. The unsweetened natural coconut flakes take the place of the oats.


Print Friendly and PDF

4/2/25

Homemade Sugar Free No Churn (No Machine) Ice Cream - Coffee flavor!

Was craving ice cream lately but never wanted to add it to the grocery budget.  I lent our ice cream maker to our daughter and haven't borrowed it back yet so I had to make the 'no churn' 'no machine' kind which takes making the sugar free sweetened condensed milk first (which is what takes the most time).  Luckily I was home yesterday and could start it and let it simmer away without standing there willing it to go faster.


Homemade Sugar Free Coffee Flavored Ice Cream

1 c heavy cream
1 1/4 c heavy cream
1/2 c unsweetened almond milk
3/4 c sweeteners - mixture of allulose, bochasweet and monk fruit
2 T butter
1/2 - 3/4 t Thick It (a xanthan based thickener available online)
1 T espresso powder
1 t vanilla
1-2 t instant coffee (I use one full single packet)


In a saucepan mix the 1 c heavy cream and almond milk along with about half the sweetener.  Bring to a brief boil, then reduce to a constant fast simmer for about 45 minutes until it's thickened up a little. Stir every now and then and make sure your heat isn't too high or it will scorch.  Remove from heat and whisk in the butter and the ThickIt (by sprinkling over the top and whisking briskly).  Add the espresso powder and vanilla.  I used a stick blender briefly pulsed a couple times to make it super quick.  

Cool this mixture either in the refrigerator or let it set until completely cool.

Whip the 1 1/4 c heavy cream to stiff peaks along with the last half of the sweeteners.  Fold in the coffee mixture.  When combined, stir and swirl in a teaspoon or so (1 packet) instant coffee.  Leave it swirled to give that look or mix it in completely if you prefer a solid color soft brown ice cream.   Transfer to the container for the freezer, seal and freeze for about 5-6 hours.


Coffee mixture after whisking.  Now let it cool completely before adding in the whipped cream


Print Friendly and PDF

4/20/24

My really old family favorite stand-by: Chicken and ham with mushroom sour cream sauce (lots of versions)

On days when I really don't want to cook but I want something hot, and I have chicken in mind for the main meat to use in some way, I often default to some version of this really old 'stand by'.

Chicken
Bacon
Ham
Mushroom Soup
Sour Cream
Salt and Pepper

That's it.  And I've been making this for so many years that I make it in almost any way possible using whatever versions of chicken, bacon and ham I have.  I also leave the ham out completely when I'm in a hurry and my ham options were frozen.

Here it is THIS TIME AROUND....  really fast and easy

Layered Chicken with Mushroom Sour Cream Sauce


3 boneless chicken breasts
3 slices ham
1 can mushroom soup mixed with about 3/4 cup sour cream I needed to use up
Real bacon crumbles
Salt and Pepper

Baked about 1 hour 15 minutes.


Originally I started making this one in a 9X13 pan (sometimes two (2) of them depending on how many people I was feeding).  That version was:

Rolled Stuffed Chicken with Mushroom Sauce

Boneless chicken breasts, pounded flat and even
Ham slice rolled up in each breast
Raw bacon slice wrapped around each chicken rolled ham slice

Place in a greased pan

Cover with a can of mushroom soup mixed with 1 cup sour cream
Season with salt and pepper, bake in the oven until the bacon is crisp and the chicken is done (about an hour 15 minutes).

More versions I've made over the years include.........

Roll the chicken with cream cheese and mushrooms inside, continue with bacon, sauce.
Roll the chicken with no ham or filling, just wrap with bacon and bake.
Roll the stuffed chicken and wrap with bacon but do not use a sauce.  Bake until crispy and done.
Stuff, roll, cover with sauce and sprinkle cooked bacon crumbles over all.
Use Spam for the filling instead of sliced ham
Lay the chicken breasts down, layer with the ham and bacon slice - bake.
Lay the chicken breast down and layer the bacon, skip the ham or use ham, cover with sauce and sprinkle bacon crumbles.
Use canned chicken, already cooked, layer with diced ham, the sauce and bacon crumbles.


When all the kids were still home and we had to feed and fill a lot of mouths, I'd double the sauce, and make potatoes on the side and use the sauce as a gravy of sorts.  


Print Friendly and PDF

5/8/23

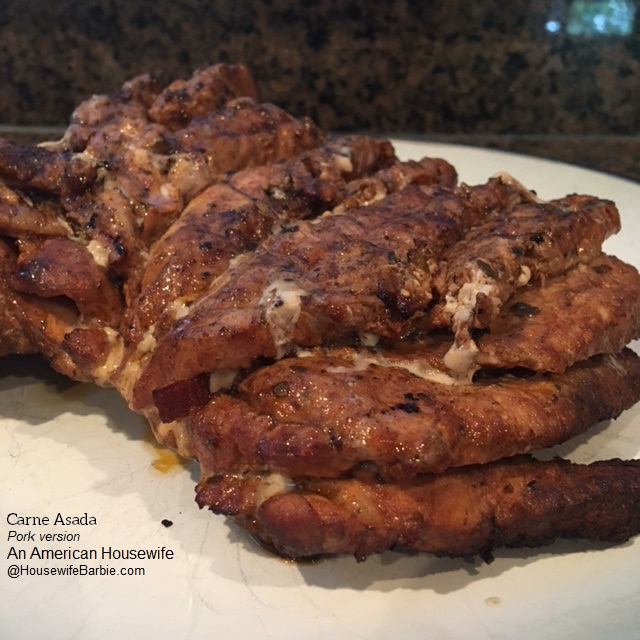
Grilled Pork - Carne Asada Style - and perfect in tortillas with cheese, sour cream and avocado

We've had this marinade from 2013 on various meats TWICE in the past week.  I've made a few different sauces for it, and one daughter loves it with just ranch dressing or green goddess dressing as the sauce.  We simply serve with fresh shredded cabbage, on flour tortillas.  


I posted this recipe previously in 2013 using thin sliced steak.  That's what I usually use, but I did it differently this time and loved it - I used a pork roast I had cut from a large pork loin I bought at Sam's Club.   It had a nice layer of fat on the back/bottom so I sliced thin slices of meat, but only 'to' the fat - not through it.  This made a fanned out piece of meat with the slices forming the fan, but attached on the very bottom with the layer of fat.  I placed this in the marinade in a glass dish, flipped it a couple times to get it covered in marinade, then let it set overnight.

The next day I grilled it, and it was really nice to have it fan out to cook; no pieces falling through the grates.  I grilled it on both sides, flipping when needed, until the meat was done through.  I let it set about 10 minutes, then sliced off the fat back (which had blackened nicely from the grill yet protected the meat) and then sliced the meat through to serve on low-carb flour tortillas with cheese and sour cream.
 
 
Here is the recipe as posted in 2013.  I doubled it this time and used amino acids in place of soy sauce and added a jalapeno from the garden that had turned ripe and red hot.
 
 
Carne Asada Marinade

1/2 c soy sauce or amino acids
3 garlic cloves, minced or chopped
1 T vinegar
1 small jalapeno pepper, chopped fine
1/3 c lime juice
1/4 c lemon juice
1/2 t either chipotle seasoning or cayenne
1 T (scant) chili powder, cumin and paprika
3/4 t dried oregano
1/4 c fresh parsley (you can use cilantro)
1/2 c oil (preferably olive oil)
pepper (about 1/2 t) but not salt as the soy sauce is very salty

Place all in a ziploc baggy (double bag) or in a ceramic or glass container, and add about 2 pounds thin steaks or other meat.  Let marinade overnight.  Grill until done, slice across the grain and serve.  I opted to serve with tortillas, salsa, sour cream, cheese, avocados and lettuce.  


Print Friendly and PDF

4/14/23

Spinach and Feta Chicken - quick and easy - minimal ingredient list too


This is basically the chicken version of one of  my favorite Greek Pizzas.  

PLAY WITH THE AMOUNTS.   I discovered I like it better when I use tons of feta cheese.  Adjust everything as you like.  Garlic or no.  More feta or less.  More mozzarella... or less.  Amounts of seasoning on the chicken?  All good.  (Kalamata olives... or not.  Want to add sun dried tomatoes and rings of red onion?  Cool.  Yes.   Or no.  Your call.)

Spinach and Feta Chicken

4 thin Chicken Breasts* 
Garlic
Italian Seasoning
Oregano
Salt and Pepper
1-2 T Avocado Oil or Olive Oil
2 - 3 handfuls of Fresh Spinach
1- 8 oz. pkg. cream cheese
1 c Mozzarella Cheese - shredded
1/2 - 1 c Feta Cheese, crumbled

*I buy chicken breasts at Sams and Costco - which are really thick.  I slice two (2) breasts in half lengthwise to make 4 nice sized chicken breasts. 

Either pound your regular chicken breasts to make them rather flat, or do as I do and slice them lengthwise.  Lay them in a pan with oil.  Sprinkle with salt and pepper, oregano and Italian seasoning and some garlic.  Put them into a 400 degree oven to bake while you make the sauce.  Set the oven timer for about 17 minutes.

In a pan on the stove add more oil to the bottom and heat to a nice medium low.  Add spinach leaves and they start to wilt immediately.  Add a package of cream cheese (8 oz.).  Turn off the heat and stir until melted.  By now the chicken should be about ready to 'top'.  

Top the chicken breasts with the spinach and cream cheese mixture.  Cover everything with some shredded mozzarella and crumbled feta cheese.  Add other things if you wish (kalamata olives, red onion, sun dried tomato) but I think we like ours without all the extras best.

Return to the oven to bake at 375 for about 25-30 minutes more.  Serve hot.


This is a quadruple batch - so, lots of chicken breasts!  Seasoned.


Into the oven


Wilting the spinach


Adding cream cheese


 Chicken is out of the oven (partially cooked) and ready to be topped with the spinach and cheeses


Spinach and Cream Cheese


All the cheeses, plus some kalamata olives this time...


Out of the oven and ready to serve a crowd.


Print Friendly and PDF

3/10/23

Peruvian Chicken, Cilantro Sauce and Cold Onion Cabbage Mixture

No photo for this one because it was SO GOOD I didn't care to stop to take a picture.  Not even the 2nd day.
I was hungry, it was incredible so I just ate it and didn't care.

And then I had it again in a wrap for 'brunch' with extra shredded cabbage, and it was still so good that I had 2 more for dinner that night. 

Personal Note:  THIS is the awesome, yummy one - and the one our daughter took a picture with on her phone because I raved about it.  ALSO:  this is the sauce I mixed with Green Goddess Dressing the next day and served as a dressing for the Cabbage, Black Olives, Avocado, Garlic Salt, etc. "First Communion" Salad that was incredible and there were no leftovers.

Peruvian Chicken, Cilantro Sauce and Cold Onion Cabbage Mixture

1 large package thigh thighs, or a whole chicken
3 T avocado or olive oil
2-3 t fresh lime juice
1 t lime zest, fresh or dried
2 t minced fresh garlic
1 t onion powder
1 T kosher salt
black pepper
1 t oregano
1 T paprika
1 T cumin


2-3 jalapenos
2 cloves garlic
1/3 c cilantro or 3/4 fresh
2 T olive or avocado oil
1/3 c mayo
1 T vinegar
1/2 t kosher salt
2 t fresh lime juice
1 t lime zest

1 c onions, sliced thin
1 c shredded cabbage
1 T lime juice
1 t apple cider vinegar
salt
1/2 t sweetener of choice like sugar


Combine the marinade ingredients in a small food processor or use a stick blender.  Blend until thick and spread all over the chicken.  Roast at 400 until done.  About an hour for boneless thighs, or 1 1/2 hours for a whole chicken.  Remove and let the chicken set for at least 15 minutes or longer.  Can be prepared ahead as well.

For the sauce, combine the ingredients and blend with a stick blender or small processor until smooth.  Taste test for salt and pepper.  Combine the onion/cabbage mixture, and store in the refrigerator until needed.

1)  Serve the chicken hot with the cold sauce and the cold onion mixture.
2)  Serve the chicken cold on a tortilla wrap with the sauce an onion/cabbage mixture in it and add more cabbage
3)  Can also use Green Goddess Dressing in place of the cilantro sauce if you can't eat spicy foods or mix them.


Print Friendly and PDF

2/24/23

Jalapeno and Cheese Stuffed Pork Loin Roast


(This is based on my pork chop version, which was posted in 2017 - which you can find here:  Jalapeno, Cheese and Bacon Smothered Grilled Pork Chops)

Here is the pork roast right after it came out of the oven, placed on the serving platter, before adding the vegetables for serving....

Basically you can use any amount of the cheese, jalapenos and bacon that you wish.  The same with the size pork loin or pork roast.  Depending on large of one you bought or how many people you are serving.

This pork roast looks fairly small in the photos but easily feeds 4 people.


Cheese, bacon & Jalapeno Pork Roast

Pork Loin or Roast (your choice cut and how large)
cream cheese - I used about 1/2 block or 4 oz. for this small pork roast, which was plenty
cheddar cheese (I used sharp cheddar this time but mild, medium or sharp will work fine)
diced jalapeno peppers - either fresh or bottled - your choice
cooked, crumbled bacon (fresh cooked and crumbled or bagged - your choice)
Optional:  cilantro, garlic or onion powder or even green onions

Form a pocket in the meat:

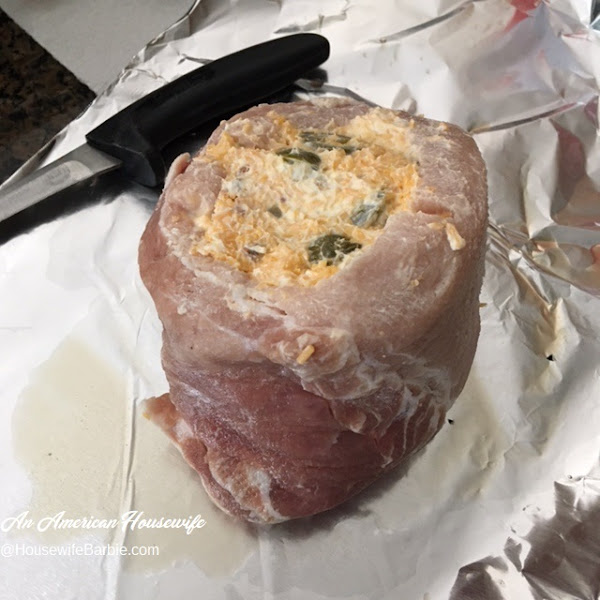
Lay the pork down on its side and use a knife to slice into the center, making a slice horizontally, but leaving about 1/2 - 3/4 inch on each side and the back/bottom.  Now turn the knife and make a vertical slice up and down, again leaving a bit on the top and bottom so you don't slice all the way through.  I added a couple more slices at angles in order to fill with more cheese filling.

Filling:

The amounts of the cheeses, bacon and jalapeno are up to you and your tastes.  If you don't like spicy foods or have children eating that are not used to spice, cut back on the jalapenos or just use a small can of diced green chili peppers (they are mild). 

We used about 4 ounces cream cheese, 1/3 cup cheddar, 1/4 cup sliced jalapenos, 1 T cooked, crumbled bacon (I just grabbed some of the Hormel real bacon bits I keep in the freezer at all times).  Mash this together and set aside.

Preheat your oven to 325.

Dry Rub: 

You could use any dry rub you like.  For this one I threw together a simple mixture using:
2 T salt
1 T ground coriander
2 T smoked paprika
3 T natural sweetener (most people would use sugar here - we are sugar free)
1/2 T espresso powder
1/2 t rosemary

Stand the pork upright and stuff the cheese mixture in.  Press it in well so it stays. 
Cover the pork roast in your dry rub spice mixture.  Roll and press gently to cover.

Heat a cast iron skillet on the stove with a bit of oil in it.  Now sear the pork roast on all sides except the cheese stuffed side.  Transfer the cast iron skillet (or any oven safe pan) to the oven and proceed to roast until done.  For the roast in my photos it was about an hour. 

(Note:  I also baked it propped 'up' so the cheese filling was on top during cooking.  This isn't necessary but I wanted to keep it all in during cooking and not have it melt/run out.  It naturally falls out when you lay it on the serving platter anyway but this way I kept it all in until serving time.)

PHOTOS BELOW


A simple mixture of cheeses and a bit of real bacon crumbles

   The pocket formed in the pork by slicing with a knife, but not all the way through.
Stuffed and ready for its dry rub marinade

 
All dressed up...
 
Searing in a hot pan
Transferring to the oven to finish cooking for about an hour
Hot from the oven, placed on a serving platter


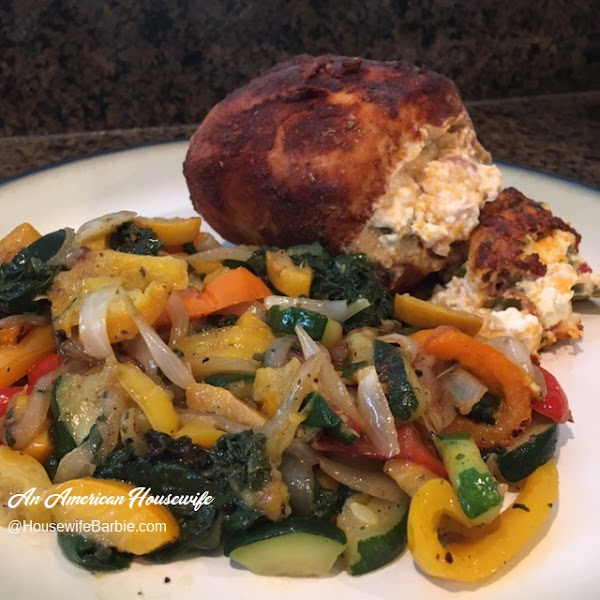
Grabbed random veggies to throw together to serve with it; spinach, peppers, onions and zucchini squash with some oil, salt and pepper 
So simple yet so good


Print Friendly and PDF

2/5/23

From My Instagram: Homemade Blueberry Granola (Can be made keto, sugarfree and low carb)


This weekend I posted on my Instagram that the homemade granola was replenished.  That might be why some of my readers are here, because they saw that one.  However, homemade granola is something I've posted a number of times in the past already - my favorites are blueberry granola and vanilla almond granola. 

Here is an image of one of the previous times I've posted this one...... for those of you who missed it or are new here.


There are SO MANY WAYS TO PLAY WITH THIS RECIPE!  I've noted some of mine below the recipe.


Blueberry Granola Cereal

1/3 c sweetener blend (Erythritol, Allulose, Bocha, - whatever you like)
1/2 c sliced almonds, crumbled a little bit
1/2 c pecans, chopped
1/4 c almond flour
1/4 c Angel Food Flavor whey protein powder or Vanilla Isopure Protein Powder
1/4 c egg white protein powder (I use Jay Robb)
1/4 c real butter
1 t blueberry emulsion (I use LorAnn)
1/2 t cinnamon powder

Preheat your oven to 300 degrees. 
Stir the dry ingredients plus the emulsion together in a large bowl.  Cut in the butter in pieces until it starts to resemble crumbs.

Spread on a cookie sheet lined with parchment or foil.  Bake 12 minutes or so, stir, flip a little bit to get the edges to the center and the inside to the outside.  Continue baking another 5-10 minutes until it's starting to turn golden.

Remove from the oven but leave it on the baking sheet.  Stir it just a little bit, then leave it to cool completely. 
It crisps up as it cools.  When completely cooled and crisp, then you can package in an airtight jar or container. 


NOTE:  Play with your recipe to use what you have and what you like.  

  • The sweetener mixture (Having at least 1/3 of your mixture be erythritol is best for it to crisp nicely).  
  • The whey protein powders and egg white powders.  I'm stingy with my egg white protein powder because it's so expensive - almost always use a mixture of whey and egg white unless it's for something 'meringue' like.  
  • I also only use Devotion and Isopure brand whey protein powders because they have zero sugar and zero carbs - many whey protein powders have carbs and sugar grams.  CHECK YOURS for accurate counts.
  • I've added a couple tablespoons of Flaxseed meal to the last two batches I made.
  • Added chopped walnuts to some of the batches - which I love.


Print Friendly and PDF

2/3/23

Sheet Pan Style Crunch Wrap Supreme


If you are a regular reader of An American Housewife, I've posted about them in the past.... Homemade Crunch Wrap Supreme

This week I made our regular Crunch Wrap meal into a 'sheet pan style' crunch wrap instead of individuals. 

NOTE:  the next time I make these sheet pan style, I will bake them without the sour cream inside, and just top the individual servings with lettuce, tomatoes, onions and sour cream, as well as extra taco sauce or salsa.  Since I wasn't going to the grocery store until the next day, I baked the sour cream inside as we were out of lettuce and tomatoes anyway!


Sheet Pan Crunch Wrap Supreme

1 1/2 lb. ground beef made into taco meat of your choice
1 pkg corn tostada shells, taco shells or even Doritos (use what you have)
1 pkg. flour tortilla shells 
1 can nacho cheese sauce or a couple handfuls of shredded cheddar cheese
butter
lettuce
sour cream
tomatoes
taco sauce
2 pans of similar size so one can lay on top of or inside the other

Lay a flour tortillas down inside a greased baking pan.  I used a sheet pan but any pan could work, just adjust your number of flour tortillas and  corn tortillas to fit.  Spread the meat over all.  Spoon and spread nacho cheese sauce on the meat (or used grated cheddar)  and top with a crunchy tostada shell, taco shells, etc.  Add some taco sauce over all.

Lay 2 or 3 more flour tortillas down the center of your pan, start to fold the wrap up over the tostadas or shells.   Cover the shells or tostadas completely with the flour tortillas, folding in the edges.  Spread butter all over the flour tortillas and use a second pan of similar size laid down on top of it all to hold the flour tortillas in place and help to get them golden brown and crisp.

Bake at 425 degrees until golden brown when checked (I think mine was around 20 minutes - I didn't time it.)  I just kept an eye on the edge of flour tortilla showing and then picked the top pan up to check how golden brown they were.  They are done when heated through, and golden brown and crispy.


I used a mixture of ground pork and ground beef since we always have both on hand (I grind our meat myself).  This makes my more expensive beef go further when I also mix pork with it. 


Make your filling with whatever you like for your taco meat fillings.  (Store bought seasoning mix, homemade, etc.)


Line a greased pan with flour tortillas.


Spreading the meat mixture


Cover all the flour tortillas with the taco or chalupa meat


Add a layer of cheese - shredded or even canned cheese spreads


Normally I'd leave the sour cream off and serve it as a topping with lettuce and tomatoes and onions.  As I noted above, I was out of lettuce and tomatoes and wouldn't be going to the store until the next day, so I just opted to bake the sour cream on it so I could clean up the kitchen while they baked, and serve without any toppings, fuss or mess.

Drizzled taco sauce (or your favorite salsa) over as well.


Add your crunchy layer.  My usual is tostadas but I only had taco shells on hand this time.


Add a couple flour tortillas to the center to cover, and fold the edges in so it's all covered up tight.  Spread butter over all.


Set a second baking pan or sheet on it to hold the tortillas down, in place and help them cook to a golden brown and crispy layer.


Its 'done' when heated through and everything is a rich golden brown.  


Print Friendly and PDF