Pages
1/31/12
Replay! Sugar Free Low Carb Almond Pound Cake
I posted this recipe once before, but that time around I didn't make a glaze to go on top. Yesterday I made this cake again and decided to use Splenda to make a nice glaze for the top of the cake. I felt it really added to it and as a matter of fact I just finished a slice with a fresh, hot cup of coffee. Enjoy!
Sugar Free Low Carb Almond Pound Cake
1 stick (1/2 c) butter, room temp
1/2 c cream cheese (not fat free)
1 c Splenda
5 large eggs
2 c almond Flour
1/2 c Cake Ability*
1 t almond extract
1 t vanilla extract
Cream butter, cream cheese and splenda. Add eggs, one at a time, beating well after each.
Mix the Cake Ability* in with the ground almonds or almond flour. Add the batter to the almond mixture a little at a time while beating. Add the extracts.
Pour or spoon into a greased 9" Springform pan, bundt pan, ring pan or even round pans. Bake at 350 for approximately 50-55 minutes. (Check early if your oven runs hot, my latest cake only took about 47 minutes.)
I mixed about a 1/2 cup of Splenda with a bit of heavy cream and a drop of almond extract to make a lovely glaze to drizzle over the cake. This is an option if you are interested too!
*2014 - I had a reader comment that this didn't turn out for her and that it tasted too much like baking soda. Which I feel terrible about - because who wants to waste all these ingredients! However, as you can tell from my personal photos, I've made this cake many times since 2009. I've used this recipe for 5 years now (2009 - 2014) and it's turned out for me.
Originally back in the early to mid 2000's there was a product called Cake-Ability that could be used in this recipe. When they stopped making it, people had to come up with a substitute. The substitute was;
Cake-Ability
1/4 cup egg white powder (like JustWhites)
1 teaspoon xanthan gum
1 tablespoon baking soda
1 Vitamin C tablet - crushed
Mix. Store air-tight. Use when called for in recipes.
You mix this together in a coffee grinder and when your recipe calls for Cake-Ability you can use this substitute. This particular recipe called for 1/2 cup Cake-Ability. When I make up the substitute I usually triple or quadruple it and keep it in a jar or baggy in my pantry and use what I need. In this cake, 1/2 cup.
With low-carb, sugar free baking the recipe can change SO MUCH with different product brands. I am just thinking out loud here, but I wonder if the taste and texture of the cake changes depending on the brands of everything else used? I'm not sure of the answer. I went back to my recipe book and yes, this is the recipe I've used since November of 2009. Low carb and sugar free baking can be tricky!
1/30/12
Homemade Turnip Fries
Many different diets and WOE's (way-of-eating) frown on potatoes because of the starch/sugar effect. Instead, suggesting that cauliflower and turnips make good alternatives to the 'mashed' version. But what if you are craving french fries? Then, consider Turnip Fries!
They will not get as crispy as a traditional fry made with potatoes, but they are so good! And you can put whatever spices on them you would like. We 'spice them up' in our family with a variety of ground spices including a little onion powder, garlic salt, cayenne, chipolte, chili powder, etc. but this week I just wanted plain old fries.
Turnip Fries
Turnips - peeled and sliced just as you would for thin french fries
natural sweetener if you want more of a fast food flavor
Salt
Oil to fry
Heat the oil while you peel and slice your turnips. About 1 medium turnip per person being served. If you wish, you can sprinkle just a touch of natural sweetener over the turnip fries before they are cooked. This is about 1/4 teaspoon per medium turnip. Not much at all. Do not over do it! This gives them 'almost' a fast food fry taste in the end.
When the oil is hot and sizzles when a single fry is dropped in, then the oil is ready. Turn it down to about medium high and add your turnips. Because they do not turn brown like potatoes and because they don't get as crisp as potatoes, you'll want to fry these longer than the 2-3 minutes that potatoes would take. I fried mine about 8 minutes. Drain completely on paper towels and salt while hot, fresh out of the oil. Serve as you would fries.
A raw turnip |
1/27/12
Turkey Wrap with Hummus and Avocado
The night before last I made wraps for dinner. I've never made this particular blend of ingredients before, but my husband, who loves roasted red pepper hummus, declared it a keeper and took an extra wrap to work the next day for lunch. My 16-year-old daughter is not a fan of hummus so she asked if I would make hers with ranch. Both were deemed fabulous so I give them to you with a 'thumbs up' from my family.
Turkey Wrap with Hummus and Avocado
1 container Roasted Red Pepper Hummus *or homemade
4 flour tortillas or wraps
4 leaves romaine or red leaf lettuce
1 beefsteak tomato, sliced into 8 slices
1 lb. oven roasted turkey breast, sliced
1/2 lb. swiss cheese (I used Provolone on my daughters as she wanted Ranch and no hummus)
1 medium avocado, sliced thin
Spread the hummus mixture on one full side of each tortilla or wrap. Top with a large lettuce leaf, add 2 slices tomato and 2-3 slices avocado to each. Layer on 3-4 slices turkey and a slice of cheese. Roll up each tortilla wrap, tucking in the ingredients as you roll. Place seam side down on the serving dish. If your tortillas were small or they are really full, secure the seam with toothpicks.
Slice each diagonally to serve.
Spread the tortilla or wrap with hummus |
Topping the wraps. Mmmm avocado! |
*Quick homemade red pepper hummus: 14 oz. can garbanzo beans - drained. Blend in a food processor with 1/4 c roasted red peppers and about 2 tablespoons lemon juice.
1/26/12
Southwestern Masa Cup Appetizers
Because I'm not a fan of any sports and because we just moved here and I don't really know anyone yet, the fact that there is a 'really big game' coming up was and is lost on me. I don't know many of my neighbors yet, but I imagine by next year we might have a football party to attend (or host ourselves once we get the basement family room finished!).
This is an appetizer I would serve as it's an individual cup so it's easier than a dip. Masa is available at almost any grocery store (I bought mine from Walmart) but you can order it online as well.
Southwestern Masa Cup Appetizer
Masa Cups
2 cups corn masa flour
2/3 cup Crisco® Butter Shortening Sticks
4 to 6 tablespoons cold water
1/4 teaspoon salt
Guacamole
2 ripe avocados, peeled and seeded
1/3 cup diced tomatoes
2 tablespoons minced red onion
1 tablespoon chopped cilantro
1 tablespoon fresh lime juice
1/4 teaspoon garlic powder
Salt and pepper, to taste
Top with:
3/4 cup crumbled queso fresco or salted farmer's cheese
Cilantro leaves
Preheat oven to 350°F. Place masa flour into a medium bowl. Cut in shortening using pastry blender until pea-sized chunks are formed. Sprinkle with water, one tablespoon at a time, tossing lightly with a fork until dough comes together to form a ball. Divide dough into 24 pieces. Roll into balls. Press into mini-muffin pans. Use a round measuring teaspoon to make a well in center of each masa cup. Bake 15-18 minutes or until golden. Cool completely in pans.
While they cool, mix the guacamole. Mash avocado in a small bowl. Add tomato, onion, cilantro, lime juice and garlic powder mixing to combine. Season to taste with salt and pepper. Spoon 1 tablespoon guacamole into each masa cup. Top each with a sprinkle of cheese and a cilantro leaf.
1/25/12
Italian Lettuce Salad
I'm late! Normally I put up the days recipe first thing in the morning but today has been a little bit more unusual than some, and busier than others. It is 1:45 pm and to be honest I'm just now having breakfast. Leftover Homemade Cream of Mushroom Soup from last night. But because I'm pressed for time (leaving in 15 minutes to get my daughter from school) I can't upload the photos and post the recipe so that one will wait.
Instead, I have this very simple lettuce salad to post. Remember, all my posted recipes are guidelines. Use what you want but for heaven's sake, leave out an ingredient if you or your family hate it. The idea is to play with your food. Make it your own favorite way.
I am swamped today so this may very well be our dinner tonight too!
Italian Lettuce Salad
1 head romaine lettuce, cut into 1-inch squares
1/4 lb sliced pepperoni, chopped
1/3 c drained sliced pimientos
1/3 c chopped red onion
1 1/2 c drained, rinsed, and chopped canned artichoke hearts
3 T red or white wine vinegar
1/4 c olive oil
1/2 t salt
1/4 t fresh-ground black pepper
1/2 c grated Parmesan
Mix the vegetables and pepperoni first. Mix the vinegar, oil, salt and pepper. Add to the salad. Toss and top with Parmesan. Delicious!!
1/24/12
Homemade Lasagna... in a Crock Pot? Yes! Crock Pot Lasagna.
Last week I had two service-people coming to my house on the same afternoon. One was installing our Directv and the other would be replacing the computer panel in our refrigerator. Not only would at least one of them be in my kitchen that afternoon, I had to also have all the food and shelves out of the refrigerator. Busy between both of them, I decided dinner that night would be something I could fix and forget. Lasagna. In the crock pot.
Start with your traditional lasagna ingredients OR cheat and do the REALLY FAST 5 minute lasagna like I did last week. So you cheat? Who cares. It tastes good and your family will love you anyways.
Crock Pot Lasagna
1 box lasagna noodles
1 jar favorite flavor spaghetti sauce
Parmesan Cheese
Cottage Cheese or Ricotta (I like the large size but we like a lot of cheese filling)
1 -2 eggs
Mozzarella cheese
Garlic (fresh, jarred or even use garlic powder if you usually do)
Spray the inside of your slow cooker with Pam or other spray or grease it with a light layer of olive oil. Mix your cottage or ricotta with about 3/4 c parmesan, about a cup of mozzarella, 1-2 eggs and about a teaspoon or two of garlic (depending on how much you like in your foods). I usually mix in some parsley or basil to this as well but I was in a hurry last week and as you can see from the photo, I didn't this time.
Pour about 1/3 of the jar of spaghetti sauce into the bottom of the slow cooker. Break 2 or 3 uncooked noodles in half or thirds and place them on the sauce, covering the bottom of the crock. Top with about a third of the cheese mixture. Layer more sauce, more noodles and more cheese. When you get to the end of your layers, add about a cup of water to the spagetti jar. Swish it around and pour this into the side of the crock pot. Sprinkle the top with shredded cheese (I like to add a bit of cheddar and mozzarella mixed as I think the colors are nice for final presentation of the food when serving.) Place the lid on and you are going to cook this on low for about 4 1/2 hours.
Every crock is different. The newer your slow cooker is, the hotter it will run (the government got involved in this a few years back) and the newer ones are prone to burning everything. If you have an older crockpot from the 70's or 80's you are going to be able to cook it for 5 hours. Newer crocks will barely be able to do 4 before you need to check it. If you have a timer, all the better! Set it for 4 hours and then let it go to the warming stage.
Serve with some hot bread and and a side salad and you have a full meal that was easy as pie! Lasagna 'pie' that is.
Use your own usual ingredients or use these for a quick 5 minute recipe |
Amounts are all relative. And lasagna is very forgiving. |
Swish about a cup of water in the sauce jar and pour it in. If you don't do this step your pasta will be dry. |
1/23/12
Celebrate National Pie Day: Quick Homemade Key Lime Pie
Today is National Pie Day! Making pies is as easy as 1-2-3, which is why The American Pie Council chose January 23rd as the day to honor this age-old dessert. (Get it? 1-2-3 and 1-23.)
If you want to impress your coworkers, friends or even hold your family captive (as in hostage?) with some "pie" trivia today, here are a few key points regarding the history of this favorite food.
- Pie has been around since the ancient Egyptians. The first pies were made by early Romans who may have learned about it through the Greeks. These pies were sometimes made in "reeds" which were used for the sole purpose of holding the filling and not for eating with the filling.
- The Romans must have spread the word about pies around Europe as the Oxford English Dictionary notes that the word pie was a popular word in the 14th century. The first pie recipe was published by the Romans and was for a rye-crusted goat cheese and honey pie.
- The early pies were predominately meat pies. Pyes (pies) originally appeared in England as early as the twelfth century. The crust of the pie was referred to as "coffyn". There was actually more crust than filling. Often these pies were made using fowl and the legs were left to hang over the side of the dish and used as handles. Fruit pies or tarts (pasties) were probably first made in the 1500s. English tradition credits making the first cherry pie to Queen Elizabeth I.
- Pie came to America with the first English settlers. The early colonists cooked their pies in long narrow pans calling them "coffins" like the crust in England. As in the Roman times, the early American pie crusts often were not eaten, but simply designed to hold the filling during baking. It was during the American Revolution that the term crust was used instead of coffyn.
I just made Key Lime Pie a few days ago, but chose to make it into tarts instead. (See photo below) but I have a post I published last March, showing you my more typical Key Lime Pie in 'pie' form. How about making a pie for tonight? Easy as..... pie!
I made them into individual pie tarts |
Key Lime Pie
1 bag of Key Limes (the very small limes!)
4 egg yolks
1 - 14 oz. can sweetened condensed milk
1 pre-made graham crust ready for filling
Zest about 4 of the limes.
Slice and juice all the limes save one. That one will be for garnish.
Strain the juice and reserve. You should have about 2/3 cup of liquid.
In an electric mixer bowl whip the egg yolks and lime zest 5 minutes.
Add the condensed sweetened milk and whip 3-4 minutes more.
Add the lime juice and mix until blended.
Pour into the graham crust. Bake 15 minutes at 325 degrees until filling is set.
Cool 20 minutes on counter. Chill 2 hours in the refrigerator.
A Topping Option
1 c heavy or whipping cream
1 -2 T confectionery sugar (powdered sugar)
1/2 t vanilla extract
*optional - 3-6 oz. cream cheese, softened
Mix and use to decorate dollops on your pie if you desire a topping.
1/21/12
Crispy Chicken Strips
I have a pad of paper on the side of the refrigerator that I use as a running grocery list. Years ago I started to tell my kids and husband "write it down" when they would mention in passing something we needed, were out of, or something they wanted. Something that has been showing up on the list an awful lot lately by my 16 year old daughter is, of all things; chicken nuggets and chicken strips!?
She has a favorite food right now that she simply calls her "chicken wrap" and uses crispy strips or nuggets inside a flour tortilla with cheese, lettuce, tomatoes and salsa. It's a current favorite snack of hers that she enjoys after school. Before this relocation I would make chicken strips from scratch. As soon as the dust settles from this move I hope to do so again.
These are great as they are, in wraps, dipped or served with honey mustard, ranch dressing, bbq sauce or ketchup or use them in a delicious lettuce salad.
Crispy Chicken Strips
1 egg, beaten
1 c milk
2 c flour
2 1/2 t salt
3/4 t pepper
3/4 t Accent (or other MSG)
1/8 t Paprika
1/8 t Garlic Powder
1/8 t Baking Powder
boneless, skinless chicken
oil or shortening for frying
Cut 6 chicken Breasts into strips. This is really easy if the chicken is partially frozen. Marinate them overnight. Beat the egg and milk. Mix the dry ingredients in separate container. Dip the chicken into the egg mixture first, then the coating. Then double dip into both again so it's a nice thick coating.
Preheat oil in a deep fry pan or deep fryer to 350 degrees. Fry a few at a time till they are golden brown. Remove the chicken to a rack and allow to drain.
1/20/12
Lemon Garlic Chicken
This is one of those meals I make when I am not really in the mood or don't have time to cook dinner or I don't know what to make. In other words, it's one of the 'fall back' meals we all have tucked up our sleeves.
I love it for many reasons. First, because it's forgiving for it's cooking method, substitutions and amounts. Second, because you can 'fix it and forget it' in the crockpot so it cooks while you are busy doing other things. Third, because it's just darn good and I'm always happy when I sit down to this meal! Another option that I think tastes even better and gets it crisper is to roast it in the oven for the entire cooking process - skipping the crock pot - but this means you have to be there to 'babysit' it a little more and I'm usually on the go so I cheat and crock pot it and just finish it off in the oven to crisp and brown it.
I don't have an actual recipe... it's just something I threw together about ten or fifteen years ago and have been making ever since.
Lemon Garlic Chicken
1 whole chicken, rinsed and patted dry
1 lemon, sliced in half
1 onion, sliced in half
Minced garlic, fresh
Salt and Pepper
Lemon Garlic and/or Lemon Pepper spice mixture
Place the halved lemon and onion inside the chicken. Place it in the crock pot and season it all over with about 2 teaspoons of fresh garlic, salt, pepper and/or your lemon pepper or lemon garlic mixtures. Cook it in your crock pot for as long as you need to while you are busy doing other things (6 hours on low or 4 hours on high - but timing depends on the size of chicken you used and your crock pot as they are all different even though they shouldn't be!). The important part is that when your chicken is just 'done' or it's about 20 minutes before you are ready to eat, take it out of the crock pot. Remove the lemon and onion. Place chicken in an oven safe dish or pan and either bake it at about 450 or put it under the broiler for 6-7 minutes. You are doing this to brown it - make it pretty - and to give it a nice crispy finish. I actually broil mine upside down for 7 minutes, flip it back over with the breast side up and then finish the broiling to the top.
Garlic, lemon pepper and an onion and lemon - and you are good to go! |
Not a great view, I know. But simply put the lemon and onion inside the bird |
Cover with spices and then? Forget about it while it cooks |
Remove it from the crock pot and remove the onion and lemon from inside (toss). |
Finish in the oven to crisp it to a beautiful golden brown |
1/19/12
A blast from my past.... Homemade Noodles! Spinach and Squash Pasta
My homemade pasta on a pasta drying rack |
Homemade Spinach Pasta
Homemade Butternut Squash Pasta or Pumpkin Pasta
1 egg
1/2 t olive oil
4-5 oz. frozen spinach, thawed and briefly cooked
or 1/2 - 3/4 c butternut squash puree or pumpkin puree - already baked and scraped from the shell or canned pumpkin (pure pumpkin only!)
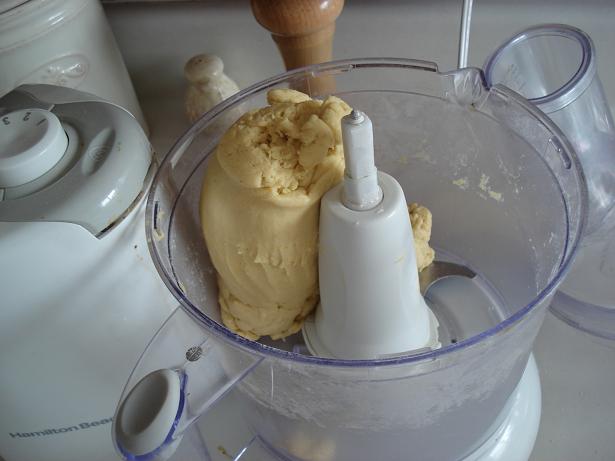
Place into the bowl of a food processor and whirl until smooth.
Add 1 1/2 c flour
1/2 t salt
Process just until it gathers to a ball. Let set 10 minutes before working with it.
Roll it out very thin on a lightly floured surface, or if you have an Italian pasta machine, roll it out in portions starting at 1 and thinning it down to a 3 or 4. If you have rolled it thin by hand, now use a pizza cutter to slice it into 1/2 inch strips, or even 1 inch if you like your noodles wide. With the pasta machine, make it into noodles if you have the attachment or lay it out and use the pizza cutter as well. This pasta is also perfect for making homemade ravioli with if you cut it into squares, fill and seal instead of slicing into pasta strips. Use right away by dropping in boiling water and boiling for about 8 minutes. Toss with butter, salt and pepper or your favorite sauce or use in a chicken noodle soup! If you want to let them dry, just let them dry on the counter overnight, flipping the next morning and continuing to dry or if you have a pasta drying rack, let hang over night or to the next day until dried. Store in a sealed ziplock in the freezer until use.
Stop processing when it forms a ball |
Roll thin with a pasta machine or with a rolling pin |
Butternut Squash pasta, Spinach Pasta and a blended squash/spinach pasta dough |
In order from the left; Squash/Spinach Pasta, Spinach Pasta and Butternut Squash Pasta |
1/18/12
Todays Lunch: Veggie Bagel Sandwich
A busy day. So busy in fact, I had to postpone an errand until tomorrow because I just do not have time to run it and still pick up my daughter at school on time. In the middle of everything, I realized my stomach was growling, and boy! Was I hungry!
I knew what I was craving and thankfully, knew that we had 'everything bagels' in the house. Time for my favorite bagel; a veggie bagel! Now, this isn't really a recipe of course because really, you shouldn't need a recipe to make yourself a 'sammich'. I happen to like everything bagels, jalapeno or onion bagels, but if you like plain, egg, sesame seed or whole wheat... knock yourself out! Use the bagel you like! Start with cream cheese (flavored or plain) and add your goodies to top.
Here is what I made to help you brainstorm what you want on your bagel!
1 bagel of your choice, split
cream cheese of your choice (low fat, fat free, plain or flavored)
cucumbers, sliced thin
onions, sliced thin
red peppers, sliced
yellow banana peppers, sliced
options: lettuce, jalapenos, bean spouts, green peppers, avocado, radishes, olives, pickles
Smear cream cheese on both top and bottom of the bagel not only for flavor, but it helps hold the veggies in place. Top with whatever vegetables you prefer, close the sandwich and enjoy!
The cream cheese helps hold the vegetables on |
My favorite! All vegetables, no meats. |
1/16/12
Caramelized Brussels Sprouts with Garlic
I'm one of those odd kids who actually loved Brussels Sprouts and spinach. But as a kid I only had them one way; butter, salt and pepper. And usually just at school as I don't think my family members cared for them. After I was out on my own I would make the sprouts with cheese sauce. Over the past few years, this has been my favorite way to enjoy them; crispy and caramelized with garlic.
A 'recipe' isn't really needed as the amounts will all be relative - but give it a try.
Caramelized Brussels Sprouts with Garlic
Brussels Sprouts
Butter
Olive Oil
Fresh chopped or minced garlic
Salt and Pepper
Cook sprouts in a pan or microwave until just tender. Heat a dollop of butter and about a tablespoon of olive oil in a pan over medium high heat. Add the sprouts. Turn the heat down a bit and let them cook, stirring once in a while until they are golden brown and the butter starts to caramelize them. Add the garlic in the last 3 minutes of cooking as you don't want it to burn and get bitter. Season with salt and pepper and serve hot.
1/14/12
Bacon Wrapped Chicken Breasts
Bacon Wrapped Chicken Breast |
When I'm busy or not in the mood to cook dinner, I try to think of what I have on hand that is quick and easy. Chicken breasts always come to mind. This is a quick photo I snapped of dinner earlier this week when I needed to get something into the oven, but I had better things to do.
It was a cold, rainy day so I paired it with a crock pot full of cheesy hashbrown potatoes. It was a perfect, hot, filling, comforting meal on a cold night and since it took little work on my part, I was able to continue to do other things until it was ready to be served on my plate!
Bacon Wrapped Chicken Breasts
4 - 6 boneless, skinless chicken breasts
1 pound package bacon
Salt & Pepper
Rinse and pat dry thawed or fresh boneless, skinless chicken breasts. Using 2 or 3 slices of raw bacon (depending on the size and thickness of each breast), wrap each piece of chicken with bacon, securing the ends under each breast and laying seam side down on a greased baking sheet.
Continue with all chicken breasts and obviously you can make 1 breast or up to 100 this way - just figure 1 pound of sliced bacon for every 4-6 chicken breasts accordingly. You can also make the bacon go farther by stretching it tightly around the chicken, thereby using 1 or 2 slices per chicken breast. Our family loves bacon so I like it nice and thick.
Season the top with salt and pepper. Bake in a preheated oven around 350 for 45 minutes or until the bacon is golden brown and the chicken is done. At this point, flip the chicken breast over, as many times the underside is not crisp. Place it under the broiler and broil for about 4 minutes until the bacon is done. Now flip it back over again and broil the top for just a minute or two until the bacon is completely done and crisp.
This goes well with almost any side dish. I often use a sour cream mushroom sauce on them but it's a healthier alternative to leave the sauce off completely and yes, you can use turkey bacon too! And for those of you doing Atkins or other low carb diets? This is an acceptable dish.
1/13/12
Cake in a Cup
Recipes... I have.
Photos... I have.
Files... I have.
Time?
Not so much. Wow. I don't know how long it will take for the dust settle around here since our relocation to the new state but I am frustrated in that I have so many wonderful recipes and photos to share but no time to do so! They are trapped on my camera or I have the photo uploaded into my files but no time to sit and pound out a post and recipe with it.
With no time in mind, I thought this would be a great quick recipe for today. A true "cup cake" - a cake in a cup! For when you want that special treat but you either don't have time to bake or it's just you and you have no need for a whole pan. Now, I'm off. Out the door yet again for another errand to the hardware store. Ahhh, moving. Fun, no?
Cake in a Cup
1 T butter, soft
2 T sugar
1/2 of a beaten egg (if you have to add the whole thing, go ahead)
2 T sour cream
3 drops of vanilla (pour into the cap and then into the cup)
1/4 c flour
1/8 t baking powder.
Mix into a coffee mug in the order listed, using a fork.
Now mix together;
1 T butter
2 T flour
1 T brown sugar
1/2 t ground cinnamon
I like to mix these in a ziploc baggy and smash it together with my fingers or you can put it in a small bowl and mash with a fork. Pour on top of the cake batter in the mug and microwave regular power for about 3 minutes.
Let it cool for at least 5 minutes before you enjoy it or you'll burn your tongue!
1/9/12
Spinach Salad with Craisins and Feta
Needing a quick and simple side dish for dinner a couple nights ago, I opened the refrigerator and saw an inviting bag of baby spinach. Knowing we had feta in the cheese drawer and craisins in the cupboard, it was only a quick glance to the door of refrigerator to see we still had a bottle of Balsamic dressing and I knew what our side dish would be. The only thing left to do was top it off with some sugared almonds.
Spinach Salad with Craisins and Feta
1 package or desired amount of fresh baby spinach leaves
Feta Cheese, crumbled
1/2 c Craisins (**or consider other flavored of dried berries! I've used pomegranates and fresh strawberries in the past)
Balsamic dressing of your choice (original, creamy, raspberry, pomegranate, etc.)
Pecans or toasted, sugared almonds, chopped
*other dried fruits - consider blueberry, pomegranate (or use original cranberry)
Start with a bowl or serving plate of desired amount of spinach leaves. Sprinkle on feta and dried fruit and nuts according to how it looks and how much you desire. See my photo above for the amounts that I like to add. Just before serving drizzle with the dressing.
Start with with fresh spinach |
Stir the almonds continuously while cooking until the sugar melts and caramelizes |
Place the almonds on buttered foil and break apart and let cool |
1/6/12
Italian Dressing
There is a package mix I like to keep on hand at all times; Good Seasonings Italian Dressing. Sometimes zesty style, sometimes regular. Doesn't matter. They are similar. I use it not only to whip up yummy Italian dressing for salads, but this is what I drizzle on our Italian Ciabatta bread sandwiches, I use it with cream cheese for delicious dips with Wheat Thin crackers and I use it mixed in with mayonnaise and sour cream for our favorite Bread Bowl Sandwich.
This Italian Dressing starts with a package mix and dresses it up a bit. Try it! Some people think it tastes just like Olive Garden's house dressing.
1/2 c olive oil
1/4 c rice wine vinegar (or use white vinegar if it's all you have on hand)
1 t dried Italian spices
1 t salt
couple dashes of black pepper
1 t sugar
1/2 teaspoon garlic powder
1 T mayonnaise
3 T water
2 envelopes Good Seasonings Italian Dressing, prepared according to directions on package
Whip or blend all ingredients until mixed. Shake the container before each use.
1/3/12
Capellini al Gamberetti
Photo by the Los Angeles Times |
PS: This recipe is from the LA Times and reminded me that two of top 10 favorite cookbooks are:
Dear S.O.S.:30 Years of Recipe Requests to the Los Angeles Times
Dear SOS : Favorite Restaurant Recipes
Dear SOS is a feature they run where readers request the LA Times to get the recipe for their favorite dishes around the greater LA area - some of which are from days long gone, but their wonderful dishes can live on in the kitchens of their fans.
Napoli's capellini al gamberetti
Adapted from Napoli Italian Restaurant in Loma Linda
6 tablespoons extra-virgin olive oil
1 pound large (16 to 20 count) shrimp, peeled and cleaned
4 cloves garlic, thinly sliced
1/2 pound sliced mushrooms
1 cup diced tomatoes
1 cup drained jarred artichokes
Salt and pepper
1/2 pound capellini (angel hair) pasta, cooked al dente in salted water
1 tablespoon finely chopped parsley
Heat a 12- to 14-inch sauté pan over medium-high heat until hot. Add the olive oil, shrimp and garlic and cook, tossing or stirring frequently until the shrimp is just cooked, about 2 minutes.
Add the mushrooms, tomatoes and artichokes and continue to cook until the mushrooms are softened, about 3 minutes. Season to taste with salt and pepper.
Stir in the pasta and parsley, and toss to combine and warm the pasta. Remove from heat and serve immediately.
Each serving: 519 calories; 29 grams protein; 50 grams carbohydrates; 3 grams fiber; 22 grams fat; 3 grams saturated fat; 168 mg cholesterol; 4 grams sugar; 328 mg sodium.
Two of my favorite cookbooks from the Dear SOS series.
Subscribe to:
Posts (Atom)