Showing posts with label Meats. Show all posts

2/27/26

Kind of a Chef Boyardee copycat version of their lasagna or pasta but also is lasagna soup (or stew if you make it thicker like I did)


This lasagna soup was one I saw on social media from McCormick spices, and although I didn't have lasagna noodles on hand, it looked really easy and surprisingly good to me that afternoon so I decided I'd whip it up for dinner.  I don't actually love 'soup' for dinner and I'm not a huge fan of lasagna or any of its soup equivalents.   But it was really cold that day, and this recipe was so easy to throw together in a pot and forget about it that I decided to make it.

At first I didn't think it was one I'd bother putting on my website for future reference but when I had leftovers the next day I realized it tasted a lot like the Chef Boyardee version I remembered from my childhood... and decided to put here just in case I ever felt like making it again.

Another quick note - I used food storage items in this too so if you need to use your freeze dried ground beef, this is a good way to do it.


Loosely based on the Lasagna Soup recipe by McCormick - but then winged it on my own version

2 T olive oil
1 onion, diced (or used the equivalent of dried)
1 lb. ground beef (used freeze dried - with some bouillon added for flavor)
2 cans diced tomatoes (14 oz each)
1 - 6 oz. can tomato paste
1 t garlic powder
1 t onion powder
1 t dried oregano (I used more like 2 teaspoons)
1-2 t dried basil
salt and pepper
4 c chicken stock or made with chicken bouillon base 
A handful of pasta - lasagna noodles broken up or penne, etc.

Brown the ground beef and onion in the oil.  Add everything else, bring to a boil and then simmer until the noodles are soft.  Add more water as needed if you are using freeze dried foods or if you want it more 'soup' and less thick.  It was even better the next day - it had thickened up to ChefBoyardee style and texture and tasted a lot like it.   


Print Friendly and PDF

1/9/26

Two (2) Ingredient Whole, Roasted Chicken


Am I 'back'?  No... not really.  I'm still pondering whether I have the time and the urge to bring An American Housewife (housewifebarbie.com) back up or not.  But in the meantime I had a couple pictures from my cellphone I could upload of our whole roasted chicken this week from dinner and thought I'd post because it is SO good and literally is just 2 ingredients.

Yes, two.


Two Ingredient Whole Roasted Chicken

1 whole chicken
Dale's Seasoning Marinade and Sauce

Place the chicken into your roasting container (pan, dish, etc) and pour over about 3/4 cup of Dale's.  Pop it into the oven and roast until done according to weight and size of your chicken. Visit the oven a few times during roasting to spoon some of the marinade/drippings from the bottom of the pan over the top of the chicken.  You can also flip your chicken over half way through cooking to get both sides browned and seasoned deeply.


Here is where I'm going to say you don't have to use Dale's if you don't want.  You can find it in many grocery stores, Walmart has it, even Amazon of course... but the reason I started to buy it a few years ago is I realized it tasted almost exactly like MY homemade steak marinade that I've made for years (decades now) and loved; but since it tastes like mine, I might as well just buy a big container of it and I wouldn't have to mix up my own.  

In December 2006 I included it on my site (it's actually been posted numerous times).

https://www.housewifebarbie.com/2006/12/steak-marinade.html

You can play with the amounts in it to suite your taste.  
When I first starting making this recipe it was so many years ago we still used vegetable oil and real sugar (eek!)  So for the past 2 years I've always substituted other options.  I'm not a big fan of ginger so I go really light on that one.  We don't use sugar much so I use low carb or keto options.  Also sometimes add a smidgen of worchestershire sauce sometimes, etc.  I also sometimes add hickory smoke liquid.  I can tell you I always add extra fresh, minced garlic - so healthy and so good.  Play with it. 

STEAK MARINADE (works for chicken)
(use the brands and types of ingredients you like best - and amounts)

1/3 c soy sauce, (or coconut aminos, liquid aminos, etc.)
2 T vegetable oil, (or canola oil, olive oil, avocado oil, etc.)
1+ T brown sugar (or brown sugar sweetener equivalent)
3/4 t garlic, minced, (or use garlic powder)
1 t ginger
1 t seasoned salt (Lawry's etc)


Print Friendly and PDF

4/20/24

My really old family favorite stand-by: Chicken and ham with mushroom sour cream sauce (lots of versions)

On days when I really don't want to cook but I want something hot, and I have chicken in mind for the main meat to use in some way, I often default to some version of this really old 'stand by'.

Chicken
Bacon
Ham
Mushroom Soup
Sour Cream
Salt and Pepper

That's it.  And I've been making this for so many years that I make it in almost any way possible using whatever versions of chicken, bacon and ham I have.  I also leave the ham out completely when I'm in a hurry and my ham options were frozen.

Here it is THIS TIME AROUND....  really fast and easy

Layered Chicken with Mushroom Sour Cream Sauce


3 boneless chicken breasts
3 slices ham
1 can mushroom soup mixed with about 3/4 cup sour cream I needed to use up
Real bacon crumbles
Salt and Pepper

Baked about 1 hour 15 minutes.


Originally I started making this one in a 9X13 pan (sometimes two (2) of them depending on how many people I was feeding).  That version was:

Rolled Stuffed Chicken with Mushroom Sauce

Boneless chicken breasts, pounded flat and even
Ham slice rolled up in each breast
Raw bacon slice wrapped around each chicken rolled ham slice

Place in a greased pan

Cover with a can of mushroom soup mixed with 1 cup sour cream
Season with salt and pepper, bake in the oven until the bacon is crisp and the chicken is done (about an hour 15 minutes).

More versions I've made over the years include.........

Roll the chicken with cream cheese and mushrooms inside, continue with bacon, sauce.
Roll the chicken with no ham or filling, just wrap with bacon and bake.
Roll the stuffed chicken and wrap with bacon but do not use a sauce.  Bake until crispy and done.
Stuff, roll, cover with sauce and sprinkle cooked bacon crumbles over all.
Use Spam for the filling instead of sliced ham
Lay the chicken breasts down, layer with the ham and bacon slice - bake.
Lay the chicken breast down and layer the bacon, skip the ham or use ham, cover with sauce and sprinkle bacon crumbles.
Use canned chicken, already cooked, layer with diced ham, the sauce and bacon crumbles.


When all the kids were still home and we had to feed and fill a lot of mouths, I'd double the sauce, and make potatoes on the side and use the sauce as a gravy of sorts.  


Print Friendly and PDF

3/30/24

"Burnt Ends" style chuck roast sandwiches


 'Burnt Ends' at the store are really, really expensive.  Basically just the ends cut from smoked and grilled meats, but an easy 'cheat' version is made at home in your own oven or crockpot. 

The photo above was taken before I broke the meat apart. 

Here is what I did....
 
Fake Burnt Ends

1 chuck roast (or use freeze dried or canned meat, but you'll have to allow for a different cook time)
butter
spices of choice (I used salt, pepper and Kinder's Woodfired Garlic)

In a crockpot, slow cooker or even an oven or fire safe pan for the grill if that's how you are cooking, place a stick of butter.  I used a container of home canned butter.   Place your meat (mine was frozen solid at the time and from the deep freezer storage from August).   Sprinkle heavily with spices of choice.  A hickory or mesquite flavor in your spices will give it a faked smoked/grill flavor as well.

Cook on high 6-8 hours in the slow cooker if it was put in frozen, less (2-3 if it was thawed) and even less if it's reconstituted freeze dried meats or canned meats:   or until it's dark, caramelized, and falling apart tender.  The parts around the edges that are 'burnt' looking have the best and most flavor - make sure you get the sides scraped to get all the flavor you can, then you'll probably have to soak the pan to clean as it's caramelized.

That's it!  Serve as is, with homemade bread or homemade buns (assuming you are cooking from food storage.  If you aren't, then use store bought buns).


A quick photo of my 'daily bread' from the refrigerator bucket plopped into a pan to bake


Print Friendly and PDF

3/16/24

Food Storage: Beef Stew (made in the Instant Pot this time)


SLOW:  I've posted this recipe many, many times over the years.  It's my favorite beef stew and I typically make it in the crock pot and let it cook 5-6 hours.  It's a no-work recipe that tastes incredible.  However, I've never tried to make it in a 'rush' before.  I've never had to.  Yesterday... I did.  And it turned out great!

FAST:  Yesterday, time got away from us and suddenly I realized my husband had to leave for work in about 25 minutes and we needed to find him a dinner to take, as we had no leftovers to throw together this time. I looked at a package of ground beef I had taken out of the freezer that was lying on the counter, and suddenly decided to see if I could throw this beef stew together SUPER FAST by using the instant pot pressure cooker, but also because since we are using food storage, most of our foods are pre-cooked in various ways already, which would cut down time.

FOODS:  The package of ground beef was one I ground from chuck roast last Fall and food sealed for the deep freeze.  However, I could just as easily used freeze-dried ground beef, canned beef, leftover steak or hamburger, diced beef (either fresh or freeze dried), etc.  I had home canned potatoes and home canned carrots on hand (again, could use freeze-dried, dehydrated, canned, etc.).  I had sliced mushrooms in the freezer, and a package of dehydrated corn I had dehydrated myself as a 'trial' last summer when I bunch leftover from a family vacation. 

I've NEVER tried to make this 'super fast' before using a pressure cooker. But it turned out perfect and so good that I ended up going back for 3rds and we plan to have it today as well. 


Beef Stew

3 c cubed, peeled potatoes  (I used home canned)
4 medium carrots, sliced  (I used home canned)
1 medium onion, cubed  (Use dried minced or freeze dried, but I had one fresh on hand)
2 lb. steak or other beef, cubed or cut to about 1" pieces  (I used frozen ground beef, thawed in the microwave)
2 T oil  (had avocado oil on hand)
3 T flour
2 beef bouillon cubes  (used 1 1/2 tablespoons beef base)
2 c boiling water  (used cold from tap)
1/4 c white vinegar
1/4 c ketchup
1 T prepared horseradish (Horseradish Cream - the kind for sandwiches, looks like mayo)
1 T prepared mustard
1 T sugar
1 c peas  (didn't have, left out)
1 c corn  (used dehydrated - added dry)
1 c fresh sliced mushrooms  (used frozen, bought, sliced and froze last summer/fall)
I added a handful of sliced cabbage as well

Place the potatoes, carrots and onions in a slow cooker.  In a large skillet, brown the beef in oil.  Lay on the vegetables in the slow cooker.  Sprinkle with flour.  In a bowl, dissolve the bouillon cubes in the water and stir in the vinegar, ketchup, horseradish, mustard and sugar.  Pour over meat in the slow cooker.  Cover and cook on high about 5 hours.  Add the peas and corn and mushrooms.  Cook an additional 45 minutes.  Makes about 5-6 servings. 

Yesterdays Instant Pot Fast Version: 
Heated instant pot to saute with oil.  Added partially thawed ground beef, broke up and browned in pot.  Added onions and flour, blended.  Added the potatoes, corn and carrots along with the water, bouillon base, vinegar and ketchup.  Added the horseradish, mustard and sugar, stirred gently.  Topped with the mushrooms.  Put the top on, sealed it and put the timer on to pressure cook on high 20 minutes.

_________________________________________________

The instant pot 20 minute version worked PERFECTLY.  


Print Friendly and PDF

3/13/24

Carne Asada Marinade (for street tacos) and the different LEVELS of food storage has paid off


There are some days I go to the kitchen pantry and see exactly what I need to pull off a meal and say "Oh Thank you God for this stocked pantry!", but then the next day I will need a couple items and go to the 2-3 year pantry and 'grocery shop' and come into the kitchen with 3-4 items I needed and "Thank you God you put it so strongly on my heart to prepare... and I had these exact items I need!"     And yet, this week I've been ever-so-thankful for my freezers.  Oh thankyouGod for my stocked freezers.... what a blessing they have been over the past 4 months!!!

And that is why I'm thankful this week because yesterday I was craving 'street tacos' - made with grilled, marinated steak.  

Great on thin sliced pork and chicken.  Great on steak too.  And normally I would have sliced these steaks thinner or into strips to get more marinade on them but I was in a serious hurry/rush to get this done ASAP and get out the door to the library to story time with the 3 year old so I got it together as fast as I could and left. Leave your meat/poultry thick if you wish for a mild flavor, but slice and marinade a long time for an intense flavor.

I grilled these last night, served with a sauce I whipped up from ingredients in the fridge and cupboard, pulled out a food sealed package of corn tortillas I had saved from 'leftovers' from when we had family visiting last July (?)  August (?). 

Carne Asada Marinade

1/2 c soy sauce  (Used liquid Aminos)
3 garlic cloves, minced
1 T vinegar
1 small jalapeno pepper, chopped fine
1/3 c lime juice (from the freezer, squeezed and froze last Fall)
1/4 c lemon juice (used all lime juice this time, no lemon)
1/2 t either chipotle seasoning or cayenne
1 T (scant) chili powder, cumin and paprika
3/4 t dried oregano
1/4 c fresh parsley (you can use cilantro)
1/2 c oil (preferably olive oil)
pepper (about 1/2 t) but not salt as the soy sauce is very salty

Place all in a ziploc baggy (double bag) or in a ceramic or glass container, and add about 2 pounds thin steaks or other meat.  Let marinade overnight.  Grill until done, slice across the grain and serve.  I opted to serve with tortillas, salsa, sour cream, cheese, avocados and lettuce.   


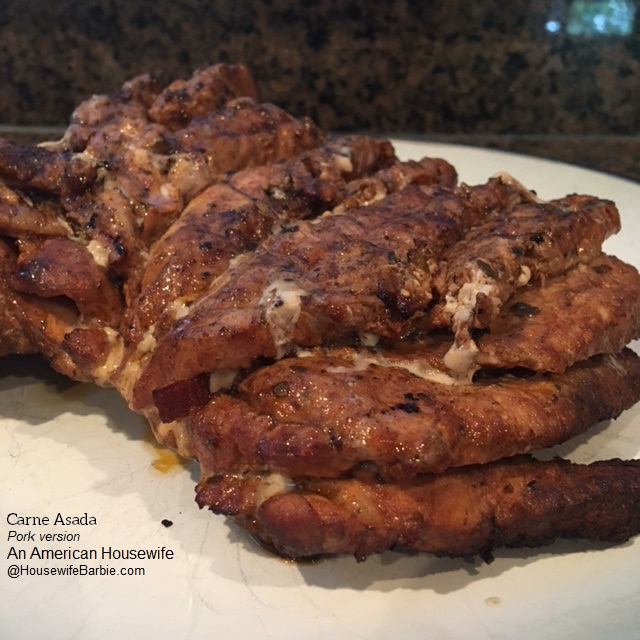
Here is a picture of one of the many (many) times I've made this recipe - this time with pork.  I use this same marinade on beef, pork and chicken - and love them all.


Print Friendly and PDF

3/7/24

Grilled Steaks


Here is a quick photo of the steaks with the simple marinade I always use in one way or another - I don't measure.


Steak Marinade

1/3 c soy sauce
2 T oil
1 T brown sugar
3/4 t garlic, minced (about 1 clove)
1 t ground ginger
1 t seasoning salt (like Lawry's) 

Mix all ingredients, whisk until blended and cover your favorite steaks with it.  I find it easy to use a gallon sized Ziploc baggy - place 4 or 5 steaks in it, add the marinade, flip it over a couple times to cover the meat and refrigerate for at least 30 minutes, up to about 3-4 hours.  Turn often to make sure the meat is marinated evenly.  Grill as usual to your favorite level of 'done'.


NOTE:  I often use Liquid Amino's or Coconut Aminios instead of soy sauce.  The photo above is Bragg's Liquid Aminios (similar in taste to soy sauce but healthier).  I used brown sugar 'sweetener' (zero sugar, low carb), and regular salt as I don't usually have Lawry's on hand and don't really fret it.


Print Friendly and PDF

3/5/24

Jalapeno and Cheese Smothered Pork Chops


One of our regular favorite recipes (posted a few times already) is the pork chops, marinated in salsa, grilled and topped with a mixture of cheese(s), crumbled bacon and jalapeno.  So, so good... and this was a quicker, easier, oven version similar to that.

Pork Chops
Cheese of choice (I used queso fresco)
Jalapeno slices
Bacon 
Spices - salt and pepper and a chipotle mixture (use what you wish)

Laid a strip of bacon down, topped with a pork chop, layer of cheese, a sprinkle of your spices, top with jalapeno slices and lay a slice of bacon across it all.  Bake at 375 or 400 until it's crispy and golden brown.  Flip them over carefully as the bacon strip on the bottom for moisture and non-stick needs to be crisped up.  Hit the 'broil' and let them cook a few minutes until crisp.  Remove them from the oven, flip back over and serve.


Print Friendly and PDF

2/27/24

Breaded Pork Chops


A quick fly-by post - dinner last night.

Pork chops from the deep freezer
Spices from the pantry
Homemade Bread Crumbs using 'leftover' breads I've tossed into a Ziploc into the freezer whenever we have ends, a couple pieces no one wants to eat, bread getting stale, etc.

Onto a foil lined pan with oil... baked at 400 or so until crispy and golden brown.


You can use almost any seasoning you like.
Seriously.
Even just salt and pepper is good.
I used salt, pepper, some woodfired garlic and a little onion powder


The leftover bread and ends torn and tossed into a food processor


Print Friendly and PDF

2/19/24

Making Ground Beef Go Farther - Vegetarian Meat Substitute, Beef (flavored)


Although I have roasts and some ground beef in the deep freeze, in order to make the meat go further, and to use up and rotate out the oldest cans in our long term storage, I'm opening and using the first things I had bought when I felt the need to start food storage (Spring of 2012 - and knew absolutely nothing... and had zero money to spend).  The 'vegetarian' (soy) fake meats were cheap and came in a little kit so I became the proud owner of vegetarian beef, chicken and taco meat.  I've already posted about the taco meat (yay) and chicken (meh, it's fine).  But last night I opened the beef (flavored).

My husband walked through the kitchen just as I opened the can.  He peeked over the edge, smelled and announced, "Mmm... dog food!"

Yeah, it does look like puppy chow. 

I decided to make a large batch.  You use 1 part fake beef to 2 parts water, bring to a boil, and simmer for a couple minutes.

I made a large pot of it, which I then turned into a big pot of chili, and the rest made into a batch of Sloppy Joes.


Here is what the imitation beef looks like in the can upon opening.


And after reconstituting with water...


It does not taste like beef.

It doesn't taste bad, but it just has a very bland, taste.  I added beef base (bouillon) to it while it was cooking, which helps a little bit.  I also added some salt and pepper. 

The soy/beef takes on whatever you are making with it - which is why it's good for 'taco' night - the taco seasonings are perfect for imitation beef.  However, made into chili, it was really good too!  And the sloppy Joe's were a little different tasting than normal (since I usually use ground beef and ground mild sausage or chicken sausage) but it too was good.   But plain reconstituted imitation beef?  Not really beef like at all.  It likes spices and sauces and flavorings.


Print Friendly and PDF

1/24/24

Roast with Dehydrated Mushrooms

Tonight's dinner is in the instant pot, on the slow cooker setting.  It's a mushroom roast and I'll be serving with potatoes, either home canned or mashed from stored potato flakes.  The star of the show however is the mushrooms.  Our family loves mushrooms cooked with our roasts but obviously mushrooms from the store go bad within days so storing them means you have to choose one or more options of storing longer term.

We store mushrooms in 4 different ways.  

The first, obvious and one we don't actually store too many of are canned from the store.  I may have some still in my 2-3 year storage but they are never my first choice.

The second way we store them is freezing.  Because they go bad so quickly, I have always immediately sliced the whole mushrooms or used sliced mushrooms from the store and put them into a food sealer bag and popped them into the freezer.  This is my primary way of using and storing mushrooms on any given day - when not using food storage items.  It ensures I always had fresh mushrooms on hand for pizza, sauces, roasts, soups, etc.

Third:  Freeze dried.  Expensive, but we do have some cans of freeze dried mushrooms in storage.  Freeze dried is the most expensive option to purchase but the quality and flavor and texture is awesome.

Fourth and last, dehydrated!  And that's what I used today.


This is my regular container of dehydrated mushrooms that lives in my kitchen pantry at all times.  I would always restock it when it got low (although of course I'm not restocking it now that we are using food storage and not buying anything at the grocery store). 

To make them, simply slice your mushrooms or buy store bought sliced and place them on the dehydrator trays.  Dehydrate until they are dried out of all moisture but still pliable.  Place into a jar with a lid and let them set for a week or so, shaking them and letting the moisture left in them equalize out.  Check for no excess moisture left in them, mold, etc.  When you see they are still dry and loose, you can make sure they are sealed tightly and start to use them as needed.

No need to rehydrate before use except if you want to use them pizza.  I add them to the dishes directly and they soak up the liquid/water/broth as they cook.  To rehydrate them for things like pizza, just toss them in a bowl of hot water and let them soak for 10-15 minutes or even overnight.  You can drain off the liquid and use them as you would fresh.


Everything thrown into the slow cooker...

Roast

1 can cream of celery soup
onion powder
dehydrated mushrooms
dehydrated or fresh green onions or onions if you wish
2-3 teaspoons beef base or bouillon
1 soup can of water 
1/4 c dry red wine or even balsamic vinegar (optional)
salt and pepper

Slow cooked about 6-8 hours or until it's fall apart tender.


Print Friendly and PDF

1/15/24

Incredible Crispy Oven Baked Pork Chops


Half of a cold, leftover pork chop from the refrigerator - the only photo I could get!

Meal made from freezer and pantry items this time.

It was 3:30 pm and I had to get something planned for dinner.  I knew it would be pork chops of some sort as I took them out to thaw earlier but other than that, it could go any way.  In the end, these were incredible and will be made again very soon (probably within about 3-4 days).  SO good.  And so easy.  


Crispy Oven Baked Pork Chops

Pork Chops
Mayonnaise
Parmesan Cheese
Crushed parmesan crisps (like a chip/cracker but are just cheese crisps sold in the snack aisles for low-carb/keto)
   OR use panko or breadcrumbs or even crushed corn flakes or rice krispies
Spices like Garlic and Woodfired Garlic, onion powder, etc.
Salt and Pepper
Oil

Preheat your oven to 400 and place a cast iron pan or other dish in it while it preheats.  Add enough oil to lightly cover the bottom of the pan.  I used avocado oil.  

While the oven pre-heats, sprinkle the pork chops with your favorite spices.  I used Kinders Woodfired Garlic and a Garlic Jalapeno mix.  Spread about a tablespoon of mayonnaise on each pork chop. Sprinkle with grated Parmesan cheese. Sprinkle with salt and pepper as you like.  Top each chop with crushed crumbs of choice. 

When the oven is ready and the pan is hot, remove the pork chops to the hot pan.  The pan should be 400 just like the oven and it should sizzle.  Cook about 25 minutes or until done.  Golden crispy and so, so good. 

I served with a broccoli, cauliflower and carrot mixture from the freezer. 


Print Friendly and PDF

12/17/23

Homemade Beef Jerky - Diving into Dehydrating

This document was extracted from "So Easy to Preserve", 5th ed. 2006. Bulletin 989, Cooperative Extension Service, The University of Georgia, Athens. 


Jerky

Partially freeze meat to make slicing easier.  Slice meat no thicker than ¼ inch. 

Trim and discard all fat from meat because it becomes rancid quickly. 

If a chewy jerky is desired, slice with the grain. Slice across the grain if a more tender, brittle jerky is preferred. A tenderizer can be used according to package directions, if desired. The meat can be marinated for flavor and tenderness. Marinade recipes may include oil, salt, spices and acid ingredients such as vinegar, lemon juice, teriyaki, or soy sauce or wine.

Jerky Marinade

  • 1 1/2 - 2 pounds of lean meat (beef, pork or venison)
  • 1/4 cup soy sauce
  • 1 tablespoon Worcestershire sauce
  • 1/4 teaspoon each of black pepper and garlic powder
  • 1/2 teaspoon onion powder
  • 1 teaspoon hickory smoke-flavored salt
Combine all ingredients. Place strips of meat in a shallow pan and cover with marinade. Cover and refrigerate 1-2 hours or overnight. Products marinated for several hours may be more salty than some people prefer. If you choose to heat the meat prior to drying to decrease the risk of foodborne illness, do so at the end of the marination time. To heat, bring strips and marinade to a boil and boil for 5 minutes before draining and drying. If strips are more than ¼ inch thick, the length of time may need to be increased. If possible, check the temperature of several strips with a metal stem-type thermometer to determine that 160ºF has been reached.

Drying the Meat

Remove meat strips from the marinade and drain on clean, absorbent towels. Arrange strips on dehydrator trays or cake racks placed on baking sheets for oven drying. Place the slices close together, but not touching or overlapping. Place the racks in a dehydrator or oven preheated to 140ºF. Dry until a test piece cracks but does not break when it is bent (10 to 24 hours for samples not heated in marinade). Samples heated in marinade will dry faster. Begin checking samples after 3 hours. Once drying is completed, pat off any beads of oil with clean, absorbent towels and cool. Remove strips from the racks. Cool. Package in glass jars or heavy plastic food storage bags. Vacuum packaging is also a good option.
If the strips were not heated in marinade prior to drying, they can be heated in an oven after drying as an added safety measure. Place strips on a baking sheet, close together, but not touching or overlapping. For strips originally cut 1/4 inch thick or less, heat 10 minutes in an oven preheated to 275ºF. (Thicker strips may require longer heating to reach 160ºF.)

Making Jerky from Ground Meat

Jerky can be made from ground meat using special presses to form or shape the product. Disease-causing microorganisms are more difficult to eliminate in ground meat than in whole meat strips. (If ground meat is used, follow the general tips for safe handling of meat and poultry, above.) Be sure to follow the dehydrator manufacturer’s directions when heating the product at the end of drying time. Again, an internal temperature of 160ºF is necessary to eliminate disease-causing bacteria such as E. coli O157:H7, if present.

Storing the Jerky

Properly dried jerky will keep at room temperature two weeks in a sealed container. For best results, to increase shelf life and maintain best flavor and quality, refrigerate or freeze jerky.


Print Friendly and PDF

5/8/23

Grilled Pork - Carne Asada Style - and perfect in tortillas with cheese, sour cream and avocado

We've had this marinade from 2013 on various meats TWICE in the past week.  I've made a few different sauces for it, and one daughter loves it with just ranch dressing or green goddess dressing as the sauce.  We simply serve with fresh shredded cabbage, on flour tortillas.  


I posted this recipe previously in 2013 using thin sliced steak.  That's what I usually use, but I did it differently this time and loved it - I used a pork roast I had cut from a large pork loin I bought at Sam's Club.   It had a nice layer of fat on the back/bottom so I sliced thin slices of meat, but only 'to' the fat - not through it.  This made a fanned out piece of meat with the slices forming the fan, but attached on the very bottom with the layer of fat.  I placed this in the marinade in a glass dish, flipped it a couple times to get it covered in marinade, then let it set overnight.

The next day I grilled it, and it was really nice to have it fan out to cook; no pieces falling through the grates.  I grilled it on both sides, flipping when needed, until the meat was done through.  I let it set about 10 minutes, then sliced off the fat back (which had blackened nicely from the grill yet protected the meat) and then sliced the meat through to serve on low-carb flour tortillas with cheese and sour cream.
 
 
Here is the recipe as posted in 2013.  I doubled it this time and used amino acids in place of soy sauce and added a jalapeno from the garden that had turned ripe and red hot.
 
 
Carne Asada Marinade

1/2 c soy sauce or amino acids
3 garlic cloves, minced or chopped
1 T vinegar
1 small jalapeno pepper, chopped fine
1/3 c lime juice
1/4 c lemon juice
1/2 t either chipotle seasoning or cayenne
1 T (scant) chili powder, cumin and paprika
3/4 t dried oregano
1/4 c fresh parsley (you can use cilantro)
1/2 c oil (preferably olive oil)
pepper (about 1/2 t) but not salt as the soy sauce is very salty

Place all in a ziploc baggy (double bag) or in a ceramic or glass container, and add about 2 pounds thin steaks or other meat.  Let marinade overnight.  Grill until done, slice across the grain and serve.  I opted to serve with tortillas, salsa, sour cream, cheese, avocados and lettuce.  


Print Friendly and PDF

2/24/23

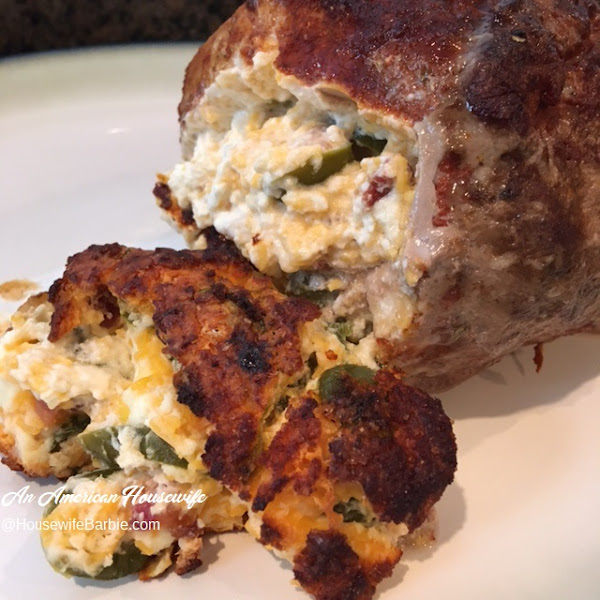
Jalapeno and Cheese Stuffed Pork Loin Roast


(This is based on my pork chop version, which was posted in 2017 - which you can find here:  Jalapeno, Cheese and Bacon Smothered Grilled Pork Chops)

Here is the pork roast right after it came out of the oven, placed on the serving platter, before adding the vegetables for serving....

Basically you can use any amount of the cheese, jalapenos and bacon that you wish.  The same with the size pork loin or pork roast.  Depending on large of one you bought or how many people you are serving.

This pork roast looks fairly small in the photos but easily feeds 4 people.


Cheese, bacon & Jalapeno Pork Roast

Pork Loin or Roast (your choice cut and how large)
cream cheese - I used about 1/2 block or 4 oz. for this small pork roast, which was plenty
cheddar cheese (I used sharp cheddar this time but mild, medium or sharp will work fine)
diced jalapeno peppers - either fresh or bottled - your choice
cooked, crumbled bacon (fresh cooked and crumbled or bagged - your choice)
Optional:  cilantro, garlic or onion powder or even green onions

Form a pocket in the meat:

Lay the pork down on its side and use a knife to slice into the center, making a slice horizontally, but leaving about 1/2 - 3/4 inch on each side and the back/bottom.  Now turn the knife and make a vertical slice up and down, again leaving a bit on the top and bottom so you don't slice all the way through.  I added a couple more slices at angles in order to fill with more cheese filling.

Filling:

The amounts of the cheeses, bacon and jalapeno are up to you and your tastes.  If you don't like spicy foods or have children eating that are not used to spice, cut back on the jalapenos or just use a small can of diced green chili peppers (they are mild). 

We used about 4 ounces cream cheese, 1/3 cup cheddar, 1/4 cup sliced jalapenos, 1 T cooked, crumbled bacon (I just grabbed some of the Hormel real bacon bits I keep in the freezer at all times).  Mash this together and set aside.

Preheat your oven to 325.

Dry Rub: 

You could use any dry rub you like.  For this one I threw together a simple mixture using:
2 T salt
1 T ground coriander
2 T smoked paprika
3 T natural sweetener (most people would use sugar here - we are sugar free)
1/2 T espresso powder
1/2 t rosemary

Stand the pork upright and stuff the cheese mixture in.  Press it in well so it stays. 
Cover the pork roast in your dry rub spice mixture.  Roll and press gently to cover.

Heat a cast iron skillet on the stove with a bit of oil in it.  Now sear the pork roast on all sides except the cheese stuffed side.  Transfer the cast iron skillet (or any oven safe pan) to the oven and proceed to roast until done.  For the roast in my photos it was about an hour. 

(Note:  I also baked it propped 'up' so the cheese filling was on top during cooking.  This isn't necessary but I wanted to keep it all in during cooking and not have it melt/run out.  It naturally falls out when you lay it on the serving platter anyway but this way I kept it all in until serving time.)

PHOTOS BELOW


A simple mixture of cheeses and a bit of real bacon crumbles

   The pocket formed in the pork by slicing with a knife, but not all the way through.
Stuffed and ready for its dry rub marinade

 
All dressed up...
 
Searing in a hot pan
Transferring to the oven to finish cooking for about an hour
Hot from the oven, placed on a serving platter


Grabbed random veggies to throw together to serve with it; spinach, peppers, onions and zucchini squash with some oil, salt and pepper 
So simple yet so good


Print Friendly and PDF

2/3/23

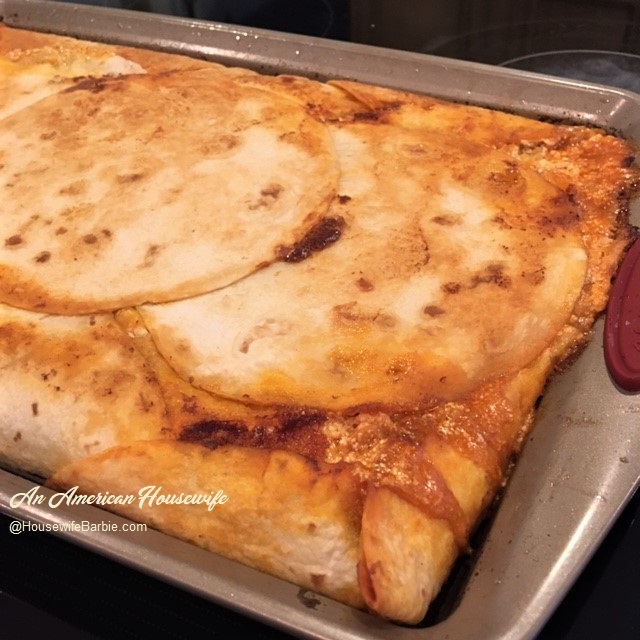
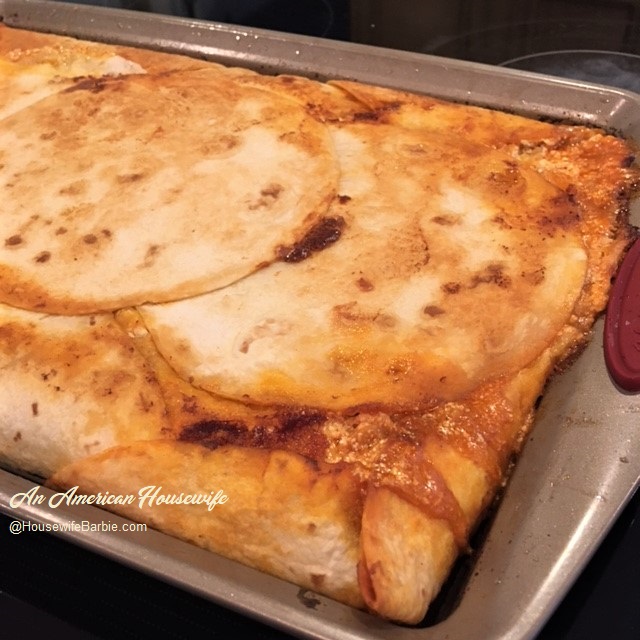
Sheet Pan Style Crunch Wrap Supreme


If you are a regular reader of An American Housewife, I've posted about them in the past.... Homemade Crunch Wrap Supreme

This week I made our regular Crunch Wrap meal into a 'sheet pan style' crunch wrap instead of individuals. 

NOTE:  the next time I make these sheet pan style, I will bake them without the sour cream inside, and just top the individual servings with lettuce, tomatoes, onions and sour cream, as well as extra taco sauce or salsa.  Since I wasn't going to the grocery store until the next day, I baked the sour cream inside as we were out of lettuce and tomatoes anyway!


Sheet Pan Crunch Wrap Supreme

1 1/2 lb. ground beef made into taco meat of your choice
1 pkg corn tostada shells, taco shells or even Doritos (use what you have)
1 pkg. flour tortilla shells 
1 can nacho cheese sauce or a couple handfuls of shredded cheddar cheese
butter
lettuce
sour cream
tomatoes
taco sauce
2 pans of similar size so one can lay on top of or inside the other

Lay a flour tortillas down inside a greased baking pan.  I used a sheet pan but any pan could work, just adjust your number of flour tortillas and  corn tortillas to fit.  Spread the meat over all.  Spoon and spread nacho cheese sauce on the meat (or used grated cheddar)  and top with a crunchy tostada shell, taco shells, etc.  Add some taco sauce over all.

Lay 2 or 3 more flour tortillas down the center of your pan, start to fold the wrap up over the tostadas or shells.   Cover the shells or tostadas completely with the flour tortillas, folding in the edges.  Spread butter all over the flour tortillas and use a second pan of similar size laid down on top of it all to hold the flour tortillas in place and help to get them golden brown and crisp.

Bake at 425 degrees until golden brown when checked (I think mine was around 20 minutes - I didn't time it.)  I just kept an eye on the edge of flour tortilla showing and then picked the top pan up to check how golden brown they were.  They are done when heated through, and golden brown and crispy.


I used a mixture of ground pork and ground beef since we always have both on hand (I grind our meat myself).  This makes my more expensive beef go further when I also mix pork with it. 


Make your filling with whatever you like for your taco meat fillings.  (Store bought seasoning mix, homemade, etc.)


Line a greased pan with flour tortillas.


Spreading the meat mixture


Cover all the flour tortillas with the taco or chalupa meat


Add a layer of cheese - shredded or even canned cheese spreads


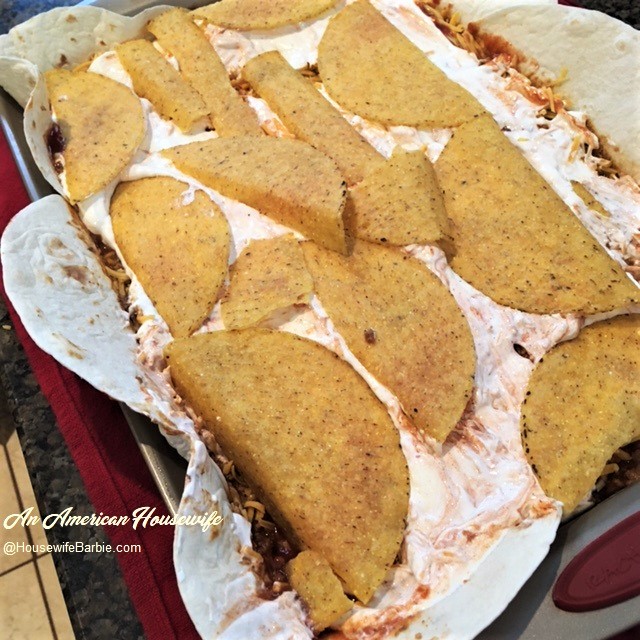
Normally I'd leave the sour cream off and serve it as a topping with lettuce and tomatoes and onions.  As I noted above, I was out of lettuce and tomatoes and wouldn't be going to the store until the next day, so I just opted to bake the sour cream on it so I could clean up the kitchen while they baked, and serve without any toppings, fuss or mess.

Drizzled taco sauce (or your favorite salsa) over as well.


Add your crunchy layer.  My usual is tostadas but I only had taco shells on hand this time.


Add a couple flour tortillas to the center to cover, and fold the edges in so it's all covered up tight.  Spread butter over all.


Set a second baking pan or sheet on it to hold the tortillas down, in place and help them cook to a golden brown and crispy layer.


Its 'done' when heated through and everything is a rich golden brown.  



Print Friendly and PDF