Showing posts with label frosting. Show all posts

1/17/26

Low Carb Sugar Free Carrot Cake with my Coffee (and cream cheese frosting on it)


We have been enjoying a keto carrot cake this weekend with our coffee as I had to use up some leftover baby carrots from when we had houseguests... I snapped a couple quick pictures with my cell phone to show it as I don't know that I care enough to try to make it look 'pretty' - I literally take a photo just before I'm going to eat it!

I have a version of it I posted back in 2016... Some of those ingredients are not made any longer and others, I don't use anymore or use newer versions.

Here is the carrot cake (sugar free, low carb) I posted back in 2016.  Very similar to the one I typically make now - just a couple changes.  About 10 years ago I started to add heavy cream to my frostings as well - so similar base - but add a huge dollop of heavy cream and you get more volume, a smooth silky frosting, and even better flavor. 

https://www.housewifebarbie.com/2016/05/ 
 
The current cake I've been making for the past almost 10 years though is this one (based on Carolyn Ketchums recipe!).

  
Low Carb Carrot Cake
 
2 c almond flour
1/3 c coconut flour
1/3 vanilla whey protein powder (I use Isopure and have for 20 years)
1 T baking powder
2 t cinnamon
1 t salt
dash of ground cloves
4 eggs
1/2 c avocado oil
1/2 c brown sugar style sweetener
1/2 c granular style natural sweetener
1 1/2 c shredded baby carrots
2 t baking vanilla
optional - a few tablespoons chopped pecans

Grease and line the pans (I use 2, 8" or 9" pans).  Blend together the dry ingredients (flours, powders, seasoning).  

Mix the eggs, oil and sweeteners, add carrots and vanilla.  Beat in the dry ingredient mixture and add chopped nuts if using.  

Divide batter between the 2 pans and bake in a 350 oven for about 20 minutes, until done in the center.  Let cool.  Remove from pans.  

Spread frosting between layers, top and frost all.

For the Frosting I used:

1 stick butter
8 oz. cream cheese
3/4 c powdered natural sweetener (depending on the brand you use some are sweeter than others so adjust to taste.  1 cup of my allulose/splenda/stevia blend is TOO sweet so must cut back to 2/3-ish.)
1-2 t vanilla
dash of salt
Enough heavy whipping cream to taste and amount you need (I use about 3/4 cup)

In a mixing bowl whip the butter and cream cheese and sweeteners with the vanilla.  Slowly pour in the heavy cream while on low speed and increase to medium high.  Beat until it's whippy and spreadable.   Use on your cakes.


Print Friendly and PDF

1/1/25

Lemon Sherbet Cupcakes with Buttercream Frosting

I saved this recipe in my files back in 2023 at some point.  I just saw it and want to post it so I can find it easily if I decide to them them this week.  Lemon everything is sounding so good lately!


 Lemon Sherbet Cupcakes with Buttercream Frosting
 

1 c (8 oz.) salted butter, softened
2 1/2 c granulated sugar
6 large eggs
3 c  all-purpose flour
1 t baking powder
1/2 t baking soda
1/4 t table salt
1 c sour cream
1 T lemon zest
1 T fresh lemon juice
1 t  vanilla extract

Frosting:
1 c butter, softened
3 T lemon zest
4 c powdered sugar
8 T fresh lemon juice
1 to 2 drops yellow liquid food coloring

Preheat oven to 350°F. Beat 1 cup softened butter at medium speed with a heavy-duty stand mixer until creamy; gradually add granulated sugar, beating until light and fluffy. Add eggs, 1 at a time, beating just until blended after each addition.

Stir together flour, baking powder, baking soda, and salt. Add flour mixture to butter mixture alternately with sour cream, beginning and ending with flour mixture. Beat at low speed just until blended after each addition. Stir in 1 tablespoon zest, 1 tablespoon juice, and 1 teaspoon vanilla. Place 30 paper baking cups in three 12-cup standard-size muffin pans; spoon 1/4 cup batter into each baking cup.

Bake in preheated oven until a wooden pick inserted in centers comes out clean, 20 to 23 minutes. Remove from pans to wire racks, and cool completely, about 20 minutes.

Prepare Frosting: Beat 8 ounces softened butter and 3 tablespoons lemon zest at medium speed until creamy, 1 to 2 minutes. Gradually add powdered sugar alternately with 8 tablespoons lemon juice, beating at low speed until blended after each addition. Add up to 1 tablespoon lemon juice, 1 teaspoon at a time, beating until desired consistency is reached. Add food coloring, and beat at high speed until well blended and frosting is light and fluffy, 1 to 2 minutes.

Spoon frosting into a ziplock plastic freezer bag. Snip 1 corner of bag to make a small hole. Pipe about 1 1/2 tablespoons frosting onto each cupcake.

Lime Sherbet Cupcakes: Substitute lime zest for lemon zest and fresh lime juice for lemon juice. For frosting, substitute fresh lime juice for lemon juice, and 1 to 2 drops green liquid food coloring for yellow.

Orange Sherbet Cupcakes: Substitute orange zest for lemon zest and fresh orange juice for lemon juice. For frosting, substitute orange zest for lemon zest and 1 tablespoon lemon juice and 7 to 8 tablespoons fresh orange juice in place of 8 to 9 tablespoons lemon juice. Substitute 1 drop red liquid food coloring for yellow.


Print Friendly and PDF

4/15/24

Homemade White Cake

My favorite white cake that I make for weddings and birthdays starts with a cake mix that is 'doctored up' quite a bit.  However, I've been searching for years for a good homemade from scratch white cake because I rarely have cake mixes on hand.

Here is today's cake.

This photo is literally as I was snitching some cake with my morning coffee... because this FROSTING.  Yum.


Homemade White Cake

2 c flour
2 t baking powder
1 t salt
4 egg whites
1/4 sugar for the egg whites
1 c sugar for cake
1/2 c Crisco shortening
1 1/2 t vanilla
1/2 t almond
1 c milk

Preheat oven to 350 and grease/flour your pan or pans.
In a bowl, place the flour, baking powder and salt.  Whisk and set aside.
In another bowl, beat the egg whites until they are soft peak, sprinkle in the 1/4 c sugar and beat to stiff peaks.  Set aside.

In a large mixer bowl, beat the shortening and 1 c sugar.  Add vanilla and almond.  Add part of the flour mixture, part of the milk, more flour and more milk, mixing between.  When just to the point of being blended and smooth, fold in the beaten egg whites, 1/2 at a time.  Pour into your pans and spread.  Bake according to pan size.  Usually 25-35 minutes for any of the sizes.  Cool in pans 10 minutes and then turn out to cool completely.

Frost.


(Frosting:  2 sticks butter, whipped until pure white.  Add 3 c powdered sugar and some vanilla/almond extract.  Beat.  Use on cake.  Double for 9X13 and double or triple for layer cakes.)


Print Friendly and PDF

12/20/23

Hundreds of Christmas Cookie Recipes - lists and photos and links... oh my!

Older post, re-posting for 2022!


For the past 12 years or so I think the average number of different recipes I make is somewhere around 24-26.  


I've been doing this for SO LONG that I don't really care to re-invent the lists and posts yet AGAIN. Seriously... I think this particular version of my site goes back to 2006.  Instead... I'll just cut and paste of the many lists I've made at some point in the past, as well a few random photos of goodies and links - no particular order or reason.

IF YOU WANT TO SEE MORE JUST USE THE SEARCH FUNCTION ON THE PAGE OR CLICK ON THE CHRISTMAS OR COOKIE OR CAKE OR DESSERT LABELS.

December 1st:  Molasses Cookies
December 2nd:  Chocolate Caramel Thumbprints
December 3rd:  Peppermint Pinwheels
December 4th:  Candy Striped Cookie Sticks
December 5th:  Peppermint Teacakes
December 6th:  Peanut Butter Patties
December 7th:  Peanut Butter Fudge
December 8th:  Sugar Cookies:  Snowflakes with Edible Glitter
December 9th:  Swedish Rosettes
December 10th:  Cream Wafer Cookies
December 11th:  Cherry Poppy Seed Winks
December 12th:  Peppermint Pretzels
December 13th:  Candy Pretzels
December 14th:  Homemade Truffles
December 15th:  Cream Horns
December 16th:  The Best Brownies
December 17th:  Red Velvet Cake Balls
December 18th:  Glazed Sugar Cookies
December 19th:  Gateau Bon Bons
December 20th:  No Bake Chocolate Bars
December 21st:  Peppermint Meltaways
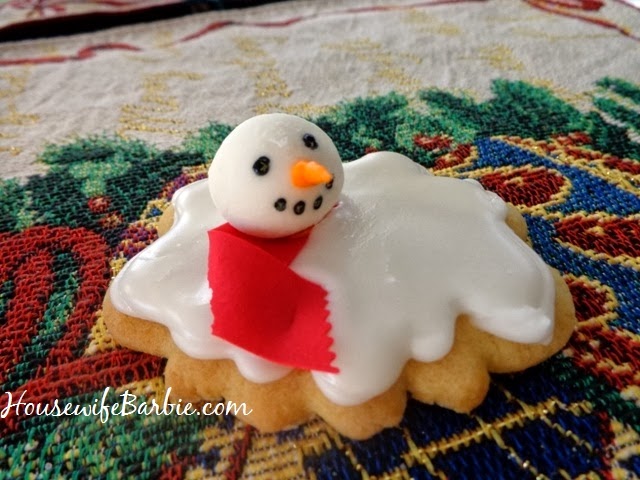
December 22nd:  Melted Snowman Cookies
December 23rd: No Bake Fruitcake Bars
December 24th:  Mini Peanut Blossom Muffin Cookies


 RANDOM LINKS FROM OVER THE YEARS......... 2006 - 2020


Peppermint Melt-aways


 Christmas Cake Balls

Cream Horns


Print Friendly and PDF

Baking Spirits Bright for 2022 - Christmas Cookies and Candies


Cookie Ideas and recipe links:   Baking Spirits Bright in 2022 


Print Friendly and PDF

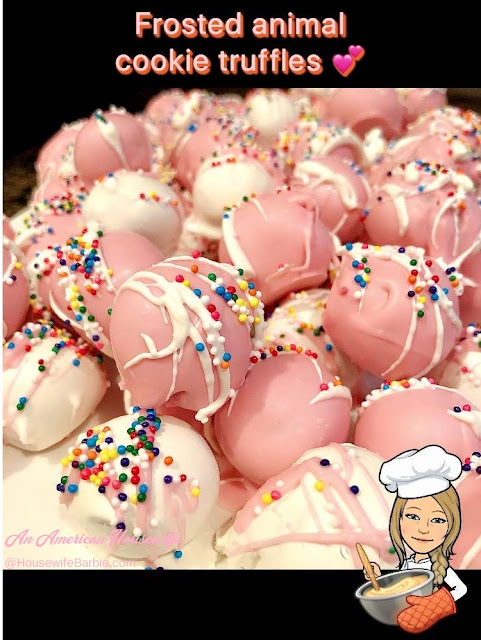
Pink and White Circus Truffles: Frosted Animal Cracker Cookie Truffles

Originally posted in June, 2022
Repost November 2022 to gear up for Christmas baking!


If you follow me on Instagram, you might have seen that I whipped up some quick truffles last week for a mini family reunion we were hosting at our home this weekend. 

I'm a big fan of the actual Mother's brand Circus Animal Cookies (Frosted Animal Crackers) and could eat an entire bag myself, easily.  When I initially decided I wanted to make truffles instead of my typical chocolate chip cookies, I first figured I'd just make the regular almond truffles I know everyone loves, but then thought maybe instead, I should do the Oreo version as well to mix it up a bit.  But... meh

When it comes to quick and easy cookie truffles, a regular 'go to' is the Oreo version but it's just as simple to make them with 'Nilla Wafers, animal crackers or obviously - frosted animal crackers like the original (and best version, in my opinion) Circus Animals.

It's basically just pulverizing the cookie, adding enough frosting or cream cheese to hold it together, forming balls and dipping in candy coating.

And... that's what you do!


Frosted Animal Cracker Truffles

Frosted Animal Crackers (like Mother's Brand Circus Animals) (9 oz)
Cream Cheese or white or pink frosting (2 oz)
Pink candy coating (1 small pkg)
White candy coating (1 small pkg)
Muli-colored sprinkles

To each 9 oz. bag of animal cookies you'll want to use about 2 ounces of either frosting or cream cheese.  The amount you make is up to you.  I used 2 bags of Circus Animal Cookies and about 6-ish ounces cream cheese.   

Separate the pink and white cookies from each bag you are using.  Pulverize the white cookies in a food processor and add about 2-3 ounces white frosting or cream cheese and pulse just until it forms a ball.  Repeat with the pink.  If your dough is a bit too sticky to work with, chill in the refrigerator for 30 minutes until you can form balls. The sprinkles in the white tend to turn it a pale 'green' tint.

Using about 1/2 teaspoon, scoop out little bits and roll in tiny balls, both pink and white, placing on parchment paper lined trays.  Freeze for about 20 minutes, and then use a white ball to smash a little and form it around a pink ball and place back on parchment.  Repeat until you've used about half of them and then reverse the process and smoosh a pink one to form around a white center.  If you want skip this step and do single color bites, (faster) just form 3/4" balls out of the white and pink cookie dough as you wish.  

Freeze your balls for about 30 minutes.  Prepare your candy melts by following directions on the packages.  Use a bowl for white and a bowl for pink (separate).  Usually this means microwaving on defrost or 50% power for 1 minute at a time and stirring and mashing between minutes until smooth and melted.

Dip half the balls pink and half white.  Be sure to sprinkle with multi-colored candy sprinkles immediately while they are wet because as they are frozen, they set up very, very quickly.

At the very end you can use the remaining melts to splatter and drizzle across and over the truffles.

You can keep these in the refrigerator for a week easily.  Mine were also out on the counter for 2-3 days, no problem.  


Some are multi color centered (right) and when I ran out of white dough but still had more pink, I did the rest solid pink.  Each are dipped in the opposite color candy coating.


Print Friendly and PDF

1/7/23

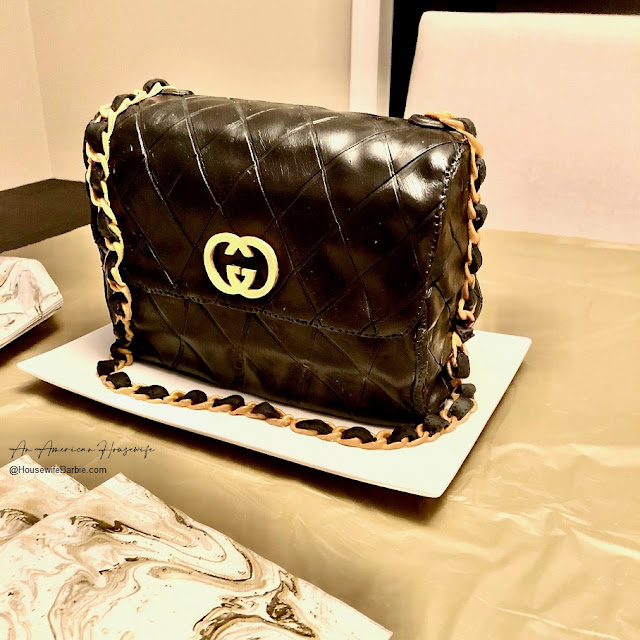
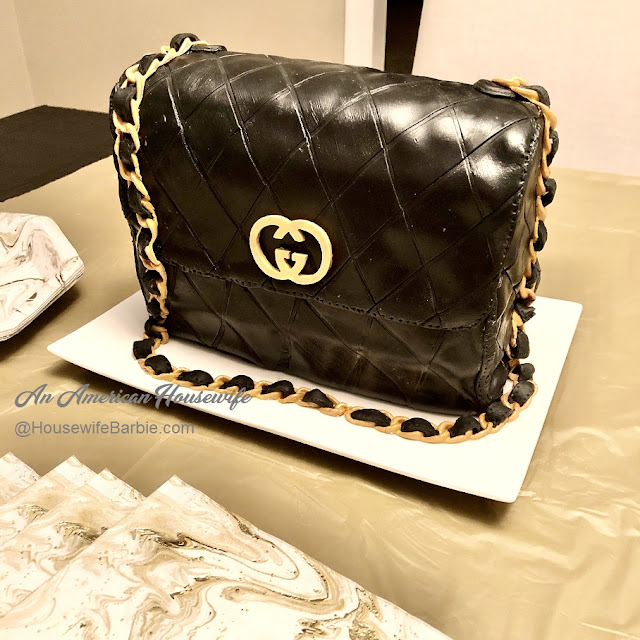
A black leather purse cake! (Or handbag cake if you prefer)


Another Birthday Cake!  As I mentioned in the previous post, this past weekend we had our big family celebration of... all the things.  Our family gathered from across the country and we celebrated 2 birthdays, Christmas and New Years; all between Friday and Monday.

This post is MOSTLY here because I think my oldest daughter might want to make this in the future and I wanted to jot down and save photos of the process for her.  But I keep my blog public so it can help others as well; so maybe someone else (you) would like to see the process I used as well.

I'm not a 'cake maker' and I'm just a Mom who makes birthday cakes for her family.  I saw this cake idea, I had no idea how I'd make it, but I figured I'd look online for a few items and make it up as I went along.  I went to a decorating site I use and put in a search for a "purse logo mold" and this one showed up, so I ordered it.  On the "you might be interested in..." that they add to the page, I saw a mold for chain link.  I had wondered how I'd make those - so I ordered that too.  Then I ordered some yellow gold fondant and some glittery gold edible food dust... just in case I needed it.

Normally I make my fondant but getting a deep black was going to be difficult so I checked and they sold black fondant in a brand I like and tastes good so I ordered a small container of that too. 

And that was it.  I tucked those away without a plan...

Here are a few more photos of the cake as I set it up on the dining room table - literally MINUTES before they were due to arrive.  The birthday girl and her family plus my son were all arriving after about a 15 hour drive, in which they also had car trouble and stop for a new alternator.  I put this on the table, got the stuff surrounding, and they arrived in less than 10 minutes.  PERFECT because she needed a happy, uplifting 'birthday party' after a long, frustrating drive.

We enjoyed cake, a quick dinner, laughter and hugs... and then everyone went to bed, exhausted.  LOL.
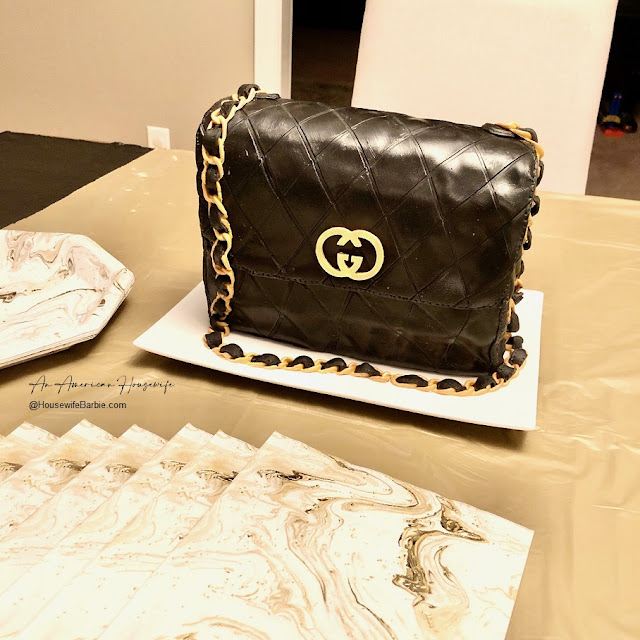


The birthday girl and her cake.


______________________________________________________________________


For this cake I wanted something sturdy to work with and it just so happens the birthday girls favorite cake is Red Velvet so that worked out perfectly!  A couple days before they were due to arrive, I found time during a 2 year olds nap to make the cake so I could fill and freeze it.

In my head I figured a bread pan would make a great cake pan because I wanted that sort of shape. 

I baked the cake in a bread or loaf pan as well as an oval Scandinavian Almond Cake pan but you can also just cut the top of a loaf/bread pan baked cake to be a rounded shape.


I made traditional frosting to go with the Red Velvet Cake because people that pair a true, traditional Red Velvet Cake with Cream Cheese Frosting are committing a cake-baking sin! 
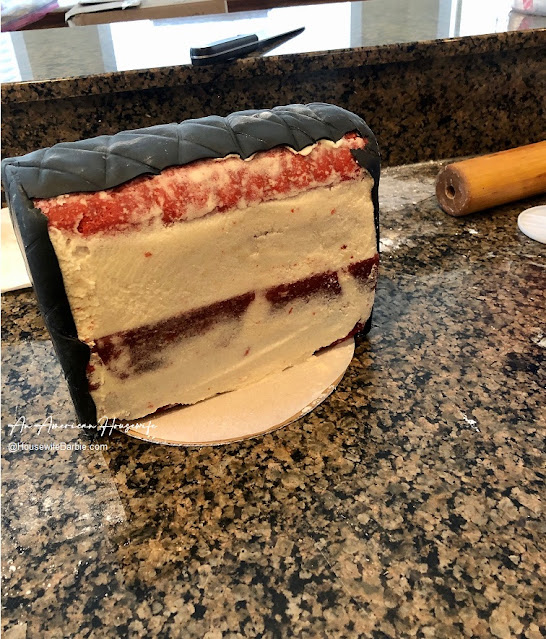
 
The cake was made, the frosting filled between a couple layers and then a little bit of a crumb coat, and it was popped back in the freezer.

On "put it together day" I got out the random things I had ordered, thinking I may or may not use them.

FIRST:  I used some gold/yellow fondant to form the Gucci logo for the front of the cake.  I knew I would have to let it set up to dry and harden a little before I could use it.  I did not make the chain at this time because I knew it would still have to be somewhat soft in order to form to draping... not too hard and not too soft. 

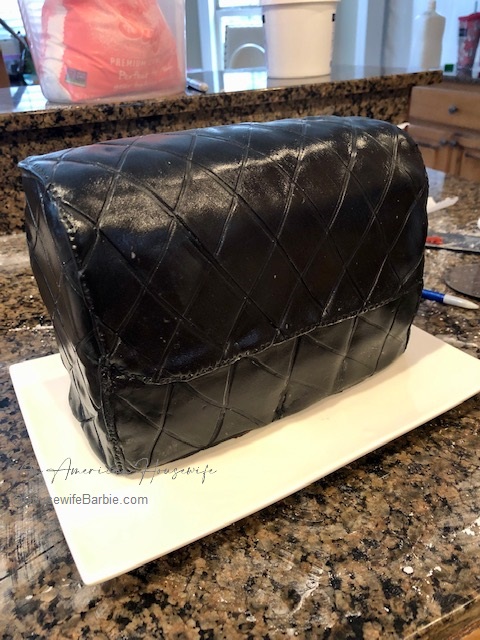
SECOND:  I didn't know what I was doing but I grabbed a hunk of black fondant and started to roll it out.  I measured the cake to get a rough estimate of how wide and high a piece needed to be to cover the back, and a little over the front as well. 

I cut it out and put it over the cake. 

NOTE:  LEARNING CURVE:  I didn't do the diamond pattern first.  I tried to add that after the fondant was on the cake, which was difficult to get even, so for the front I did the pattern first, then draped it on the cake.

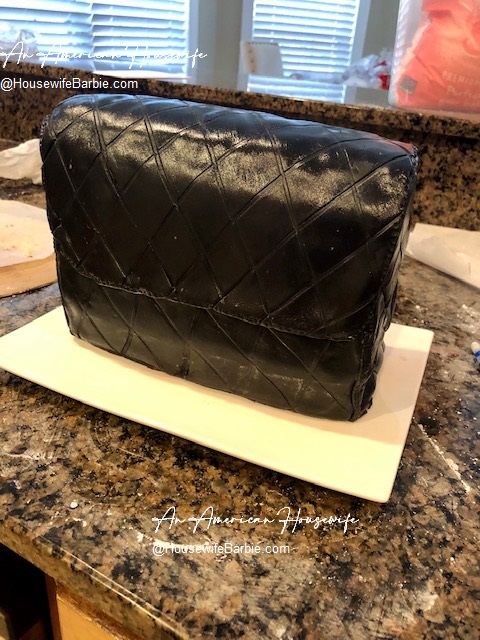
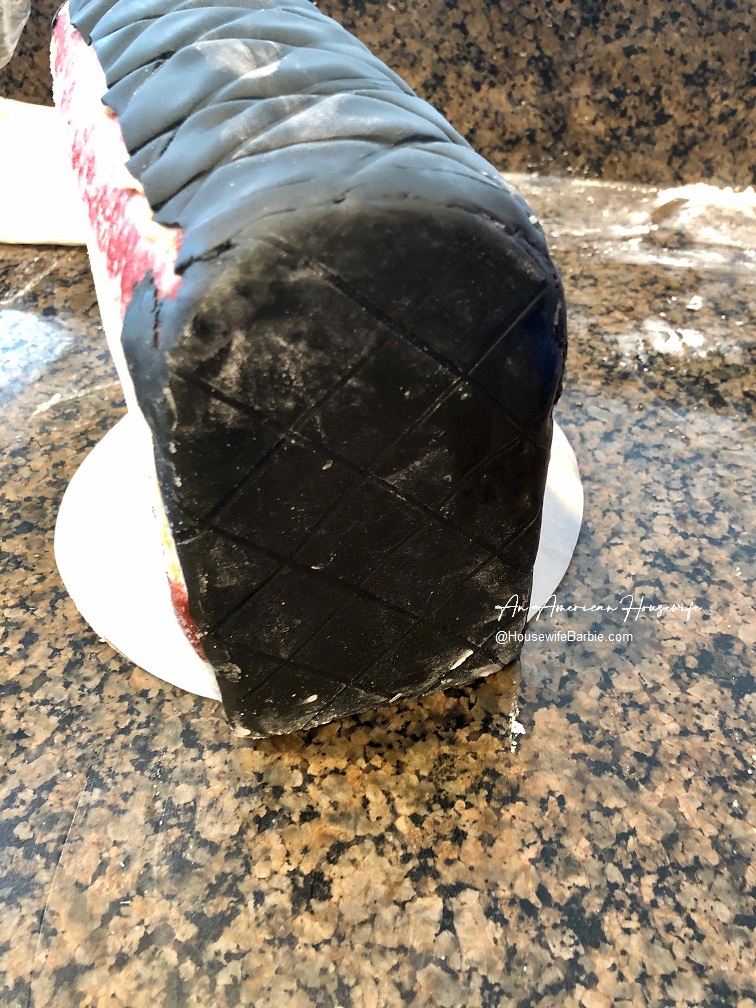
I cut two pieces for the sides in the general size and shape I wanted, and placed them on the cake with a little clear decorating gel to hold them.  Then I used a sharp knife to cut the fondant down a bit so I could smooth it with my fingers to meet the top fondant piece on the cake.  See photo.
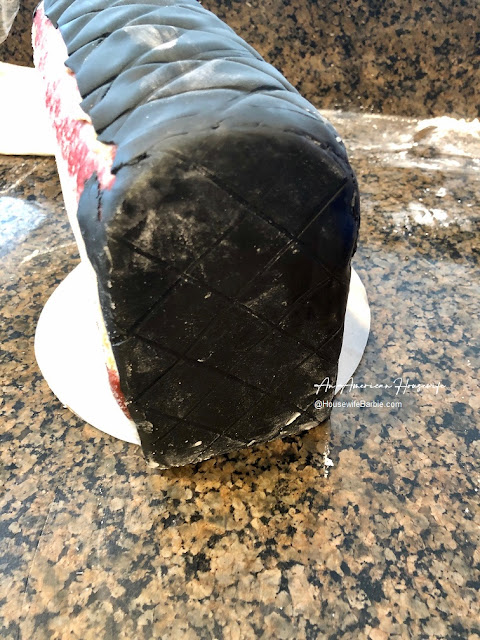


With the back and sides in place, I now had to the front to figure out.
First I did a piece across the bottom front (see photo). 
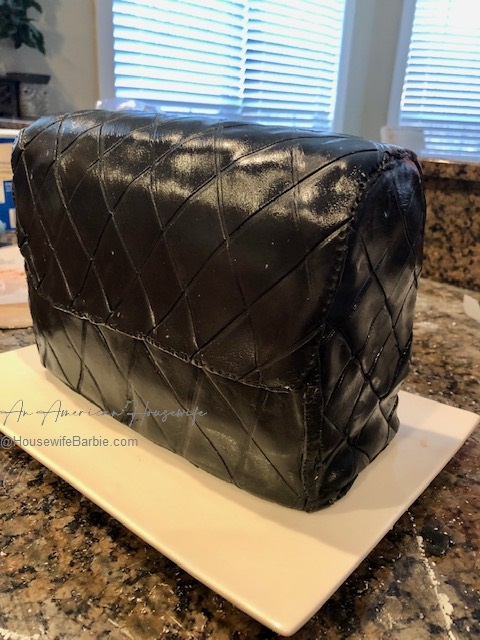
Then I laid out my fondant and did a guesstimate measure to start the last piece at the top of the cake where a 'seam' would be, and down about half way in the front like a purse flap.


When I was deciding what to use to make the diamond leather pattern for the purse, I tried a couple things, but ended up just flipping my knife over and using that to gently press in lines that overlapped to make the pattern.


I draped the last piece of fondant over the purse cake and....  this was the moment I realized I might actually pull this off!  It was really looking like a purse!


And a couple minutes later my hopes were dashed and I figured I was really screwing it all up because I then attempted the chain links to make the purse strap for the cake and I actually put everything down TWICE and was going to just stop.  I almost just cut black fondant to make a simple black strap... but I'm glad I didn't stop in the end.  I persevered.
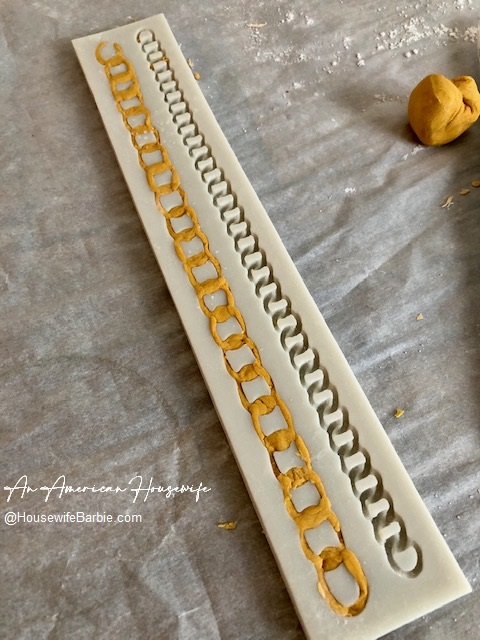


NOTE:  LEARNING CURVE - fondant is really soft for this.  I think a gum paste or something similar would work better and I know professionals have other things they use - but I only had fondant.  I popped out the chain link the best I could. 

I tried using the edible gold to paint it on before placing it on the cake because I didn't want to accidentally get paint on the cake by doing it after... mistake.  This didn't work at all and the fondant just wanted to break.  MAKE THE PURSE STRAPS AND PUT THEM ON THE PURSE FIRST.  And if you can use gum paste or something other than fondant, you will be happy you did.
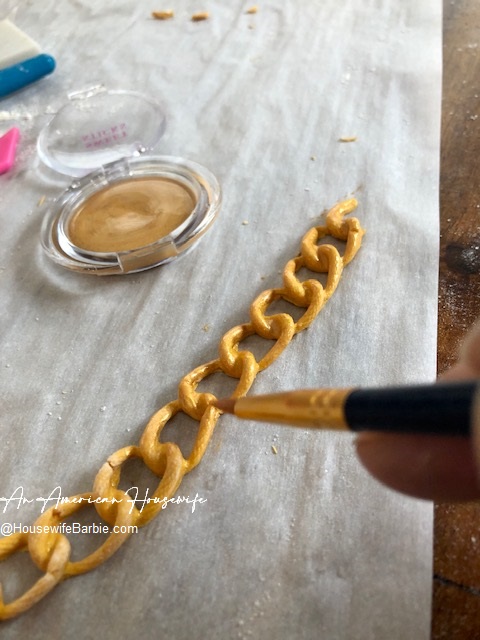
 

While I let the fondant chains sit on parchment for a little bit so they would (hopefully) get hard enough I could pick them up without them falling apart on me... I went back to the cake to attempt to find something to make it look like the seams were sewn.

Maybe they have something to do this design, I have no idea.  But I was grabbing things from all over my kitchen to try, including an icing pick, a straight pin, the head of the straight pin, a long twisted wire, etc. Just use whatever you have in your kitchen to make little indents all over the edges for a fake seam.

And finally... cleaning it up!  On some cakes I just use a brush and brush the extra powdered sugar or cornstarch off; or sometimes get the pesky spots brushed off with a little water, but to make the fondant shiny, I wanted to use shortening. 

I brushed the whole cake with shortening to make it shiny and keep it soft.
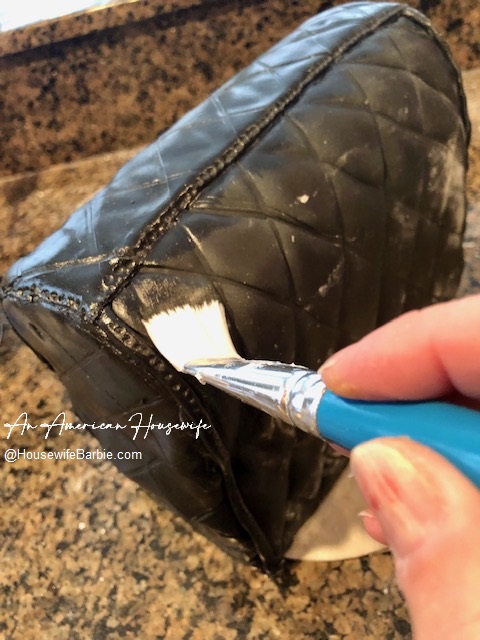


HERE is right after I carefully carried and draped those darn pieces of fondant chain over the cake and down across the front.  I pieced them together as best I could and yes, they were breaking since they hadn't had much time to set up.  I placed a few straight pins in to hold them in place while I got some pieces of black fondant rolled out, and cut them into tiny rectangle shaped pieces about 3/4 of an inch long and a little less than a half inch wide.  Basically about the width of the gold chain links.

Each little piece I poked the indents on, then pinched each end of it and tucked it into the chain links to look like a leather strap was weaved between the gold chain to form the cake's purse strap.

I wanted to make a little circle where the straps attached to the purse, so I grabbed a bottle cap from a random bottle (I think it was a taco sauce bottle) and with a perfectly clean and dry cap, cut out two little circles, with an indent of two tinier circles inside, to which I placed the ends of the purse 'strap' fondant pieces.
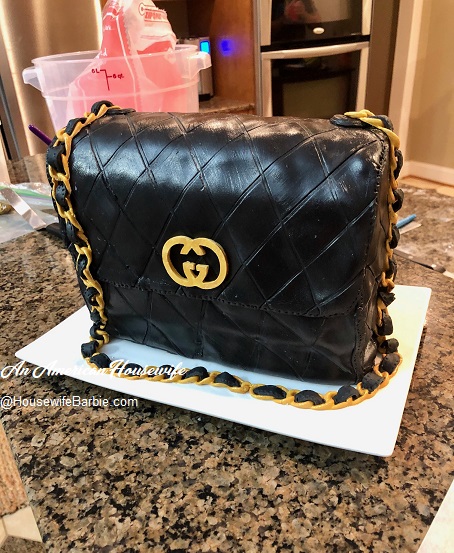

And that's it!  I called it "done" and rushed to get it on the table along with some random items like plates and little gold forks and gold and black napkins - added the birthday gifts and then, they walked in the front door!   :)



Print Friendly and PDF