Pages

2/24/23

Jalapeno and Cheese Stuffed Pork Loin Roast


(This is based on my pork chop version, which was posted in 2017 - which you can find here:  Jalapeno, Cheese and Bacon Smothered Grilled Pork Chops)

Here is the pork roast right after it came out of the oven, placed on the serving platter, before adding the vegetables for serving....

Basically you can use any amount of the cheese, jalapenos and bacon that you wish.  The same with the size pork loin or pork roast.  Depending on large of one you bought or how many people you are serving.

This pork roast looks fairly small in the photos but easily feeds 4 people.


Cheese, bacon & Jalapeno Pork Roast

Pork Loin or Roast (your choice cut and how large)
cream cheese - I used about 1/2 block or 4 oz. for this small pork roast, which was plenty
cheddar cheese (I used sharp cheddar this time but mild, medium or sharp will work fine)
diced jalapeno peppers - either fresh or bottled - your choice
cooked, crumbled bacon (fresh cooked and crumbled or bagged - your choice)
Optional:  cilantro, garlic or onion powder or even green onions

Form a pocket in the meat:

Lay the pork down on its side and use a knife to slice into the center, making a slice horizontally, but leaving about 1/2 - 3/4 inch on each side and the back/bottom.  Now turn the knife and make a vertical slice up and down, again leaving a bit on the top and bottom so you don't slice all the way through.  I added a couple more slices at angles in order to fill with more cheese filling.

Filling:

The amounts of the cheeses, bacon and jalapeno are up to you and your tastes.  If you don't like spicy foods or have children eating that are not used to spice, cut back on the jalapenos or just use a small can of diced green chili peppers (they are mild). 

We used about 4 ounces cream cheese, 1/3 cup cheddar, 1/4 cup sliced jalapenos, 1 T cooked, crumbled bacon (I just grabbed some of the Hormel real bacon bits I keep in the freezer at all times).  Mash this together and set aside.

Preheat your oven to 325.

Dry Rub: 

You could use any dry rub you like.  For this one I threw together a simple mixture using:
2 T salt
1 T ground coriander
2 T smoked paprika
3 T natural sweetener (most people would use sugar here - we are sugar free)
1/2 T espresso powder
1/2 t rosemary

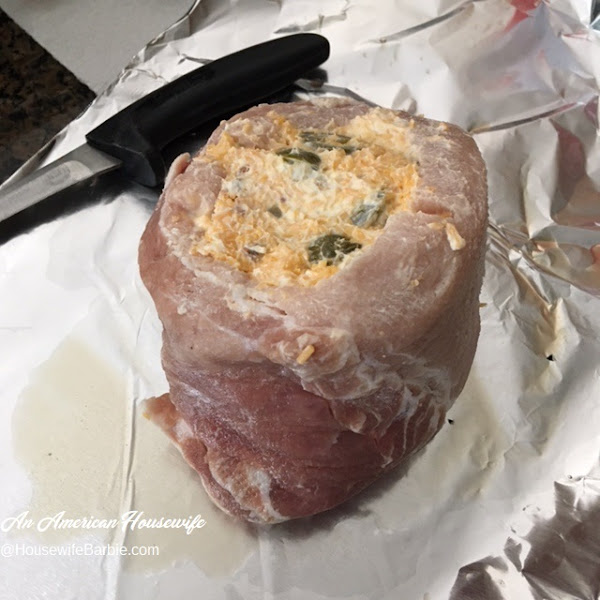
Stand the pork upright and stuff the cheese mixture in.  Press it in well so it stays. 
Cover the pork roast in your dry rub spice mixture.  Roll and press gently to cover.

Heat a cast iron skillet on the stove with a bit of oil in it.  Now sear the pork roast on all sides except the cheese stuffed side.  Transfer the cast iron skillet (or any oven safe pan) to the oven and proceed to roast until done.  For the roast in my photos it was about an hour. 

(Note:  I also baked it propped 'up' so the cheese filling was on top during cooking.  This isn't necessary but I wanted to keep it all in during cooking and not have it melt/run out.  It naturally falls out when you lay it on the serving platter anyway but this way I kept it all in until serving time.)

PHOTOS BELOW


A simple mixture of cheeses and a bit of real bacon crumbles

   The pocket formed in the pork by slicing with a knife, but not all the way through.
Stuffed and ready for its dry rub marinade

 
All dressed up...
 
Searing in a hot pan
Transferring to the oven to finish cooking for about an hour
Hot from the oven, placed on a serving platter


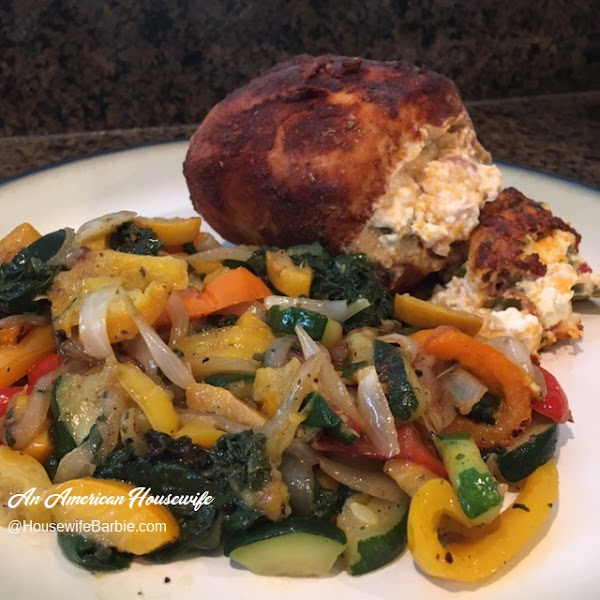
Grabbed random veggies to throw together to serve with it; spinach, peppers, onions and zucchini squash with some oil, salt and pepper 
So simple yet so good


Print Friendly and PDF

2/5/23

From My Instagram: Homemade Blueberry Granola (Can be made keto, sugarfree and low carb)


This weekend I posted on my Instagram that the homemade granola was replenished.  That might be why some of my readers are here, because they saw that one.  However, homemade granola is something I've posted a number of times in the past already - my favorites are blueberry granola and vanilla almond granola. 

Here is an image of one of the previous times I've posted this one...... for those of you who missed it or are new here.


There are SO MANY WAYS TO PLAY WITH THIS RECIPE!  I've noted some of mine below the recipe.


Blueberry Granola Cereal

1/3 c sweetener blend (Erythritol, Allulose, Bocha, - whatever you like)
1/2 c sliced almonds, crumbled a little bit
1/2 c pecans, chopped
1/4 c almond flour
1/4 c Angel Food Flavor whey protein powder or Vanilla Isopure Protein Powder
1/4 c egg white protein powder (I use Jay Robb)
1/4 c real butter
1 t blueberry emulsion (I use LorAnn)
1/2 t cinnamon powder

Preheat your oven to 300 degrees. 
Stir the dry ingredients plus the emulsion together in a large bowl.  Cut in the butter in pieces until it starts to resemble crumbs.

Spread on a cookie sheet lined with parchment or foil.  Bake 12 minutes or so, stir, flip a little bit to get the edges to the center and the inside to the outside.  Continue baking another 5-10 minutes until it's starting to turn golden.

Remove from the oven but leave it on the baking sheet.  Stir it just a little bit, then leave it to cool completely. 
It crisps up as it cools.  When completely cooled and crisp, then you can package in an airtight jar or container. 


NOTE:  Play with your recipe to use what you have and what you like.  

  • The sweetener mixture (Having at least 1/3 of your mixture be erythritol is best for it to crisp nicely).  
  • The whey protein powders and egg white powders.  I'm stingy with my egg white protein powder because it's so expensive - almost always use a mixture of whey and egg white unless it's for something 'meringue' like.  
  • I also only use Devotion and Isopure brand whey protein powders because they have zero sugar and zero carbs - many whey protein powders have carbs and sugar grams.  CHECK YOURS for accurate counts.
  • I've added a couple tablespoons of Flaxseed meal to the last two batches I made.
  • Added chopped walnuts to some of the batches - which I love.


Print Friendly and PDF

2/3/23

Sheet Pan Style Crunch Wrap Supreme


If you are a regular reader of An American Housewife, I've posted about them in the past.... Homemade Crunch Wrap Supreme

This week I made our regular Crunch Wrap meal into a 'sheet pan style' crunch wrap instead of individuals. 

NOTE:  the next time I make these sheet pan style, I will bake them without the sour cream inside, and just top the individual servings with lettuce, tomatoes, onions and sour cream, as well as extra taco sauce or salsa.  Since I wasn't going to the grocery store until the next day, I baked the sour cream inside as we were out of lettuce and tomatoes anyway!


Sheet Pan Crunch Wrap Supreme

1 1/2 lb. ground beef made into taco meat of your choice
1 pkg corn tostada shells, taco shells or even Doritos (use what you have)
1 pkg. flour tortilla shells 
1 can nacho cheese sauce or a couple handfuls of shredded cheddar cheese
butter
lettuce
sour cream
tomatoes
taco sauce
2 pans of similar size so one can lay on top of or inside the other

Lay a flour tortillas down inside a greased baking pan.  I used a sheet pan but any pan could work, just adjust your number of flour tortillas and  corn tortillas to fit.  Spread the meat over all.  Spoon and spread nacho cheese sauce on the meat (or used grated cheddar)  and top with a crunchy tostada shell, taco shells, etc.  Add some taco sauce over all.

Lay 2 or 3 more flour tortillas down the center of your pan, start to fold the wrap up over the tostadas or shells.   Cover the shells or tostadas completely with the flour tortillas, folding in the edges.  Spread butter all over the flour tortillas and use a second pan of similar size laid down on top of it all to hold the flour tortillas in place and help to get them golden brown and crisp.

Bake at 425 degrees until golden brown when checked (I think mine was around 20 minutes - I didn't time it.)  I just kept an eye on the edge of flour tortilla showing and then picked the top pan up to check how golden brown they were.  They are done when heated through, and golden brown and crispy.


I used a mixture of ground pork and ground beef since we always have both on hand (I grind our meat myself).  This makes my more expensive beef go further when I also mix pork with it. 


Make your filling with whatever you like for your taco meat fillings.  (Store bought seasoning mix, homemade, etc.)


Line a greased pan with flour tortillas.


Spreading the meat mixture


Cover all the flour tortillas with the taco or chalupa meat


Add a layer of cheese - shredded or even canned cheese spreads


Normally I'd leave the sour cream off and serve it as a topping with lettuce and tomatoes and onions.  As I noted above, I was out of lettuce and tomatoes and wouldn't be going to the store until the next day, so I just opted to bake the sour cream on it so I could clean up the kitchen while they baked, and serve without any toppings, fuss or mess.

Drizzled taco sauce (or your favorite salsa) over as well.


Add your crunchy layer.  My usual is tostadas but I only had taco shells on hand this time.


Add a couple flour tortillas to the center to cover, and fold the edges in so it's all covered up tight.  Spread butter over all.


Set a second baking pan or sheet on it to hold the tortillas down, in place and help them cook to a golden brown and crispy layer.


Its 'done' when heated through and everything is a rich golden brown.  


Print Friendly and PDF