Showing posts with label Chocolate. Show all posts

6/7/25

Keto Brownies (Note to self: THIS ONE!!!!!!)

Last night, spur of the moment, decided to make brownies before bed.

I don't like chocolate and rarely crave sweets but I've been starting back on keto after a long, long time off  due to... things; and after a couple days, I was mentally craving foods I knew I didn't even really like. However, I know when I am re-starting keto or sugar free, low carb, I always start to crave crazy things around days 3 and 7 just because I want something sweet.  (25 years of eating mostly low carb/sugar free you start to know yourself!)

Chose a cast iron skillet this time for no particular reason.  When I was going to add the sweeteners, I grabbed my current mixture of allulose, monk fruit and stevia but saw a bag of Splenda Magic Blend I forgot I even had.  Used half that and half the allulose blend (that I'm trying to use up as it's used in so few recipes as it's a 'softer' finish so it's best in things like homemade ice cream... not baked goods that you like with a crisp edge).

I ended up eating it warm, straight from the oven, with a spoon.
Then I went to bed.
  
Brownies

3/4 c almond flour
1/2 c natural sweeteners (used Splenda Magic Blend, and Allulose, Monk Fruit and Stevia)
1/4 c cocoa powder
1 t baking powder
1/4 t salt
3 oz cream cheese
1/4 stick melted butter
2 eggs
1 t vanilla
1/2 c sugar free chocolate chips (used Lily's this time)

Oven to 325.  Buttered pan.  Combine the dry, add the wet.  Mix.  Pour into pan and smooth the top.  Bake 30-35 minutes.  Let cool completely.


A really ugly photo of the brownies literally right out of the oven.  It was night time, and my kitchen lights always make things look ugly even in the day (with a yellow cast) but at night, even uglier.  They are actually a deep, deep dark chocolate color and were oh-so good!!!! A quick photo of one I ate at lunch today.
   And to make it easy to 'grab one' I sometimes do this with brownies or cheesecake... make them into little "brownie bites" or "cheesecake bites" so I can grab just one and not have to rely on myself for portion control.
Print Friendly and PDF

5/19/25

Low Carb Keto No Bake Cookies (and a few other versions of vintage No Bake Cookies including those cooked in a saucepan)


I rarely post anymore and I've removed almost everything from my site except the bare minimum but once in a great while I still pop in to add a recipe as it makes it easy for me to find them myself.  And, at least for now I'm still keeping my site open to the public, so you get to enjoy all the collected recipes as well.  (I may start up again in the future and build the site back but life kicked me in the teeth (again) in 2024 and this site fell down on the priority list.)

The no-bake cookies my family (my Mother) has been making since the late 1970's and our family continues to make to this day are not the kind most people know as no-bake cookies as typically they make the ones you boil in a saucepan for 3 minutes.  I have that recipe, yes I make it sometimes, but the family favorite of our family is truly NO BAKE.

We make these without fail every single Christmas and various times through the year.  They have oatmeal, butter, cocoa powder, sugar, vanilla and powdered sugar, etc....  which a couple of which, are things we do not eat when we are eating low-carb and sugar free.  

Replacing the oats with flaked unsweetened coconut works well and I found a recipe that used a mixture of coconut, pecans and peanut butter; I found it to be pretty good - a 'keeper' anyway although it's not the keto low carb version I make when I do a copycat of my mother's version.  For now I'm keeping that one tucked away.


This version of a low carb, sugar free
No Bake Cookie

1 1/2 c crunchy peanut butter
1 1/2 c unsweetened coconut flakes
4 T butter
1/2 c powdered sweetener such as allulose/monk fruit
2 heaping T cocoa powder
1 heaping t good quality vanilla paste or extract
1/2 c chopped pecans

Mix all together in a large mixing bowl with a paddle attachment or by hand.  Scoop mounds with a 1 1/2" cookie scoop or use a large spoon and form into mounds on parchment or wax paper.  Smash each mound with the palm of your hand just a little bit to form a nice flat circle, but still quite thick.

Let stand until they harden a bit and form a bit of a crust (depending on the humidity and temperature of your house this can be in an hour or could be 4-5 hours.  You can also just leave them out overnight.)


 ___________________________________________


In May of 2012 I posted this version, which uses oats and are not low carb, but are sugar free. 

No Bake Cookies

1/2 c butter
1/2 c unsweetened almond milk (or regular milk, but milk does have sugar in it)
2 c sweetener substitute
4 T cocoa powder
3 c oatmeal
1 c natural, no sugar added peanut butter
1 t vanilla
*optional:  you can add unsweetened, shredded coconut or chopped nuts if you wish

In a saucepan, bring the sugar substitutes, cocoa, butter and milk to a boil.  Whisk quickly until smooth.  Remove from heat.  Add the oatmeal, peanut butter and vanilla.  Stir to blend.  Drop by tablespoons on parchment or foil and let set until hardened a bit so they don't fall apart!  After about 2 minutes or so you can shape them a little if you wish (I flattened mine a bit) or leave them in haystacks.  Let harden and cool completely.  


In February, 2016 I posted this version - which I think almost every housewife in America was making back in the 1970's and is still popular today.  This is the kind that is cooked in a sauce pan and then spooned out into mounds.  (In 2016 I started to make this version using natural sweeteners like erythritol, monkfruit, etc.  and used almond milk in place of dairy milk).

No Bake Cookies

1 c granulated sugar
4 T butter
1/2 c milk
1/3 c cocoa
1-2 t vanilla
3 c oats - quick or regular

Combine sugar, butter, milk and cocoa in a saucepan and bring to boil over medium heat. Boil 3 minutes, stirring frequently. Remove from heat. Stir in oatmeal and vanilla.  Drop portions onto foil or parchment paper. Let stand until firm.


Low-carb and sugar free - no oats in this one. The unsweetened natural coconut flakes take the place of the oats.


Print Friendly and PDF

12/2/24

It's that time... the 2024 Christmas Cookie List


Briefly popping in to the mostly-neglected recipe blog to update my 2024 Christmas Cookie List.
I really should say 'idea' list though as I brainstormed a list a couple weeks ago, but more than likely will change and adapt it as I go along.  There are currently 17 recipes on the list but I usually end up making between 22-26 so I know I'll have more when I make up the trays and boxes.  


2024 Current Christmas Cookie Idea List

  1. Russian Tea Cakes (or sometimes called Mexican Wedding Cakes)
  2. Angel Bars
  3. Cream Wafers
  4. English Toffee (maybe)
  5. Harris Fruitcake
  6. Gateau Bonbons
  7. Pretzel Bites with Rolos, Kisses and M&M's
  8. Peppermint Meltaways
  9. No Bake Cookies
  10. Peanut Blossoms
  11. Peanut Butter Fudge
  12. Salted Nut Chews
  13. Sugar Cookies - Trees for sure, maybe Mittens and Hats too.
  14. A second style Tree shaped sugar cookie
  15. Molasses Cookies
  16. Macarons
  17. Chocolate Chip Cookies with Red and Green M&M's


Reposting an older blog post page because I already have links included on that year's list and I don't feel like taking all the time/work to link anything right now.  PAGE:  https://www.housewifebarbie.com/p/blog-page_2.html


Almond Macrons
  Mexican Wedding Cakes (or Russian Tea Cakes)
  Fruitcake Bars (no bake)
  Molasses Ginger Cookies
  Homemade Chocolate Truffles
  Cream Horns (easy with Puff Pastry!)
  Cut out Sugar Cookies with an easy Glaze
  Peppermint Meltaway Cookies with Crushed Candy Canes
  Homemade Girl Scout Style Thin Mints
  M&M Kiss Pretzels
  Cream Wafers
  Peppermint Pretzels
  Candy Striped Cookie Sticks
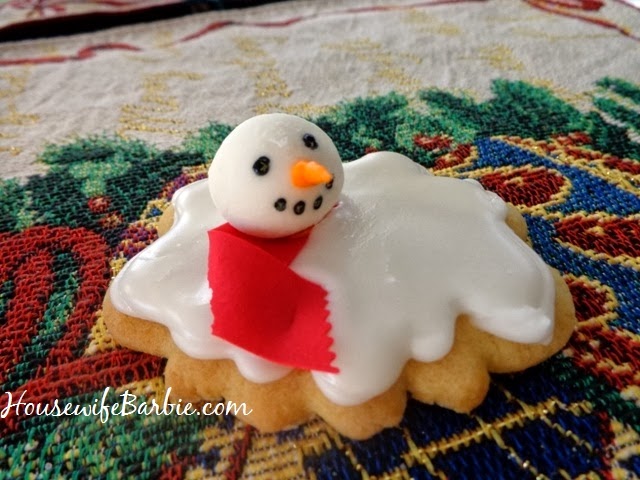
  Melted Snowman Cookies
  Stenciled Icing Sugar Cookies
  Peanut Blossoms
  Peanut Butter Fudge
  Sugar Cookies:  Snowflakes with Edible Glitter
  Red Velvet Cake Balls
  Gateau Bon Bons
  Swedish Rosettes
  Peppermint Teacakes
  Salted Nut Chews
Sugar Free, Low Carb Cinnamon Spice Cookies
Sugar Free Mexican Wedding Cakes
Mini Peanut Blossom Muffin Tin Cookies
Mittens and Winter Hat Sugar Cookies


Print Friendly and PDF

10/28/24

Knafeh Bars (the viral Dubai Bars with Pistachio Cream Centers)


So apparently there was a 'viral' recipe on social media this Fall.  I had no idea.  My personality is such that I don't pay attention to what people are doing - I rarely use social media and frankly, I'm too dang busy in my own life to bother.  I actually stumbled upon this fad honestly - and accidentally.

Two things.  First, I've been wanting to find a cheap 'candy bar' style silicone mold to have on hand.  Have wanted this for about 2 years.  Didn't want one bad enough to buy one, but I'm part of a product review group and after a year of waiting, searching, keeping my eye out and looking, I stumbled upon one!  Ordered it post haste.

Within a couple weeks I stumbled upon shredded phyllo dough.  Yes please!  I LOVE phyllo dough and had never heard of nor seen shredded.  But I had it, so I had to find something to do with it.  That is when I put those words into a search engine and realized there was something called a Knafeh Bar - or a Dubai Bar.  It used shredded phyllo AND it used a silicone candy bar mold.  BINGO.

I also happened to have pistachio's on hand (always) and cream and other ingredients (always).  It was meant to be.


 My pistachios were roasted and salted. I simply ran them under water to get rid of some of the salt.  Next time I probably won't bother - I'll just not put any salt in the rest of the filling to make up for it.

I thought this was pretty cool...  My stick of butter said it was 113 grams on the wrapper.  I wondered if it would really be exactly that?  I weighed it. 

IT WAS.  Exactly 113 grams in one stick of butter.  I didn't actually need exactly one stick, I'm just a geek and wanted to weigh it.
 
The shredded phyllo (fillo) has to be cooked with butter to make it brown and crisp.
 
This is the mixing of the pistachio cream with the crispy phyllo.
 Getting ready to mix the candy bar filling - the phyllo, pistachio cream, vanilla, peanut butter, extra chopped pistachios...
 The candy bar mold was already lined/filled with a thin chocolate layer.  This is the molds being filled.
 By this point I was over it... I sent this message to my family.
 But in the end... they turned out quite well!  Here I am un molding them... they were dusted with edible gold dusting powder and drizzled with a tiny bit of green as well.
 Taste test..
 Bagged up and ready for my family to enjoy.

Knafeh Bars

In a candy bar silicone mold, dust a little bit of edible gold luster dust and green if you have it or use white chocolate colored green and drizzle that.  Or just use luster dust and forget the green - not sure why people insist there should be green.  Gold is just fine and looks pretty.

Brush or pour/spread melted chocolate of choice.  I used what I had on hand and mixed a bunch different bits.
Chocolate almond bark, sugar free chocolate chips, milk chocolate chips and some chocolate bars from Turkey.

Pistachio Cream

2/3 c pistachios
1/3 c sugar
1/2 c chopped up white chocolate or white chocolate melts
1/3 c butter
1/2 c cream or half and half
vanilla
almond extract
salt

Put into a blender and blend smooth.    Chill until needed if you've made it ahead of time.

Crisp the Shredded Phyllo

In a pan on the stove, heat some butter.
Add the shredded phyllo (kataifi)
Cook and stir until it's golden brown and crispy.  Set aside.

Filling

1 c shredded phyllo (kataifi)
1/2 cup of the pistachio cream you made
1 T peanut butter
2 T extra chopped pistachios

Fill the chocolate lined bar molds with the filling, be sure to flatten and smooth the filling and leave enough room to top with more melted chocolate.  When the bars are topped and you can't see any filling - it's totally encased in the chocolate in the molds, place them in the refrigerator to harden.

When the molds are cold and the chocolate hard, pop them out of the molds.


Print Friendly and PDF

4/21/24

Chewy and Fudgy Brownies


Beat 2 eggs slightly with a spoon in a bowl (these work great with powdered eggs!)
Stir in 1 c sugar
1/2 t salt
2 t vanilla

Then add in:
1/3 c melted shortening
2 squares melted unsweetened chocolate (if they are thin rectangles, use 4 to make 1 square)

Stir in 3/4 c all purpose flour
Add some nuts if you wish

Spread in a buttered pan - size of your choice.  Small pan = thicker bars, larger pan, thinner bar. 
Bake to the size of the pan - and your choice.  We like them fudgy and thin so I baked this pan about 22 minutes, took it out, a little under done and let it set on the counter for 30 minutes.  The result is slightly underdone, fudgy, amazing brownies.

You can bake them up to 35 minutes if you prefer them more done, dry, crisp around the sides, etc.


Print Friendly and PDF

12/20/23

Keebler Bars - Angel Bars - Kit Kat Bars (everyone knows them by different names)


I've posted what we call "Angel Bars" and have made regularly since about 1999 or 2000 - but what I'm not sure I've mentioned is that it's not the recipe I originally made.  I made these the first time using butterscotch chips in them as well, and I didn't care for the 'fake' flavor of butterscotch chips (but I'm picky like that), so I ended up tweaking the recipe until it was the one we have loved and used for about 15 years now.  However, I realize many people may like the original version that includes the butterscotch chips.  So this morning, here is the original version of our 'Angel Bars' that some people think tastes similar to a Kit Kat.  I don't.  But these are a FAVORITE bar in our family.

Update to add:  for 2018 I made a huge double batch of these only to have my husband eat two ROWS of bars the first night!  It's a good thing I start to do my holiday baking 'early' because this allows me to make a 3rd batch for the cookie trays before Christmas giving.


Angel Bars - also known as Keebler Bars (or some call Homemade Kit Kat Bars)

80 club crackers
1 cup butter
2 cups graham cracker crumbs
1 cup firmly packed dark brown sugar
1/2 cup milk
1/3 cup sugar
2/3 cup creamy peanut butter
1/2 cup semi-sweet chocolate morsels
1/2 cup butterscotch morsels


Line an ungreased 9X13-inch baking pan with foil, leaving an extension of foil on either end. Line the foil with 1 layer of club crackers, breaking to fit if necessary.

In a large saucepan, melt butter over medium heat. Add graham cracker crumbs, brown sugar, milk and sugar. Bring to a boil and simmer for 5 minutes, stirring constantly.  Remove from heat and spread half of butter mixture evenly over crackers. Place another single layer of crackers evenly over butter mixture, cutting to fit if necessary. Spread remaining butter mixture evenly over crackers. Top evenly with remaining crackers.

In a small microwavable dish or in a saucepan, combine peanut butter, chocolate morsels, and butterscotch morsels. Melt in the microwave or over medium-low heat, stirring constantly. Spread evenly over top of crackers. Cover, and chill for at least 1 hour. Lift foil overhang and remove bars from pan. Cut into bars. Store in the refrigerator.


Print Friendly and PDF

Hundreds of Christmas Cookie Recipes - lists and photos and links... oh my!

Older post, re-posting for 2022!


For the past 12 years or so I think the average number of different recipes I make is somewhere around 24-26.  


I've been doing this for SO LONG that I don't really care to re-invent the lists and posts yet AGAIN. Seriously... I think this particular version of my site goes back to 2006.  Instead... I'll just cut and paste of the many lists I've made at some point in the past, as well a few random photos of goodies and links - no particular order or reason.

IF YOU WANT TO SEE MORE JUST USE THE SEARCH FUNCTION ON THE PAGE OR CLICK ON THE CHRISTMAS OR COOKIE OR CAKE OR DESSERT LABELS.

December 1st:  Molasses Cookies
December 2nd:  Chocolate Caramel Thumbprints
December 3rd:  Peppermint Pinwheels
December 4th:  Candy Striped Cookie Sticks
December 5th:  Peppermint Teacakes
December 6th:  Peanut Butter Patties
December 7th:  Peanut Butter Fudge
December 8th:  Sugar Cookies:  Snowflakes with Edible Glitter
December 9th:  Swedish Rosettes
December 10th:  Cream Wafer Cookies
December 11th:  Cherry Poppy Seed Winks
December 12th:  Peppermint Pretzels
December 13th:  Candy Pretzels
December 14th:  Homemade Truffles
December 15th:  Cream Horns
December 16th:  The Best Brownies
December 17th:  Red Velvet Cake Balls
December 18th:  Glazed Sugar Cookies
December 19th:  Gateau Bon Bons
December 20th:  No Bake Chocolate Bars
December 21st:  Peppermint Meltaways
December 22nd:  Melted Snowman Cookies
December 23rd: No Bake Fruitcake Bars
December 24th:  Mini Peanut Blossom Muffin Cookies


 RANDOM LINKS FROM OVER THE YEARS......... 2006 - 2020


Peppermint Melt-aways


 Christmas Cake Balls

Cream Horns


Print Friendly and PDF

Baking Spirits Bright for 2022 - Christmas Cookies and Candies


Cookie Ideas and recipe links:   Baking Spirits Bright in 2022 


Print Friendly and PDF

Christmas Goodies for 2022 - PLUS my almond chocolate truffle recipe


ALMOND TRUFFLES - so, my almond truffles have a creamy almond flavored center (no hard nut) and are a staple around our house for years and years.  It's funny that each time I post about them on my site I mention I should take some new photos, as I just usually use the ones I already have - like I did on the post about the truffles from 2018. (Truffle post link here)

But this year I DID take new photos!  OK - so I quickly snapped a couple on my cell phone.. and they suck but this site isn't about pretty photos - it's about the food.  :)

Creamy Almond Truffles


Almond Truffles

1/2 c evaporated milk
1/4 c sugar
2 cups milk chocolate chips
1/2 t almond extract
1 c finely chopped toasted almonds
OR 1 cup melted chocolate almond bark for dipping (or extra chocolate chips)
and melted white almond bark for drizzling

Combine evaporated milk and sugar in small saucepan. Cook over medium heat until mixture comes to a full boil. Boil 3 minutes, stirring constantly. Remove from heat. Stir in chips and almond extract, stirring gently until smooth. Chill mixture about 45 minutes until it can easily be shaped into balls. Roll into the crushed nuts or dip in melted chocolate. Drizzle or sprinkle with nuts if desired. Chill to harden quickly.

NOTES:  Normally I just do the typical truffle 'ball' shape. It's quick.  It's easy.  It's easy recognizable as a truffle.  But this year I mixed it up a little by making shapes.  Then, I realized I had some leftover royal icing in a decorator bag sitting right there on the counter from another cookie, so I grabbed it and topped them all with a dollop. 

They turned out really pretty and it's nice to do something different with them after all these years.  Same recipe - just played with the shapes. 


 You can see the truffles sitting behind this box of goodies...


Print Friendly and PDF

1/6/23

The Mirror Glaze Ocean Beach Cake with Edible White Chocolate Seashells


This cake didn't have a plan so much as a general idea of what I wanted. 

Last weekend we had a dozen people staying at our home from Friday through Tuesday in order to celebrate 'all the things'.  Christmas, New Year's and 2 birthdays.  I made a purse cake for the first birthday, which we celebrated Friday night.  Saturday was our Christmas.  Sunday was our New Year's and Monday was another birthday.  So it was CHAOS and LOUD and CRAZY and here I was... attempting to make a cake in the midst of the hullabaloo. 

And I had NO PLAN.
And I had NEVER attempted a mirror glaze before.

So there you go.


I had made the cake ahead of time and although it should have been frozen solid, I had no room in a freezer to do so (because of the 12 people staying at the house and all the food I had to have on hand for meals).  Instead, it was in a 'really cold refrigerator'. 

I did make the seashells ahead of time with white chocolate candies.  That's all I had planned or prepped.  A four layer cake and the shells.  Everything else I just decided to 'wing it' when the time came.


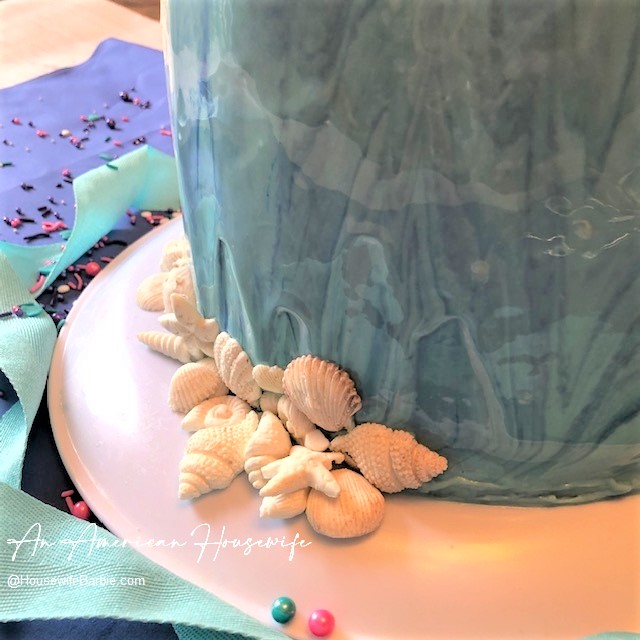
Here is a close up up the pretty shells.  I added those around the edge at the last minute to cover the base and to use them up as I had made a handful 'extra' because I didn't know what I would want when I used them.


I added a ribbon I found in the drawer that matched the colors - and then, needing something 'more' to add some texture and color, I sprinkled candy sprinkles around.  I finished LITERALLY just as the birthday girl and her family were walking in the front door!  Ha.


The Cake

The cake recipe has been posted far too many times to count since this website began around 2006.  It's my 'go to' and I love it.  However, it makes enough for about 4 layers depending on the pans you use; so half it if you only need 2 layers.

White Cake

2 boxes white cake mix
2 c flour
2 c white sugar
1 1/2 t salt
2 2/3 c water
1/4 c canola oil
2 t vanilla
2 t almond extract
16 oz. sour cream
8 large egg whites, room temperature

Place all dry ingredients in a large mixing bowl and beat just to blend. Add the water, oil, vanilla, almond extract, sour cream and egg whites and beat on medium speed for 2 minutes. Pour into 2-4 greased and floured pans (shape of your choice, 2  9X13 or 4 smaller round), filling each pan about half full. Bake at 325° F oven until cake tests done in the center. Cool and use as you wish.

__________________________________


The Mirror Glaze - I looked at and ran off recipes for about 5 (?) of them from the web.  They were almost similar - almost exactly similar actually.  I ended up choosing this one because it had the ingredients in grams and ounces instead of just the American 'cups' and such.  I was nervous about my first time making and using a mirror glaze so I wanted to be exact.

All recipe credit goes to ChefIso's website

I followed their directions and because I anticipated I would screw up something and wish I had more glaze, I made the 'large' sized recipe which is far more than I needed, but I didn't care - better safe than sorry.  I followed everything exact - even weighed out my ingredients on my scale for exact grams and ounces. 

Makes glaze for a dozen 10-inch cakes. You can halve or quarter the recipe for a smaller yield.

  • 700 grams white chocolate (24.5 ounces)
  • 300 grams water (10.5 ounces, 1 1/4 cups)
  • 600 grams sugar (21 ounces, 2 2/3 cups)
  • 400 grams condensed milk (14 ounces, 1 3/4 cups)
  • 1 tablespoon vanilla extract
  • 38 grams powdered gelatin
  • optional food dye for colored mirror glaze

(half portion below)

  • 350 grams white chocolate (12.25 ounces)
  • 150 grams water (5.25 ounces, ~1/2 cups)
  • 300 grams sugar (11.5 ounces, ~1 1/2 cups)
  • 200 grams condensed milk (7 ounces, ~2/3 cups)
  • 1 tablespoon vanilla extract
  • 19 grams powdered gelatin
  • optional food dye for colored mirror glaze

Bloom the gelatin in cold water and set it aside while you heat the liquids.
Heat the water, sugar, and condensed milk.
When the sugar is fully dissolved and the liquid is hot, turn off the heat and stir in the gelatin.
Pour this mixture over the chocolate.
Wait about 5 minutes for the chocolate to melt.
Using an immersion blender or a regular blender, blend this mixture until smooth.
Strain this through a sieve and allow to cool, gently stirring every so often to prevent a film from forming on top. Depending on the container you are using and your starting temperature, the cooling can take up to 2 hours, which an ice bath can accelerate.
Your target temperature is about 92°F (33°C). When the glaze is between 90°F and 94°F (32°C - 34°C), it is ready to be poured over the cake. At this point be very careful not to introduce bubbles since the glaze is very viscous and they will not pop on their own.
You must manually pop them or strain the mixture through a sieve. Pour the glacage over the frozen cake
You can pour starting at the sides in a circular motion working towards the center, or start from the center and work out to the sides.
Allow the glaze to chill on the cake for a few minutes.

LEARNING CURVE because I did not have a frozen solid cake:  I did my pour when it tested at 91 degrees and it was still too warm.  By the time I tried to 'fix' it and had mixed and poured a couple more attempts, it was cooler, which would have worked better for me as I wanted it to resemble water.  But the marble effect in the end was good enough.  IF (And that's a BIG IF) I ever work with a mirror glaze again, I'm going to make SURE my cake is frozen solid - which I couldn't do this time and then do a 'test' pour - and if needed, wait until it's just a tad, smidgen bit cooler.  Maybe 87 ish verses the 91 degrees.  

 __________________________________________


*Note - because I was decorating the top of mine and not doing the traditional mirror glaze left plain, I had to put my graham crumbs and little seashells on right away before it set up.

I colored three colors separate at first - a lighter blue, darker navy blue and a white.
I saw on other sites where they pour them separate and 'swish' them with a knife to form water.  Mine didn't turn very well for my first try, and even though it was 91 degrees, it poured too quickly for the look I wanted since my cake was not frozen solid;  so I poured a little more, then mixed the two blues together and poured again.  I added a few back-and-forth pours of white for the waves and then tried to swish... nope.  So I got out the hair dryer and tried to blow it to be wave-ish.  Nope.

In the end I used some leftover white frosting from the filling to form waves and by that time it was set up anyway and I couldn't work with it anymore!  Ha ha.  So it was what it was.


 I had a 6 year old helping me decorate and he had a blast putting down the 'sand' and some of the seashells.  This is my hand placing a few more shells.
 
 
I had a bunch of shells I had made (not really having a plan to start, I just made stuff....)
So I ended up placing shells around the cake at the base as well.  I loved this addition.


Print Friendly and PDF