Showing posts with label #WhatsForDinner. Show all posts

9/11/24

Pork and Lemon Ragu with Pasta


The photo above is when it had started to thicken upon standing a few minutes, but wasn't the finished product.  I could have taken a better 'finished' photo but honestly I was hungry, it smelled (and tasted) so good I started to eat it, and didn't really care about getting a better picture.  It's just for my personal blog - I don't make any money for posting recipes I make, and I have no income from the time I spend on this site, so... yeah.  LOL.

I would normally use a different pasta with this one, but for a number of crazy things going on in our life right now, I have cleared out the pantry except for mere basics and all I have to choose from currently is macaroni shapes and spaghetti shapes.  So, I chose spaghetti this time. 


Pork and Lemon Ragu with Pasta

Bacon, cooked and crumbled or use real bacon crumbles bought - about 1/3 cup
olive oil
1 lg onion, diced
4-6 cloves garlic, minced
1 1/2 t salt
1 t thyme
1 t fresh black pepper
1/2 - 3/4 c cream or half and half
1 1/2 - 2 c water
1 1/2 lb. boneless pork roast
1 t dried lemon peel
1/4 c lemon juice
12 oz. pasta of choice
Romano or Parmesan cheese

In an oven proof pan with a lid, cook the bacon bits in the oil until they start to crisp up, add the onion and cook til soft and turning golden.  Add the garlic and salt, pepper and thyme.  Add the cream and water and whisk/stir.  Add the pork roast, cutting it into half or even quarters.  Bring to a boil and then remove, put the lid on and place into a 350 degree oven.  Roast until tender (about 1 1/2 hours).

Add the lemon juice and zest.  Let it set as you cook the pasta.  When the pasta is almost done, use two large forks to pull apart the pork into shredded pieces.  Add the pasta to the sauce reserving just a bit of the pasta water in case you want to thin the sauce.  It should have a bit of liquid at this point as it will thicken as it stands.  Let it thicken about 10-15 minutes before serving.   You can stir in a bit of the pasta water to the leftovers before refrigerating, as it will absorb the liquid and become really thick by the next day. 


Stirring in the half and half or cream to the onion/bacon mixture
Adding the pork to cook
Shredding the pork
 
Add the pasta and cheese (I used quesa fresca as I didn't have Romano on hand)  It will be VERY LIQUID at this point as it hasn't thickened up at all yet.  It will in the next 10-15 minutes.


Print Friendly and PDF

5/9/24

Just another Mexican Casserole (or nacho dip) featuring ground beef, refried beans and sausage

The plan tonight was to use up some of the homemade sausage in the freezer, the last glass jar of homemade salsa, a half round of my favorite queso that I had food sealed and in the fridge as well as some cheddar from the deep freezer that tastes great, but cheddar does get 'crumbly' after frozen.  I added to that some refried beans, black olives and was able to empty the last of the homemade taco sauce. 

I originally got this recipe when I was 14 years old and was babysitting for a woman who made it and had me bake it for her 3 kids while I was babysitting.  I loved it so much I had her write down the recipe for my Mom.  She then made it regularly as we all loved it - and I continued making it for my own family once I grew up and married and had kids.

It's a casserole and/or a dip for tortilla chips.  You can also put it in a flour tortilla.  Since I'm trying to use UP groceries and not BUY ANY... I don't have tortilla chips so we are having it as a casserole - which is my favorite way to eat it anyway!


 Mexican Casserole or Dip

1 lb. ground beef browned with 1 small onion, chopped
1 can refried beans
1 c ground and browned sausage
4 c shredded cheddar cheese
1 small can green chilies, chopped
1 - 16 oz. container sour cream
1 jar salsa or taco sauce
*optional - black olives, green olives, sliced
*optional - 1 1/2 c guacamole or avocado dip


Spread the refried beans on the bottom of a sprayed casserole dish for a meal or if you are using this recipe as a dip, spread it thinly on the bottom of a larger pan of your choice - (pizza pan, 9X13, anything you wish!) Brown the ground beef and/or sausage with the onion. Place half into a greased casserole dish or if you are using for a dip, use all of it over the refried beans in the larger pan. Sprinkle with half the cheese. Add the chilies and/or jalapenos, the sour cream, the salsa/sauce and the rest of the cheese in layers. Top with olives if you love them!

Bake at 350 for 20 minutes for a thinner pan and bake 45 minutes if you have a thick casserole dish. When the cheese is melted and it's hot all the way through, remove and serve as a dip or let set for 5-8 minutes to 'set up' when serving as a casserole. It may be more runny when hot straight from the oven and it sets up (like lasagna does) when left to stand and cool a bit. We can never wait and don't care - we dig right in!


Here are photos of what I think might be the first (1st) time I posted the recipe on An American Housewife - these were from March of 2011. 
You can see what it looks like when it's not all mixed up and dished, ready to eat.


Print Friendly and PDF

4/6/24

Broccoli Cheese Soup


Back in high school I had wrote down a recipe for broccoli soup we had made in Home Economics class (now known as Family Consumer Science).  I've been making it ever since. 

Tonight's dinner version of it used pantry, shelf-stable milk and Velveeta from the pantry as well.  I was prepared to use freeze dried broccoli but was gifted fresh broccoli by a friend so I used that instead (yay!). 

I don't use a recipe as I've been making it so man years, but here is the 'recipe' off the top of my head - all amounts are approximate.  Adjust as you wish.  I usually end up doubling it.  When we had all the kids at home I would triple it.

Broccoli Cheese Soup

2 T flour
2 T butter
3 c milk
dash of tobasco sauce
pepper
1 t chicken base or chicken bouillon (optional)
2 oz Velveeta or cream cheese
1 1/2 c cooked broccoli

Melt butter in a pan on the stove and whisk in flour.  Add a dash of tobasco sauce and pepper to taste.  Add the milk all at once and whisk smooth.  Add the chicken base or bouillon, whisk. Remove from heat.  Add the cheese and broccoli.


Print Friendly and PDF

3/30/24

"Burnt Ends" style chuck roast sandwiches


 'Burnt Ends' at the store are really, really expensive.  Basically just the ends cut from smoked and grilled meats, but an easy 'cheat' version is made at home in your own oven or crockpot. 

The photo above was taken before I broke the meat apart. 

Here is what I did....
 
Fake Burnt Ends

1 chuck roast (or use freeze dried or canned meat, but you'll have to allow for a different cook time)
butter
spices of choice (I used salt, pepper and Kinder's Woodfired Garlic)

In a crockpot, slow cooker or even an oven or fire safe pan for the grill if that's how you are cooking, place a stick of butter.  I used a container of home canned butter.   Place your meat (mine was frozen solid at the time and from the deep freezer storage from August).   Sprinkle heavily with spices of choice.  A hickory or mesquite flavor in your spices will give it a faked smoked/grill flavor as well.

Cook on high 6-8 hours in the slow cooker if it was put in frozen, less (2-3 if it was thawed) and even less if it's reconstituted freeze dried meats or canned meats:   or until it's dark, caramelized, and falling apart tender.  The parts around the edges that are 'burnt' looking have the best and most flavor - make sure you get the sides scraped to get all the flavor you can, then you'll probably have to soak the pan to clean as it's caramelized.

That's it!  Serve as is, with homemade bread or homemade buns (assuming you are cooking from food storage.  If you aren't, then use store bought buns).


A quick photo of my 'daily bread' from the refrigerator bucket plopped into a pan to bake


Print Friendly and PDF

3/18/24

Food Storage: Mexican Casserole


Yesterday morning I was putting something in the freezer when I spied the extra 'fake' taco meat I had made a couple weeks ago.  I pulled it out of the freezer and placed it into the refrigerator to thaw for 'something' today.  And that is how this recipe came to be.

The idea was to use up some of this food storage imitation taco meat - which was already reconstituted for a previous post.  I saw next to it I had a food sealed package of corn tortillas leftover from last Fall (we don't normally eat them but we had a family get together so I had some random foods on hand left).  I grabbed those, a food sealed bag of frozen diced avocados, one fresh avocado a family member left here this week, one of my few remaining packages of frozen shredded cheese, and a can of enchilada sauce.  I had to go to the 2-3 year pantry to get a can of refried beans and a can of black olives.  I had some green chilies in the pantry so I grabbed those.

Lastly, the onions were freeze dried, and you all know how I hated the sour cream powder and did actually go to the store to buy a container of sour cream.  I used that in this recipe and finished it off with some homemade taco sauce (already posted).

Mexican Casserole

Reconstituted 'taco' meat
Refried beans
Green chilies
Cut up corn tortillas
Enchilada sauce
Sour Cream
Avocado
Cheese
Black Olives
Green onions
Taco Sauce

Layer the taco meat, beans, green chilies and corn tortillas.  Bake at 350 about 25 minutes.  Remove from oven and top with the rest of the ingredients.  Return to the oven for another 25 minutes.  Serve hot.  Goes well with flour tortillas and corn.

 NOTES:  I'm still using up the can of Auguson Farms imitation Taco Meat as I rotate out the oldest cans in our food storage - which are from 2012 ish.  Use that if you have it or use freeze dried ground beef, freeze dried diced beef, fresh or frozen ground beef or diced chuck, whatever you have.  Use freeze dried or canned chicken if you wish.


I happened to have some corn tortillas on hand in the freezer - which I normally don't.  What I do have however, is the ingredients to make them from scratch if I needed to, and I have one of the 'bucket' meals some of the popular food storage companies sell as a "Mexican Food" bucket that has a package of corn meal in it to make them as well.


Random... frozen avocado.  I also have freeze dried avocado if I need to break into that at some point.


Still blessed to have some fresh shredded (frozen) cheese and haven't had to use any of the freeze dried so  far, although I am out of cheddar cheese so if I want that I have to go dig through food storage to find a can of it.


Topped with my homemade taco sauce (recipe on the site a lot of times already) - and used freeze dried green onions.  Love black olives - and I have some in the 2-3 year storage.  Leave those off (obviously) if you don't like them.


 I don't have a finished picture of it.  I sent some with Mr. Husband for his dinner at work tonight and I had a LOT of it for my lunch today.  The rest is in the refrigerator and I don't  want to get up and go to the kitchen to take a picture of it.  So you get this... prior to baking.


Print Friendly and PDF

3/16/24

Food Storage: Beef Stew (made in the Instant Pot this time)


SLOW:  I've posted this recipe many, many times over the years.  It's my favorite beef stew and I typically make it in the crock pot and let it cook 5-6 hours.  It's a no-work recipe that tastes incredible.  However, I've never tried to make it in a 'rush' before.  I've never had to.  Yesterday... I did.  And it turned out great!

FAST:  Yesterday, time got away from us and suddenly I realized my husband had to leave for work in about 25 minutes and we needed to find him a dinner to take, as we had no leftovers to throw together this time. I looked at a package of ground beef I had taken out of the freezer that was lying on the counter, and suddenly decided to see if I could throw this beef stew together SUPER FAST by using the instant pot pressure cooker, but also because since we are using food storage, most of our foods are pre-cooked in various ways already, which would cut down time.

FOODS:  The package of ground beef was one I ground from chuck roast last Fall and food sealed for the deep freeze.  However, I could just as easily used freeze-dried ground beef, canned beef, leftover steak or hamburger, diced beef (either fresh or freeze dried), etc.  I had home canned potatoes and home canned carrots on hand (again, could use freeze-dried, dehydrated, canned, etc.).  I had sliced mushrooms in the freezer, and a package of dehydrated corn I had dehydrated myself as a 'trial' last summer when I bunch leftover from a family vacation. 

I've NEVER tried to make this 'super fast' before using a pressure cooker. But it turned out perfect and so good that I ended up going back for 3rds and we plan to have it today as well. 


Beef Stew

3 c cubed, peeled potatoes  (I used home canned)
4 medium carrots, sliced  (I used home canned)
1 medium onion, cubed  (Use dried minced or freeze dried, but I had one fresh on hand)
2 lb. steak or other beef, cubed or cut to about 1" pieces  (I used frozen ground beef, thawed in the microwave)
2 T oil  (had avocado oil on hand)
3 T flour
2 beef bouillon cubes  (used 1 1/2 tablespoons beef base)
2 c boiling water  (used cold from tap)
1/4 c white vinegar
1/4 c ketchup
1 T prepared horseradish (Horseradish Cream - the kind for sandwiches, looks like mayo)
1 T prepared mustard
1 T sugar
1 c peas  (didn't have, left out)
1 c corn  (used dehydrated - added dry)
1 c fresh sliced mushrooms  (used frozen, bought, sliced and froze last summer/fall)
I added a handful of sliced cabbage as well

Place the potatoes, carrots and onions in a slow cooker.  In a large skillet, brown the beef in oil.  Lay on the vegetables in the slow cooker.  Sprinkle with flour.  In a bowl, dissolve the bouillon cubes in the water and stir in the vinegar, ketchup, horseradish, mustard and sugar.  Pour over meat in the slow cooker.  Cover and cook on high about 5 hours.  Add the peas and corn and mushrooms.  Cook an additional 45 minutes.  Makes about 5-6 servings. 

Yesterdays Instant Pot Fast Version: 
Heated instant pot to saute with oil.  Added partially thawed ground beef, broke up and browned in pot.  Added onions and flour, blended.  Added the potatoes, corn and carrots along with the water, bouillon base, vinegar and ketchup.  Added the horseradish, mustard and sugar, stirred gently.  Topped with the mushrooms.  Put the top on, sealed it and put the timer on to pressure cook on high 20 minutes.

_________________________________________________

The instant pot 20 minute version worked PERFECTLY.  


Print Friendly and PDF

3/10/24

Food Storage: Shrimp and Pasta Alfredo


The other night with dinner I served the last bag of mixed vegetables from the freezer - and we had leftovers, which I mentally added to this recipe as I was planning it. 


Into a pan of water on the stove, cook whatever amount of pasta you want.

Into a pan on the stove:

Oil/butter and shrimp with about a tablespoon fresh minced garlic or a teaspoon of powdered garlic.
Cook about 3 minutes until they are all turning pink.
Add the leftover (or pre-cooked) veggies of choice.  Broccoli is especially good in this one.
Add the Alfredo Sauce.
I added a bit of dried parsley too.
When warmed through, turn off heat.

Pour drained pasta into a serving dish.  Top with the Alfredo Sauce mixture.  Salt and Pepper to your own taste.  If desired, top with a bit of smoked Gouda, or some crumbled bacon.


Print Friendly and PDF

3/5/24

Jalapeno and Cheese Smothered Pork Chops


One of our regular favorite recipes (posted a few times already) is the pork chops, marinated in salsa, grilled and topped with a mixture of cheese(s), crumbled bacon and jalapeno.  So, so good... and this was a quicker, easier, oven version similar to that.

Pork Chops
Cheese of choice (I used queso fresco)
Jalapeno slices
Bacon 
Spices - salt and pepper and a chipotle mixture (use what you wish)

Laid a strip of bacon down, topped with a pork chop, layer of cheese, a sprinkle of your spices, top with jalapeno slices and lay a slice of bacon across it all.  Bake at 375 or 400 until it's crispy and golden brown.  Flip them over carefully as the bacon strip on the bottom for moisture and non-stick needs to be crisped up.  Hit the 'broil' and let them cook a few minutes until crisp.  Remove them from the oven, flip back over and serve.


Print Friendly and PDF

3/4/24

Daily Bread Dough made into Pizza


Yesterday afternoon I took my 'plan' for dinner and tossed it out, and decided to make pizza.  Much easier and faster since I have my 'daily bread' dough in the bucket in the refrigerator every day.

Using the bucket dough (already posted about so many times regular readers are tired of it, I'm sure) I floured my hands, grabbed about a third of the dough and plopped it onto some parchment paper I had sprinkled with a bit of corn meal.

I used my fingers and hands to press it out to a round.  

Precook:  Preheat the oven to about 425 or 450 with a pizza stone in it, and then slid the parchment onto the stone to precook the pizza round for about 7-8 minutes.  Remove and let set (or you could freeze them at this point if you wished to save them for a later meal).   I did two pizza crusts this way and let them hang out on the counter, and turned off the oven until I was ready to come back and make them for dinner.

I made both into simple pepperoni pizza using homemade sauce from pantry tomato products and spice, pepperoni I have in the freezer (will switch to vegetarian pepperoni bites from long term storage when I need to), shredded mozzarella I still have a couple food sealed bags in the deep freezer but will use #10 canned freeze dried mozzarella reconstituted when I need to, and some parmesan - the green can version you can buy at the store, which I have a couple of in the 2-3 year food storage pantry.

Delicious and easy.  Thank you God for our daily bread.... or err, um, pizza dough!   


Print Friendly and PDF

2/15/24

Burgers!


Regular readers know I grind my own beef.  So, last spring and summer, roasts were bought (Costco and Sam's).  I then grind them myself into ground beef and package them in food sealed bags, weighed, and write with a Sharpie on the package how much is in it, for future meals.

I also came up with this cheeseburger/hamburger spice mix about 20 years ago and we've used it ever since.  When it runs out we just fill up the container again.  The container is an old spice bottle with the 'recipe' wrote on a piece of paper and clear packing tape around it. 


The food sealed bags of ground beef look like this, straight out of the freezer. 


Print Friendly and PDF

2/24/23

Jalapeno and Cheese Stuffed Pork Loin Roast


(This is based on my pork chop version, which was posted in 2017 - which you can find here:  Jalapeno, Cheese and Bacon Smothered Grilled Pork Chops)

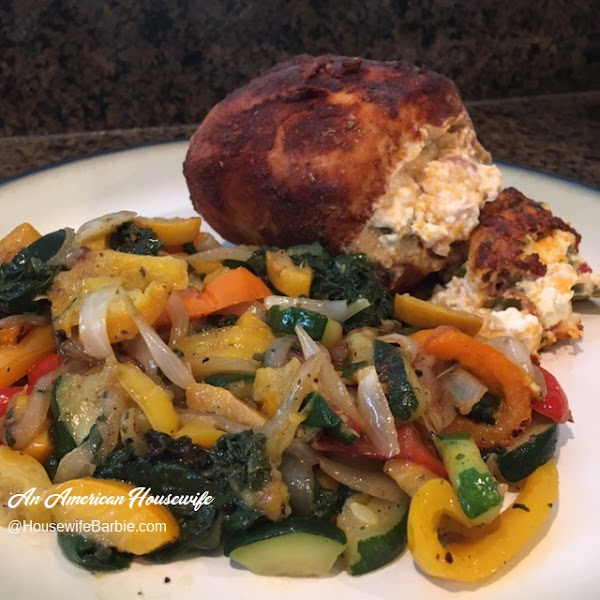
Here is the pork roast right after it came out of the oven, placed on the serving platter, before adding the vegetables for serving....

Basically you can use any amount of the cheese, jalapenos and bacon that you wish.  The same with the size pork loin or pork roast.  Depending on large of one you bought or how many people you are serving.

This pork roast looks fairly small in the photos but easily feeds 4 people.


Cheese, bacon & Jalapeno Pork Roast

Pork Loin or Roast (your choice cut and how large)
cream cheese - I used about 1/2 block or 4 oz. for this small pork roast, which was plenty
cheddar cheese (I used sharp cheddar this time but mild, medium or sharp will work fine)
diced jalapeno peppers - either fresh or bottled - your choice
cooked, crumbled bacon (fresh cooked and crumbled or bagged - your choice)
Optional:  cilantro, garlic or onion powder or even green onions

Form a pocket in the meat:

Lay the pork down on its side and use a knife to slice into the center, making a slice horizontally, but leaving about 1/2 - 3/4 inch on each side and the back/bottom.  Now turn the knife and make a vertical slice up and down, again leaving a bit on the top and bottom so you don't slice all the way through.  I added a couple more slices at angles in order to fill with more cheese filling.

Filling:

The amounts of the cheeses, bacon and jalapeno are up to you and your tastes.  If you don't like spicy foods or have children eating that are not used to spice, cut back on the jalapenos or just use a small can of diced green chili peppers (they are mild). 

We used about 4 ounces cream cheese, 1/3 cup cheddar, 1/4 cup sliced jalapenos, 1 T cooked, crumbled bacon (I just grabbed some of the Hormel real bacon bits I keep in the freezer at all times).  Mash this together and set aside.

Preheat your oven to 325.

Dry Rub: 

You could use any dry rub you like.  For this one I threw together a simple mixture using:
2 T salt
1 T ground coriander
2 T smoked paprika
3 T natural sweetener (most people would use sugar here - we are sugar free)
1/2 T espresso powder
1/2 t rosemary

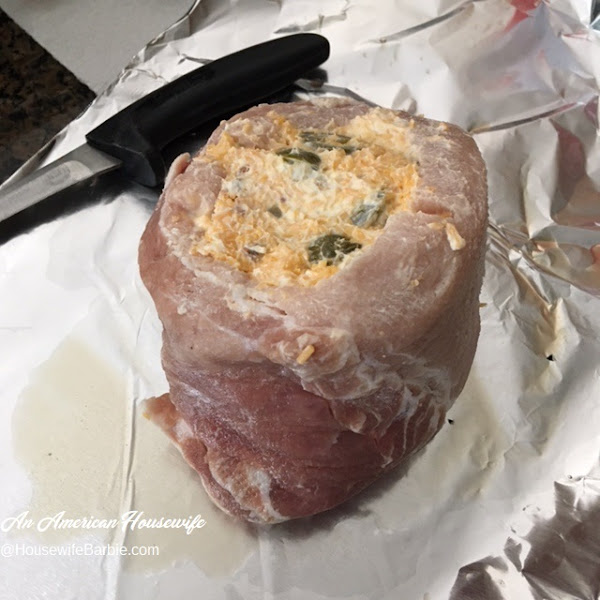
Stand the pork upright and stuff the cheese mixture in.  Press it in well so it stays. 
Cover the pork roast in your dry rub spice mixture.  Roll and press gently to cover.
Heat a cast iron skillet on the stove with a bit of oil in it.  Now sear the pork roast on all sides except the cheese stuffed side.  Transfer the cast iron skillet (or any oven safe pan) to the oven and proceed to roast until done.  For the roast in my photos it was about an hour. 

(Note:  I also baked it propped 'up' so the cheese filling was on top during cooking.  This isn't necessary but I wanted to keep it all in during cooking and not have it melt/run out.  It naturally falls out when you lay it on the serving platter anyway but this way I kept it all in until serving time.)

PHOTOS BELOW


A simple mixture of cheeses and a bit of real bacon crumbles

   The pocket formed in the pork by slicing with a knife, but not all the way through.
Stuffed and ready for its dry rub marinade

 
All dressed up...
 
Searing in a hot pan
Transferring to the oven to finish cooking for about an hour
Hot from the oven, placed on a serving platter


Grabbed random veggies to throw together to serve with it; spinach, peppers, onions and zucchini squash with some oil, salt and pepper 
So simple yet so good


Print Friendly and PDF

2/3/23

Sheet Pan Style Crunch Wrap Supreme


If you are a regular reader of An American Housewife, I've posted about them in the past.... Homemade Crunch Wrap Supreme

This week I made our regular Crunch Wrap meal into a 'sheet pan style' crunch wrap instead of individuals. 

NOTE:  the next time I make these sheet pan style, I will bake them without the sour cream inside, and just top the individual servings with lettuce, tomatoes, onions and sour cream, as well as extra taco sauce or salsa.  Since I wasn't going to the grocery store until the next day, I baked the sour cream inside as we were out of lettuce and tomatoes anyway!


Sheet Pan Crunch Wrap Supreme

1 1/2 lb. ground beef made into taco meat of your choice
1 pkg corn tostada shells, taco shells or even Doritos (use what you have)
1 pkg. flour tortilla shells 
1 can nacho cheese sauce or a couple handfuls of shredded cheddar cheese
butter
lettuce
sour cream
tomatoes
taco sauce
2 pans of similar size so one can lay on top of or inside the other

Lay a flour tortillas down inside a greased baking pan.  I used a sheet pan but any pan could work, just adjust your number of flour tortillas and  corn tortillas to fit.  Spread the meat over all.  Spoon and spread nacho cheese sauce on the meat (or used grated cheddar)  and top with a crunchy tostada shell, taco shells, etc.  Add some taco sauce over all.

Lay 2 or 3 more flour tortillas down the center of your pan, start to fold the wrap up over the tostadas or shells.   Cover the shells or tostadas completely with the flour tortillas, folding in the edges.  Spread butter all over the flour tortillas and use a second pan of similar size laid down on top of it all to hold the flour tortillas in place and help to get them golden brown and crisp.

Bake at 425 degrees until golden brown when checked (I think mine was around 20 minutes - I didn't time it.)  I just kept an eye on the edge of flour tortilla showing and then picked the top pan up to check how golden brown they were.  They are done when heated through, and golden brown and crispy.


I used a mixture of ground pork and ground beef since we always have both on hand (I grind our meat myself).  This makes my more expensive beef go further when I also mix pork with it. 


Make your filling with whatever you like for your taco meat fillings.  (Store bought seasoning mix, homemade, etc.)


Line a greased pan with flour tortillas.


Spreading the meat mixture


Cover all the flour tortillas with the taco or chalupa meat


Add a layer of cheese - shredded or even canned cheese spreads


Normally I'd leave the sour cream off and serve it as a topping with lettuce and tomatoes and onions.  As I noted above, I was out of lettuce and tomatoes and wouldn't be going to the store until the next day, so I just opted to bake the sour cream on it so I could clean up the kitchen while they baked, and serve without any toppings, fuss or mess.

Drizzled taco sauce (or your favorite salsa) over as well.


Add your crunchy layer.  My usual is tostadas but I only had taco shells on hand this time.


Add a couple flour tortillas to the center to cover, and fold the edges in so it's all covered up tight.  Spread butter over all.


Set a second baking pan or sheet on it to hold the tortillas down, in place and help them cook to a golden brown and crispy layer.


Its 'done' when heated through and everything is a rich golden brown.  


Print Friendly and PDF