Pages

5/30/16

Sugar Free Carrot Cake - Wheat free, sugar free - no guilt and so good


Carrot Cake (or Carrot Bars)

4 eggs
1 c coconut oil
2 t vanilla
1 1/2 c almond flour (I used natural, unblanched)
1/3 c whey protein powder (I use unflavored, zero carb, zero sugar)
1/4 c coconut flour
1/8 t xanthan gum
1/3 c Ideal sweetener
1 T Truvia
1/2 t liquid sweetener
1 t salt
2 t baking powder
2 t baking soda
2 t cinnamon
3 c carrots - finely shredded

Oven preheat:  350
Pan:  Your choice. Larger means thinner, smaller means thicker.  Use a 9X14 or larger for 'bars' and a smaller one, down to 2 - 9X9" for cake with filling options.  Grease or spray the pan(s) of your choice.
In a mixing bowl, beat the eggs with coconut oil and vanilla.  If it's a cold day, you can partially melt your coconut oil, if it's a hot, humid day, it might already be partially melted.  I haven't found it matters when I make these.
Beat in the dry ingredients; almond flour, whey protein powder and coconut flour along with the sweeteners (using 2 or 3 gives the best flavor but just use your favorites if you wish), the xanthan gum, leavening agents, salt and cinnamon.  If you don't have or don't want to use coconut flour, I've added about 1/3 cup total of a mixture of oat or wheat bran before or just added a little more almond flour and whey protein powder to make up the difference.  The coconut flour tends to make it 'less over wet and moist' as is the texture with most almond flour breads and cakes.  Stir in the carrots last.  Pour and spread into a prepared pan.

If you've used coconut flour, let your batter sit for about 3-4 minutes and see how thick it gets.  Coconut flour tends to absorb a lot of liquid.  This should make a nice, really thick batter like a quick bread would be (not a typical flour/sugar cake batter).  Still, if you think it's so thick that it will be hard to spread, you can add a tablespoon or two of coconut milk, stir well. Bake times will depend on the pan you use.  I baked an 9X15" pan about 40 minutes until it was golden brown, just started to pull away from the edges and when I jiggled it, the center did not move any longer.  Let cool completely in the pans before frosting with your favorite frosting.

The frosting I used on the bars above didn't come from a recipe but here is what I used;

1 - 8 oz. pkg. cream cheese
1 stick real butter
2 t vanilla extract
1/4 c coconut milk
Just like Sugar Baking Blend (because it's powdered form) - about 1/2 cup
Few drops of liquid sweener
Added Ideal Sweetener by tablespoons and tasted until I got the sweetness I wanted

Mix on medium high til smooth.  Spread.


________________________________________

Print Friendly and PDF

5/28/16

Almond Flour Breaded Pork Chops


Almond Flour breaded Pork Chops

Boneless Pork Chops
Almond Flour (blanched or natural)
Salt and Pepper;  and/or any seasonings you like (brown sugar, paprika, garlic powder, onion powder, cayenne, chipotle or use a store bought pork seasoning mix.  Add about 1 teaspoon per cup)

Dredge your pork chops in almond flour, seasoned as you wish.  Unseasoned you can add salt and pepper later, or you can add seasonings to almond flour.  Bake at 350 on a greased baking sheet or pan for approximately 40 minutes or until browned and done in center.


Weber Steak N' Chop Seasoning 8.5 oz
Bob's Red Mill - Natural Almond Meal/Flour

Honeyville Blanched Almond Flour Super Fine Grind Gluten Free Cholesterol Free 3lbs 


Print Friendly and PDF

5/23/16

Flour Free Cheese Crackers (similar to Cheez-its or Goldfish) Using Almond Flour


Flour Free Cheese Crackers (similar to Cheez-its or Goldfish)

1 1/2 c Blanched Almond Flour Super Fine Grind
1 c grated Parmesan cheese or a 'hard' cheese (I used Gruyère this time)
1/2 c grated Cheddar Cheese
1-2 T Oat Fiber 500 (optional but I like it for this style and saltine style crackers)
1/2 - 2/3 c Freeze Dried Shredded Cheddar Cheese
1/4 t salt
Ice water - about 3 T

Preheat oven to 350.  In a food processor, place the almond flour, cheeses, oat fiber if you are using it, and the salt. Pulse to blend.  Drizzle in about 2-3 T ice water slowly, watching to stop as soon as the dough starts to pull away from the sides and form a ball.  Divide the dough into 2 pieces to make it easier to roll out.  Roll thin between two pieces of parchment paper, as thin as you can make them - 1/8".  Use a pizza cutter to cut lines horizontal and vertical into square crackers.  

I pricked them quickly with a fork but that was more for looks (like a Cheez-it) than needed.  Bake about 25 minutes, watching so they don't brown too much.  When the edges start to get golden and the center is baked enough to be moved, you can flip them or try to separate the dough a little to help it bake evenly.  Let them get golden brown to be crisp.  Let them cool a few minutes on the parchment to make them snap apart easier.  The center crackers can be put back in the oven to crisp up and bake golden a little more if needed.  Let cool completely before storing.


Just like a pie crust - stop drizzling water as soon as the dough forms a ball


Roll out between parchment


The thinner the dough, the more crisp the cracker


You can play with flavors!  I taste tested chili powder, ranch dressing, celtic sea salt, garlic powder...


I loved the chili powder flavor but decided to just do a plain batch for this run


They break apart easily after baking if you let them cool down after removing from the oven


THIS is what happens when you put a batch into the oven and then leave the kitchen to attend to other tasks and forget about them!  A bit burnt on the edges.  I still ate them.  LOL.


Print Friendly and PDF

5/22/16

Homemade Honey Wheat Bread - Using Wheat I Grind Myself


My 'go to' recipe for wheat bread makes a double loaf (two loaves) and uses about 6 cups of white wheat flour.  I usually end up doing a wheat blend, mostly white wheat with a bit of soft and a bit of hard red in it but I think using all hard white wheat berries turns out a fabulous loaf.

For sandwiches, I find my husband is more likely to make one if the bread is square.  Years of using square store bought bread I guess.  When it's a full round or regular homemade shaped loaf he loves it fresh with butter, for soups, for garlic bread, etc. but he's a man of habit and doesn't 'think about' sandwiches unless the slices are square!  Since square pans are rather expensive (for our budget) I only own one (1) right now so you'll see in the photo's below I usually bake this is one traditional style bread pan and one square.  Square pans are thicker and tend to need a longer bake time so increase the time by about 10-15 minutes and test.

White Wheat Bread

3 c warm water
1 T instant or quick yeast
1/3 c oil of choice
1/3 c honey
1 T salt
6 c hard white wheat flour mixed with:
1/2 c whole oats (I've used quick oats, as well as oat fiber and it worked fine)
1/4 c vital wheat gluten with vitamin C

Combine water, yeast, oil, honey and salt.  Add 5 c flour, mix on slow in a heavy duty mixer with bread hook.  Add 1-2 cups more flour as needed to form a dough ball.  This will change with the temperature, humidity level, time of year, etc.  Knead 5-10 minutes.  If your home is chilly or it's winter time, heat your oven to just barely 100 degrees and turn it off.  If it's a nice day anyway, you can usually just turn your oven light on and that is enough warmth to raise your dough.  Divide dough in half to form 2 loaves.  Place in your greased pans.  Cover and let rise in the turned off but still warm oven for about 45 minutes or until doubled in height.  Take the bread out and heat oven to 350.  Place bread in and bake 25-30 minutes or until done.  Remove and cool.


Freshly ground wheat berries - still warm from grinding


I typically just grab canola oil for this recipe but I've tried various others as well.  I didn't have good luck with grape seed oil (I have no idea why, but the loaf just didn't seem to turn out the same).  Coconut Oil worked ok but the loaves didn't raise as much that time and honestly I don't know if it was a fluke or the coconut oil.  

I've used olive oil in a pinch but honestly, I get the best results with plain old canola oil.  I had stopped buying it for a long time for health reasons but I do keep it on hand now mostly for bread and it only uses 1/3 cup for 2 loaves.


The dough is starting to come together and pulling away from the sides of the bowl.


This is a bad picture but I mention often that this blog isn't about pretty pictures and heck, I usually forget to take them at all!  The reason I hate to use this one is because I didn't have enough dough in the square pan to completely rise to the top.  This loaf didn't end up being 'square' as it had a rounded top - it wasn't tall enough for me to bother with the lid that completes the 'sandwich bread' shape that my husband prefers for sandwiches. Eh... it is what it is.


Print Friendly and PDF

5/19/16

Gougeres (pronounced goo-zhairs) - Savory Cream Puffs


Gougeres (pronounced goo-zhairs) are really just a fancy name for a savory cream puff - as compared to a sweet filled cream puff.   This particular version doesn't have a savory filling but instead, the spices and cheese are baked into the puff.  No need to fill.


Gougère

5 T butter
1/2 c water
1 T milk
dash salt
1/2 c flour
3 eggs
1/4 c Gruyere, grated
1/4 c Pecorino, grated
1 T fresh thyme leaves
1/2 t fresh ground black pepper
1 1/2 t anchovy paste
pinch cayenne

Preheat oven to 350.  In a saucepan, place the butter, milk, water and salt.  Bring to a boil while stirring and add the flour all at once.  Stir and cook until the mixture forms a ball, remove from heat.  Let cool slightly and beat the eggs in one at a time, beating well between.  Add the cheeses and spices.  Spoon dough into dollops on a parchment lined baking sheet.  Sprinkle extra cheese on the tops and bake 35 minutes until puffed and golden brown.  Serve.


Print Friendly and PDF

5/12/16

#WhatsForDinner? Bacon Wrapped Pork Chops


We had these a couple days ago but I have tons of photos I just 'never get around to' posting!  This one doesn't use a recipe - it's just two ingredients of course.  But a good 'reminder' if you are brainstorming ideas to use up some pork chops!  I've posted this idea before - but this time I used my solar oven and I have to say it makes them so easy and so perfect I just have to share!

  • Wrap your boneless pork chops with strips of bacon to cover.
  • Wrapped rather tightly they stay in place just fine and don't need toothpicks.
  • Season with salt and pepper. No special crazy spices are really needed but you could add what you like.
  • Place in a solar oven as is - or wrap in foil and place in a traditional oven at 350 degrees and bake about 45 minutes.
  • This cooks the meat, pre-cooks the bacon and yet leaves them very moist because the steam is trapped by the solar oven or foil.
  • Take the bacon wrapped pork chops and brown and crisp them up by grilling or broiling them for a few minutes on each side until the bacon is done.


Print Friendly and PDF

Re-posting: BBQ BEEF RIBS with a DRY RUB (The day my husband asked me to show him how to make them!)


My husband doesn't cook.  No, really. Doesn't know how.

It doesn't come naturally to him.  His brain doesn't function in a way to make cooking anything of any size, form or shape easy.  Even boiling pasta is a difficult task. When I say this, I mean it in all honesty.  When I met him, he and his Dad would make boxed macaroni and cheese and carefully measure out the water because the box stated to boil the macaroni in 6 cups of water.  They precisely measured 6 cups of water.   Most people would just fill a pan with some water, boil and add the dry pasta.  When I did this, they both stood with confused looks on their faces and asked me how I knew how much water to use if I didn't measure it.

In all the time my husband and I have been together he has never, ever asked me to show him how to make something because he wanted to know how to make it himself.

And THIS is the meal he loves so much he shocked me and our youngest daughter the other night by requesting to have me show him how to make them. I am pretty sure my AND my daughter's eyes popped as wide open as they can get, and our mouths were hanging down.  *grin*  Well, he has today off so today was/is his day to learn!

It's a simple dry rub mixture I came up with by using 4-5 different recipes, adding my own spices like some coriander and cayenne.  Cook the ribs with the dry rub, drain off the juices to make a simple sauce and let it reduce while you finish the ribs over a fire or the grill (or a broiler).  We like to cook ours in the solar oven as it doesn't heat up the house, doesn't use up electricity and we don't have to watch it or check it at all.  Just pop it in and forget about it.  But I also make these in the oven on cold or rainy days.  It's just such an easy-go-lucky recipe you can't really mess it up as long as you let the ribs cook long enough to be tender, the hard part is finished. 


Dry Rub


1 T cumin
1 T paprika
1 T granulated garlic
1 T granulated onion
1 T chili powder
1 T brown sugar
2 T salt
1 t ground coriander seed
1 t cayenne pepper
1 t black pepper
1 t white pepper

Mix in a bowl. Sprinkle on damp beef ribs as heavy or light as you wish for your personal taste.I like to pour about 1/4 cup apple cider vinegar in the bottom of the foil under the meat.  You could also use apple juice, orange juice... or nothing at all.  It's still going to be fabulous.

Wrap the ribs in heavy aluminum foil and slow cook them on 200-250 degrees for a few hours in the oven or in a solar oven.

Turn the oven off and let them sit in the closed oven for another 2 hours.  If you are using a solar oven, just leave them and forget about them until you are ready to make the bbq sauce.  Opening one side of the foil, pour off the juices into a pan on the stove.  Over medium high heat, proceed to make a sauce out of it by adding a heavy dose of (low sugar) ketchup, brown sugar (sweetener alternative for us), and a teaspoon of Worcestershire sauce. I simply kept spoon tasting until I got the sweetness I liked. (about 1/2 cup ketchup, 1/2 cup brown sugar sweetener). Medium high heat to boil and turn down a bit so it continues a slow boil/high simmer until it's reduced to a thick sauce. Broil the ribs under the broiler for a few minutes each side until golden brown. Drizzle with the sauce and serve.


Print Friendly and PDF

5/1/16

Grinding your own meat to make hamburger patties and ground beef packages


Why do we grind our own meat?  First: the safety.  Cuts of meat like steaks and roasts are least likely to be infected with bacteria (such as e Coli).  Store bought ground beef can have meat from hundreds of different cows in it.  More likely to be contaminated.  Second:  the taste!  We feel the flavor simply cannot be beat. Also, we know it's 100% pure ground beef. No fillers. No preservatives or additives!  Third:  The cost.  The price of ground beef has gone through the roof in the last five years or so.  Although roasts are expensive as well, I still come out ahead when I compare the costs; especially when I get lucky enough to find good deals on the roasts to begin with.  Since I'm freezing everything for future use, I have the opportunity to shop sales, watch for new mark downs and buy when I know it's a good price.

Note:  I use a very (very) affordable meat grinder. No big name, no bells and whistles.  

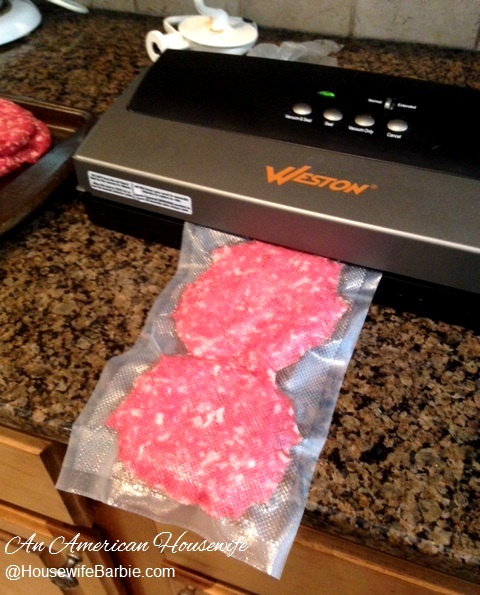
As a matter of fact, my husband saw it on clearance at the hardware store and bought it.  I didn't even know I wanted one... until I started to use it.  Now I never want to be without one.  For a couple years now I've made our own ground beef but also I use it to make amazing chicken, spinach and feta sausages and ground chicken for enchiladas, etc.  I also use a food vacuum (another buy my husband spied on clearance during a Lowe's shopping trip!).  It is a very no frills, inexpensive food vacuum.  You can of course freeze in freezer Ziploc or similar style bags though! 


Set up the grinder, a bowl to put it in and slice your roasts (I like chuck roast for best flavor) into 1-2 inches pieces

Form the meat into 1 or 2 pound packages or into hamburger patties
For hamburger patties I season the meat in the bowl and mix well with my hands before forming
the patties.  We like this when we grill them later as they are ready to go - no seasoning or preparation needed.
We just pop them onto the grill, cook, and serve.


I food seal ours in packs of 2 or 4 patties.


From two small/medium roasts I got 13 hamburger patties and 2 packages of ground beef.


Print Friendly and PDF